Melodyne 5 assistant – Quick Start
-
The basic workflow –the basic procedure for swift, intuitive editing. Shown here: Melodyne 5 studio, smaller editions may differ.
-
Melodyne assistant –an overview of its tools and features.


Melodyne 5 assistant gives you direct access to individual notes within your recordings, allowing you to edit their pitch, position, duration and other musical parameters in an intuitive way. The quality of Melodyne’s correction of out-of-tune notes is legendary, but you can also introduce melodic variations, create vocal arrangements, quantize audio, improve timing and do many other things with it as well.
Here is a quick and concise guide to getting Melodyne 5 assistant up and running.
Integration
Melodyne 5 assistant is suitable for the editing of lead vocals and monophonic instruments as well as drum and percussion tracks, but you can also edit entire mixes with it – using functions such as transpose, quantize and time-stretch.
Checking the algorithm
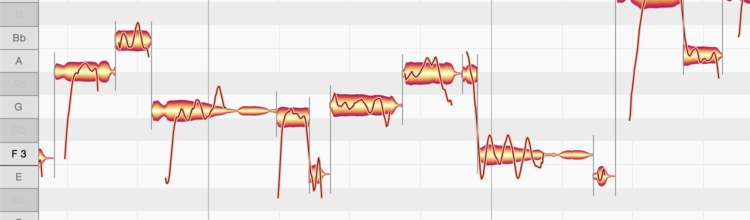
Melodyne’s characteristic blobs represent the notes found in your recording, which you can select, drag and edit using the tools provided. Before you begin, however, there is one thing you must check:
Based on its analysis of the audio material, Melodyne assistant will have chosen to use either its Melodic or its Percussive algorithm. When the Percussive algorithm is used, all the notes are displayed in a single horizontal line; when the Melodic algorithm is used, on the other hand, the vertical position of the notes represents their pitch.
If your audio material is not displayed the way you want, you can select a different algorithm from the Algorithm menu. Please note, however, that if you do this, any editing of the track you may already have done using Melodyne will be lost! That is why, you should always make sure that the correct algorithm has been selected before you begin editing.
Editing
In Melodyne assistant, you will often be working with Melodyne’s Main Tool, which can be used not only to change the pitch of notes but also their position in time and their duration as well as to split them. With the other tools, you can alter, among other things, the vibrato, amplitude and formant spectrum of notes as well as their internal timing.

Using the tools, you can edit notes individually or entire selections of notes simultaneously. The Main Tool is used as follows:
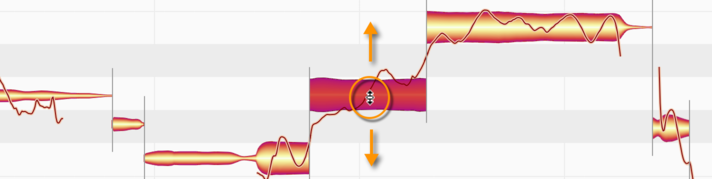
To change the pitch of a note:
– Click in the middle of the corresponding blob and drag it up or down. The note will move in steps of a semitone.
– If you hold down the Alt key as you drag, the grid will be deactivated and you will be able to move the note by smaller amounts (in steps of a cent).
– If it’s the right note but simply out of tune (“off key”), double-click on it and it will snap at once to the intended pitch.
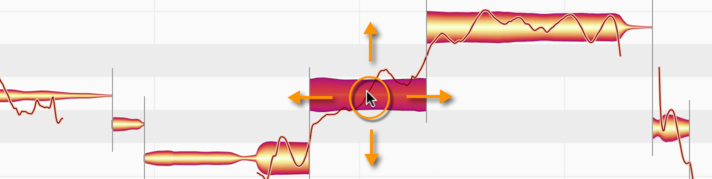
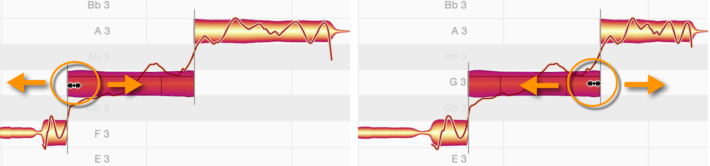
To change the position in time of a note:
– Click in the middle of the corresponding blob and drag it to the left or right. When released, the note will snap to the nearest grid line.
– If, however, you hold down the Alt key as you drag, the grid will be deactivated and you will be able to position the note freely.
To change the duration of a note…
…by making it begin earlier or later: Click the left-hand side of the blob and drag it, respectively, to the left or right.
…by making it end earlier or later: Click the right-hand side of the blob and drag it, respectively, to the left or right.
– If you hold down the Alt key as you drag, this will deactivate the grid, allowing you to position the beginning or end of the note freely.
To split a note in two:
– Position the tool at the intended split point – not on but slightly above the blob; the appearance of the mouse pointer will then change, and you will be able to split the note with a double click. This can give you greater flexibility when correcting or reshaping notes.
– The note separation that is created can be removed with a double click to reunite the two segments.

The macros
Whilst the tools are used primarily to solve specific problems with individual notes, the macros allow you to edit multiple notes and even entire recordings in one go. The macros affect only the notes currently selected, unless none are, in which case they affect all the notes of the current audio file. There are three macros:
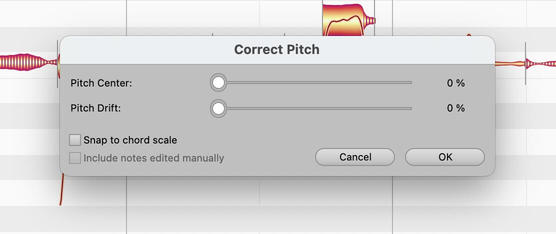
Correct Pitch, which moves notes to, or towards (you decide how far), the nearest semitone. How far they move also depends upon how badly out of tune they were to begin with. With the second slider, you can rein in pitch drift within notes.
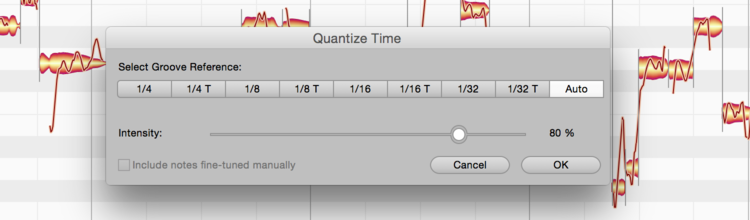
Quantize Time moves notes to or towards (you decide how far) either the intended beat or the nearest line of the selected grid.
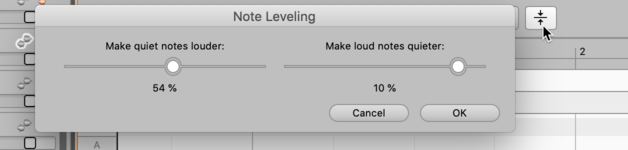
Note Leveling allows you to make loud notes quieter, or quiet notes louder, or both. In this way, you can smooth out disparities in volume and give your recordings greater homogeneity. It is also the perfect way to optimize input to any compressor after Melodyne in the signal chain.
What else should I read?
In this tour we have covered only the points needed to get you off to a fast and successful start with Melodyne. But there’s plenty more to discover and to learn. Take a look at the list of topics on the left: In the Help Center, you will find each of these topics explained in detail as well as a wide range of video tutorials. You can access these any time via Melodyne’s Help menu.