Inserting and preparing to use Melodyne
-
Melodyne and Cubase: the ARA workflowThis short film shows the advantages of the ARA integration of Melodyne into Cubase. Shown here: Melodyne 5 studio, smaller editions may differ.

The following tour will show you how to integrate Melodyne into your Cubase project.
Please note: For the ARA integration of Melodyne, Cubase 10.0.30 or later is required. The two programs then communicate via ARA2, which is the new, expanded version of ARA Audio Random Access.
Opening Melodyne
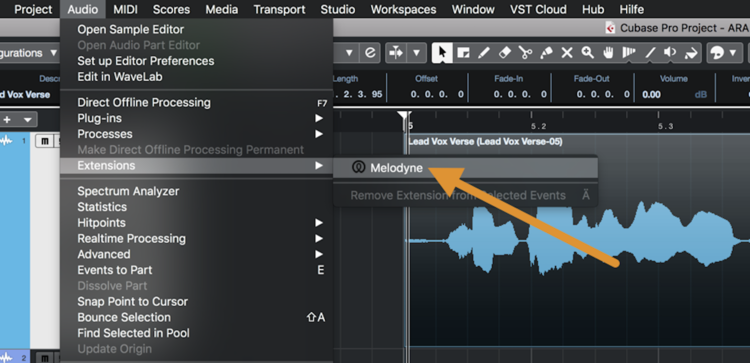
To edit audio events with Melodyne in Cubase, first select them, then:
- either choose Audio > Extensions > Melodyne from the menu;
- or activate Melodyne in the Extension field of the info line.
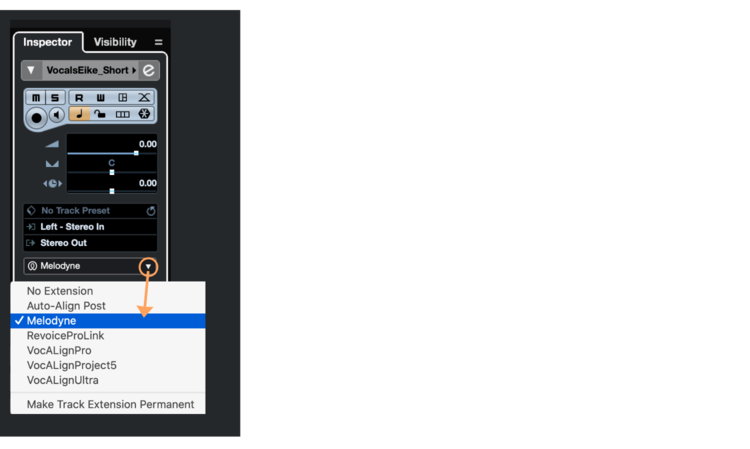
Alternatively, Melodyne can be employed as an extension in the track header,
in which case Melodyne will automatically be applied to all the events on the track. The corresponding items in the Extensions menu and info line will then be superfluous and will remain grayed out.
Whichever of the three methods you choose, Melodyne will be launched automatically, the audio events in question analyzed, and their notes displayed. By default, Melodyne opens in the bottom pane of the Cubase window unless you have altered your Editor settings, in which case it opens in a separate Editor window.
To toggle between these display modes, click the arrow button in the top right corner of the editor. Whenever the bottom pane or Editor window are closed, just double-click on the event and it will reopen and the notes will be displayed in Melodyne as before.
When Melodyne is applied to the entire track, a small extension symbol is displayed in the track header.
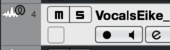
When Melodyne is opened from the menu or info line, the audio event in question carries the same symbol.
Bypassing or removing Melodyne, comparing edits
To remove Melodyne from an event, select it and choose Audio > Extensions > Remove Extensions from Selected Events. Alternatively, in the Info line, under “Extension”, just deselect Melodyne. A further alternative is to restore the setting “No extensions” in place of “Melodyne” in the track header; Melodyne will then be removed from all the audio events currently selected on the track in question.
If you remove Melodyne, obviously, you will lose any changes you have made with it.
The Compare switch
The Compare Switch in Melodyne offers you an elegant way of comparing the current state of your editing with the original state of the audio file.
Unlike a typical bypass function, however, Melodyne’s Compare function reverses not only the acoustic, but also the visual, consequences of all editing. It is also the case that:
- the Compare switch affects all audio events equipped with Melodyne, regardless of track and whether or not they are currently displayed in the Note Editor;
- the effects of all changes you have made to the notes yourself using Melodyne are nullified, but not actions performed in Cubase such as muting or moving events.
Tip: Working with long files
With ARA, Melodyne always analyzes in its entirety the audio file that is being referenced by an audio event, even if you have narrowed the event’s boundaries before using Melodyne. This has several advantages. It allows you, for instance, to widen the event boundaries again later without any further analysis by Melodyne being required.
It does mean, however, that there can be a noticeable hold-up when Melodyne is first used on an audio event; this would be the case, for example, if the audio file being referenced by the event was a live recording lasting several hours (which Melodyne would analyze with the Polyphonic algorithm).
So if you just want to edit part of such a recording, we recommend that, before you begin editing with Melodyne, you convert the passage in question into a new event (Audio>Bounce Selection). This will then be based on a new, shorter audio file that Melodyne will be able to analyze that much faster.
Saving, archiving and passing on your songs
Thanks to ARA, when saving and archiving your work, it is not necessary to give special thought to Melodyne, because all the files used by Melodyne (which it will need again when the song is next opened) are stored in the Cubase project.
If, however, you are passing on your Cubase project to third parties – for remixing, for example – you do then need to make sure that the recipient also has at their disposal Version 4.2.2 (or higher) of Melodyne. Which actual edition of Melodyne the recipient possesses is not relevant. If, for example, they only possess the “small” Melodyne essential, where you have been working with the “big” Melodyne studio, they will still hear all your Melodyne editing exactly as if they too had the studio edition. Naturally, if they propose to modify or add to your Melodyne editing of the song, they will be limited in in the actions they can perform to the function set of the edition they possess.
If not, it cannot hurt to render your tracks before sharing your work with others. This may be advisable for other reasons too, such as any use you may have made in your project of third-party plug-ins.
Buffer Size
Buffer size
We recommend an audio buffer size of 1,024 samples. Smaller values lead to a marked increase in the CPU load. Should you require a smaller buffer, e.g. when you are performing the headphone mix directly in your computer and not monitoring via an external channel strip or mixer, switch all instances of Melodyne during the recording to bypass Reactivate Melodyne as soon as you begin editing your new track.