Melodyne in Cakewalk with ARA
- • Editing of an audio clip with Melodyne and ARA
- • Procedures that are no longer necessary thanks to ARA
- • The Track and Clip editing modes
- • Local playback in Melodyne
- • Bypassing or removing Melodyne, comparing edits
- • Adjusting and stretching the tempo
- • Tempo and the Time Grid
- • Quantizing notes
- • Copying and pasting notes
- • The Sound Editor
- • Audio-to-MIDI and further Tips & Tricks
-
ARA in Cakewalk– how ARA makes Melodyne’s integration into Cakewalk particularly intuitive and user-friendly. Shown here: Melodyne studio, smaller editions may differ.

In this introduction, you will learn everything you need to know to use Melodyne in Cakewalk. This guide complements the normal Melodyne user manual.
Please take note also of the information regarding the compatibility of Melodyne with Cakewalk on our website.
Editing of an audio clip with Melodyne and ARA
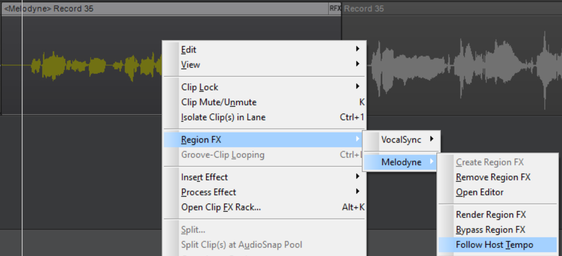
Within Cakewalk select an audio clip or make a selection within an audio track. Right-click within the selected range and choose the entry “Create Region FX” from the context menu. Note: With the entries “Remove Region FX” and “Bypass/Bypass Region FX” you can, respectively, remove Melodyne permanently from the region or set it to bypass mode.
Melodyne will launch immediately, analyze the clip, and display the notes contained within it. Melodyne is now embedded in the lower area of the Cakewalk window just like Cakewalk’s audio editor or mixer. If you wish to access this clip again later, just double-click on it and the notes will be displayed immediately in Melodyne.
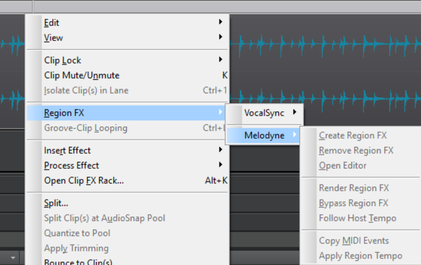
Tip: you can also apply this procedure to the selected clip or the current selection using the keyboard shortcut “CTRL+M”.
You could also load Melodyne as an insert into a channel strip (“Track Effect Bin”), but in this case no ARA integration takes effect. This means you do have to perform transfers, and Melodyne will no longer follow tempo changes and changes to the audio events on the track in Cakewalk automatically.
Procedures that are no longer necessary thanks to ARA
To get to know Melodyne, we recommend the normal Melodyne User Manual or the User Manual Videos. These describe the use of Melodyne without ARA. Since ARA introduces considerable improvements in the use of Melodyne, certain themes mentioned in the manual are no longer of relevance:
Transfers: In the absence of ARA, you have to play through to Melodyne in real time the audio segments from the DAW that you wish to edit – a recording process known as a “transfer”. With ARA, transfers are no longer necessary; it is enough to create the Region FX with Melodyne and the desired audio event will open in Melodyne. For this reason, when you are using ARA, the “Transfer” button is no longer visible in the Melodyne user interface.
File management: Since there are no more transfers with ARA, you no longer need to concern yourself with the management of transfer files. Melodyne Plugin therefore no longer has a File Management dialog. This means that all you have to worry about now, when saving and restoring your work or passing it on to other users, is your Cakewalk project. All the data required by Melodyne is stored along with the Cakewalk project.
Tempo and time signature changes: With ARA, Melodyne follows automatically any changes in tempo or time signature in Cakewalk, provided the option “Follow Host Tempo” is checked in the local Region FX menu. Without ARA, all such changes must first be played through to Melodyne in real time.
MIDI Export: With ARA, too, a command is provided in the “Settings” menu of Melodyne editor and Melodyne assistant (but not Melodyne essential) for the exporting of MIDI. But ARA makes exporting MIDI to a Cakewalk track far easier: simply use drag and drop from any audio clip to any instrument track. (for further details see the passage “Audio-to-Midi”)
Changes to audio clips that Melodyne follows automatically
If you change the arrangement of audio clips in Cakewalk, Melodyne, when connected using ARA, follows automatically, as long as the function “Follow Host Tempo” is checked in the local Region FX menu. In the absence of ARA, every change to the DAW track has to be repeated manually in Melodyne. The changes to audio events automatically followed by Melodyne with ARA include:
- muting,
- shortening,
- moving,
- copying,
- alteration of the volume and of fades,
- time-stretching of the event with Cakewalk’s Slip Stretch function (by CTRL-dragging the end of the clip).
Note: Even when Melodyne is running in playback or trial mode, Melodyne will follow the tempo of the sequencer through time-stretching, provided the “Follow Host Tempo” option is checked. Most of the ARA functions mentioned are also active; it is only editing within Melodyne that is impossible.
The Track and Clip editing modes
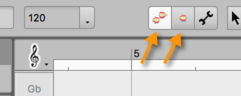
With ARA integration, after inserting the Melodyne plug-in and opening a DAW track, two alternative modes are available for editing the notes: Track Mode and Clip Mode. You can switch between them using the buttons above the Note Editor. The left-hand button activates Track Mode; the button to the right of it, Clip Mode.
Track Mode
Track Mode lets you see the entire contents of the track opened in Melodyne, however many clips it is composed of in the DAW.
The clip borders are indicated in Melodyne by vertical gray lines. The moving of borders is performed in the DAW, not in Melodyne, but the lines in the Melodyne user interface move accordingly. This allows you to see at once whether a clip change occurs at an unfortunate moment, such as in the middle of a note.
Clip Mode
The alternative to Track Mode is called Clip Mode. You select this by clicking the right-hand mode button (the one with a single blob) above the Note Editor.
In Clip Mode, you see only a single clip from the DAW track at a time. The track list remains in view, but in Clip Mode the Edit and Reference buttons are grayed out.Track Mode and Clip Mode differ in the way notes are displayed at clip borders: whilst in Track Mode, only notes lying within the clip borders determined by the DAW can be seen, in Clip Mode notes on either side of the borders remain visible; you therefore see in Melodyne – in the area with a gray background – what you might hear if you were to resize the clip in the DAW.
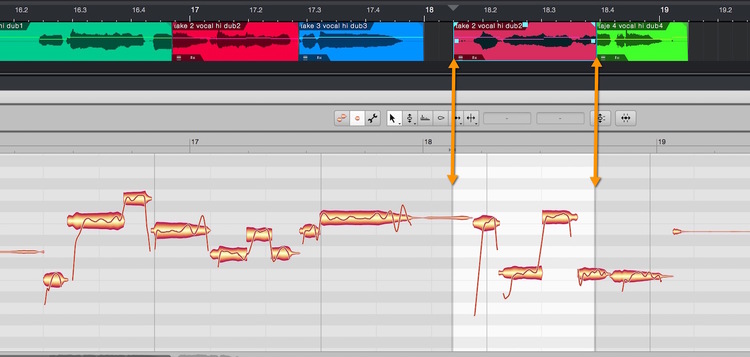
The ability to reach beyond the borders of the clip has advantages when performing tasks such as comping. (Comping is the technique of selecting from multiple takes the best rendering of each passage and concatenating the chosen clips to obtain what, given the available material, you consider the optimal performance). Notes overlapping the borders of the clips in question pose particular problems when comping. In Clip Mode, such problems can be resolved on the note level simply by moving or shortening the offending notes until they fit neatly within the clip. In Clip Mode, it is also possible to copy notes lying outside the clip borders and paste them into the clip, which can also be very useful when comping.
Switching from Track Mode to Clip Mode and from clip to clip
Whereas in Track Mode it is always obvious what you are looking at – the contents of the entire DAW track currently selected – Clip Mode displays only one of a track’s clips, so before you can switch to Clip Mode, you must indicate clearly which clip you wish to edit. If in the Options menu the entry “Follow the Selection in the DAW” is checked, Melodyne’s display follows the clip selection in the DAW.
If, however, it is unclear which clip you mean to edit, the Clip Mode button will be grayed out. In this case, while still in Track Mode, you must indicate which clip you wish to examine. You can do this in either of two ways:
- By selecting a note, in which case it is obvious which clip interests you: the one containing the note selected
- By making a selection, which, provided all the notes selected belong to the same clip, is equally unambiguous; if they do not, you must narrow your selection – if need be, to a single note.
If no note is selected, Melodyne looks to see which clip or clips are selected in the DAW. If only one clip is currently selected in the DAW, Melodyne opens its contents in Clip Mode. If several clips are selected, you can resolve the ambiguity by simply selecting a note belonging to the track you wish to examine.
Tip: If you are already in Clip Mode and wish to change clips, it is not necessary to switch back to Track Mode in order to do so. Simply click on the desired clip in the DAW, and Melodyne will display its contents immediately. For this to happen, however, the function “Follow the Selection in the DAW” must be activated in the Options menu and Melodyne must be present on the track containing the newly selected clip.
Entering Note Assignment Mode
You can only enter Note Assignment Mode from Track Mode if it is clear from the current note selection which clip you wish to examine. If necessary, therefore, click on one of the notes of the clip you wish to examine in Note Assignment Mode. You can enter Note Assignment Mode from Clip Mode directly, as only one clip can be selected in Clip Mode at a time and it is therefore obvious which clip you intend to examine.
Local playback in Melodyne
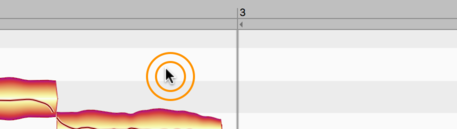
If you commence playback from the DAW, using the bar ruler, for example, or the transport buttons, the full arrangement plays back. The DAW mixer then determines the balance between tracks. The same is true if you commence playback by double-clicking on the Melodyne ruler. It is also possible, however, for Melodyne alone to control the playback. We call this “local playback”. With ARA integration, this local playback is started by double-clicking in the background of the Note Editor.
What exactly you hear during local playback depends upon the current edit mode.
Local playback in Track Mode: In Track Mode during local playback, you hear all the DAW tracks in which Melodyne is present. These tracks pass as usual through the DAW mixer but can be pre-mixed in Melodyne using the Editing Mix Fader.
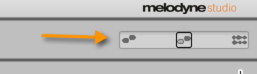
When this is at its leftmost extreme, only the colored notes sound – i.e. those belonging to the tracks currently open for editing in the Note Editor. As you move the fader towards the middle, the gray notes (displayed merely for reference) are faded in. As the fader is moved still further to the right, the remaining tracks in Melodyne’s track list – i.e. those open neither for editing nor for reference – are added to the mix. The Editing Mix Fader is only effective during local playback in Melodyne. If you commence playback from the DAW, in which case all the song’s tracks can be heard, the Editing Mix Fader has no function and is grayed out.
Local playback in Clip Mode: In this mode, you hear only the clip currently open in Melodyne’s Note Editor. A significant difference arises at the clip borders, however, between this mode of playback and playback in the DAW. During DAW playback, you hear only what lies within the borders of the selected clip. If any notes are incomplete, due to a poorly positioned clip border slicing off the start or end of the note, this is immediately obvious during DAW playback. During local playback, on the other hand, you can hear material lying beyond the borders of the clip (i.e. in areas with a gray background).
This allows you to check out what the result would be if you were to move the clip borders in the DAW. It can also be useful if, for instance, you wish to use the rest of the track – i.e. the material lying outside the clip as currently defined – as a “note supply” from which to “pinch” notes, by copying them and pasting them into the clip you are working on.
Local and DAW playback differ also in respect of playback tempo. This is discussed in the section on Tempo and the Time Grid.
Bypassing or removing Melodyne, comparing edits
You have several ways of removing Melodyne as a Region FX from the signal path. For temporary comparisons between the edited and unedited clip, you can use the “Compare” function in the Melodyne user interface. With this function, Melodyne’s time-stretching remains active, but all changes to the notes are temporarily undone, a fact indicated by the fact that the affected blobs are displayed in gray.
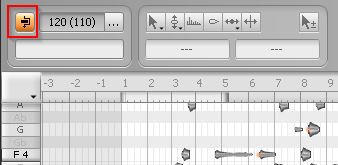
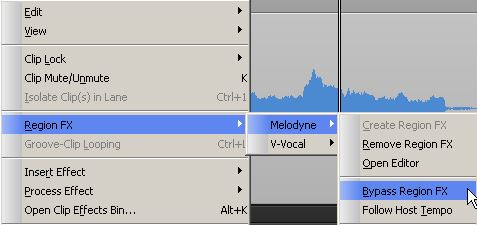
It is also possible, however, to switch Melodyne to Bypass in the Region FX menu, so that the CPU no longer needs to process it. In this case, any time-stretching will no longer be performed by Melodyne but by Cakewalk.
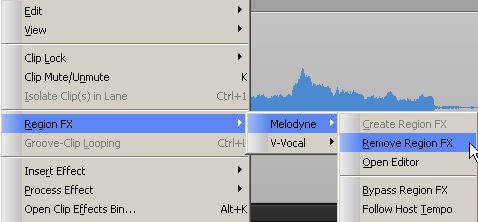
The final option is to remove Melodyne permanently by removing the corresponding Region FX from the clip.
Adjusting and stretching the tempo
One of the strengths of ARA integration lies in the adjustment of the tempo of audio files to the existing song tempo. This functions from a technical standpoint like this: Melodyne “detects” in the case of each audio file (and consequently of each clip in the DAW arrangement) the tempo of the original recording. This works even with takes that were recorded without a click and that therefore contain tempo fluctuations – and works even if they were recorded in a quite different context from the current DAW song e.g. with stems taken from a different song or loops from a loop library. The information “discovered” in this way by Melodyne is then shared with the DAW, which in turn might come back to Melodyne with the request that it “reshape” the playback tempo of the file in question to make it match the song tempo exactly.
This communication, governed by ARA, between Melodyne and the DAW does not preclude human intervention, as there are times when it is only sensible that you, the user, should have some say in it – for example, in the question of whether or not the DAW should “believe” what Melodyne is telling it about the tempo. It may be that you know for a fact that the stems were recorded at a specific constant tempo, and therefore have no desire for Melodyne to engage in the search for a non-existent variable tempo. The procedures by which you can intervene in the process are described step by step in the following section.
Requirements for dynamic tempo-adjustment:
Melodyne follows automatically any changes in tempo or time signature in Cakewalk, provided the option “Follow Host Tempo” is checked in the local Region FX menu
The tempo display in Melodyne:
If the file tempo and the current song tempo are identical, a single value with no brackets is displayed in Melodyne’s Tempo field. If two values appear here, you know that Melodyne has detected a file tempo that is different to that of the song. The first value is the tempo of the song (in this example 83 BPM). The value in brackets indicates the tempo Melodyne has detected in the audio file (here 117 BPM).
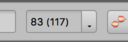
In Track Mode, too, the song tempo is displayed without brackets, whilst the tempo of the clip over which the playback line is currently passing is shown in brackets. (If, in a multi-track context, the playback line is passing simultaneously over two clips with different file tempos, only a dash (“-”) will be displayed within the brackets.) In Note Assignment Mode, where you are examining the “raw” source material, only the file tempo (in our example, the “117”) is displayed.
Now it is up to you to decide how the conflicting tempos are to be reconciled. To do this, open the Tempo dialog.
The Tempo dialog
To open the Tempo Dialog, click on the button next to the tempo display.
“Confirm as File Tempo”: This tells the DAW to take Melodyne’s word for the tempo. This triggers Melodyne’s time-stretching and the tempo of the audio file is adjusted to match that of the song (slowing, in our example, from 117 to 83 BPM). Typical application: You are using an audio file (the tempo of which you do not know) and simply wish it to match that of the song
“Assign File Tempo”: If you think Melodyne has slipped up in its detection of the file tempo, with this command you can open the Tempo Editor in Assign Tempo Mode and correct the tempo manually. Typical application: Your file consists of a vocal take containing many pauses during which Melodyne can find nothing upon which to base its file detection and as a result, if only in places, gets the tempo wrong. Through tempo assignment you can lend Melodyne a hand, so to speak, to ensure that any subsequent time-stretching proceeds upon the basis of accurate values and delivers musically appropriate results.
“Apply Project Tempo”: In this case, regardless of the tempo detected by Melodyne, you do not wish the file to be subjected to time-stretching. In other words, you have determined that the file and song tempos are identical (which means that no time-stretching is necessary). Typical application: You had already, using functions supplied by the DAW, adjusted the tempo of the file to the song tempo, before deciding to open a passage within it in Melodyne. Now you wish to change the melody or key in Melodyne but without jeopardizing the tempo adjustment already performed.
“Apply Constant Tempo”: With this command, you can, if necessary, set the file tempo manually. To do this, select the command from the menu and type into the Tempo field the desired tempo. You might wish to do this when you already know the tempo of the recording that you are importing into your song. Suppose, for example, the song tempo is 83 BPM and you are importing from a sampling CD a drum loop the stated tempo of which, in the booklet, is 90 BPM. As a rule, Melodyne will detect the 90 BPM immediately and display “83 (90)” in the Tempo field. To trigger the time-stretching in this case, it would be enough to select “Confirm as File Tempo”. In the event of Melodyne here displaying a value other than 90 BPM for the file tempo, as, for instance, when it interprets the loop in double time and consequently displays “83 (180)”, you can use the “Apply Constant Tempo” command to correct the misapprehension by typing “90” in place of “180”.
After you took any of tempo dialog options described above, Melodyne knows the original tempo, and now you can draw in any tempo path you like in Cakewalk and Melodyne will adjust the file to match it.
Tempo and the Time Grid
The discovery (or explicit definition in the Tempo dialog) of the “correct” file tempo serves other purposes as well as that of musically sensitive tempo adjustment. It makes the work of editing the notes easier, because the file tempo also determines the calibration of the Time Ruler as well as the positioning of the grid lines in the background to the Note Editor.
Imagine, in this case, that you want to move a note a semiquaver (sixteenth note) to the right or left. What you intend, in all probability, is that the exact length of this sixteenth note should be a function of the current song tempo (say 100 BPM). If the Time Grid, however, were still based on the tempo of the original recording (120 BPM, say), then when you attempted to move a note by a semiquaver, it would end up in the wrong place – (the rule here being: the quicker the tempo, the more closely spaced the gridlines). For this reason, the DAW and Melodyne, communicating via ARA, strive to ensure that their rulers and Time Grids provide at all times an “accurate” representation of the current tempo and that any quantization that is undertaken is therefore similarly “accurate”. In the following, an overview taking into account the various edit modes as well as the difference between local and DAW playback.
Tempo display in Track Mode:
- Melodyne’s Tempo field displays a single value: the song tempo in your DAW.
- Melodyne’s ruler and the Time Grid in the Note Editor background are synchronized and they are each calibrated according to the same principle: the faster the song tempo, the smaller the distance between lines.
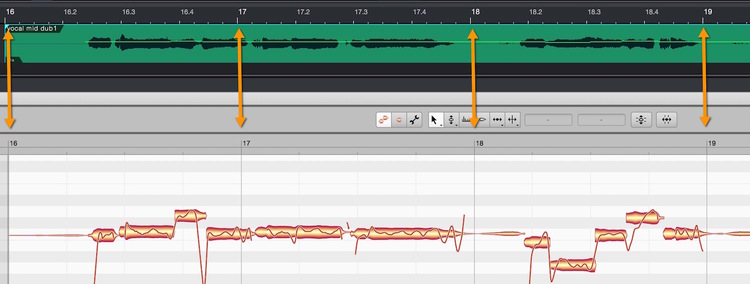
Tempo display in Clip Mode
- Melodyne’s Tempo field displays two values (as described above): the song tempo, followed by the file tempo in brackets. A single value is displayed only when the tempo of the file and that of the song are identical.
- Melodyne’s Time Ruler and the Time Grid in the Note Editor background are now no longer necessarily in sync, as the ruler reflects the song tempo, whereas the grid represents the tempo of the file. If the two tempos are not identical, the dashes on the ruler will no longer coincide with the lines of the grid.
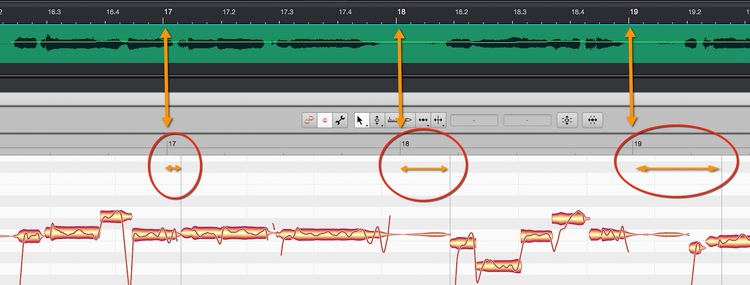
This is as it should be and reveals the effect of dynamic time-stretching during DAW playback: the Time Grid, and with it the notes of the original recording, are squeezed or stretched to accord with the song tempo and also, therefore, with the ruler. The results, of course, will only be musically viable if the Time Grid is calibrated on the basis of “accurate” tempo-detection or -input. For this reason, Clip Mode allows you to examine the Time Grid to ensure that it corresponds with the notes. Should this not be the case, you can make the necessary adjustments using the Tempo dialog options described above.
- During DAW playback, the clip follows the tempo of the song i.e. the value before the brackets. This is achieved by stretching or squeezing the original file to match this tempo.
- During local playback, the clip is heard at its original (file) tempo – i.e. at the tempo shown in brackets – and no time-stretching or -squeezing occurs.
Tempo display in Note Assignment Mode:
- Melodyne’s Tempo field displays a single value: that of the original file.
- The ruler and Time Grid are synchronized.
- DAW playback follows the song tempo. Local playback follows the file tempo. There is one difference here: Double-clicking on the Melodyne ruler in this edit mode also starts local playback and not (as in Track and Clip modes) playback from the DAW.
Quantizing notes
As described above in the section entitled “Tempo and the Time Grid”, it is possible – in Clip Mode only – for discrepancies between the ruler and Time Grid to occur. These serve initially as an orientation aid, reminding you perhaps that you have moved a clip in the DAW a sixteenth note backwards, the evidence being that the Time Grid is now a sixteenth note ahead of the ruler.
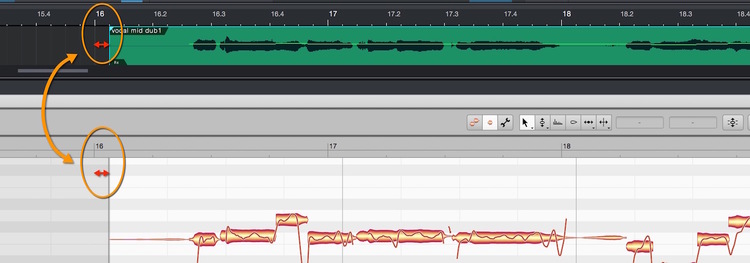
Such an offset, however, has an effect upon the quantization, because Melodyne uses its own Time Grid for the quantization and not the DAW ruler. In practice, of course, the two are nearly always identical and the quantization therefore mostly behaves in the manner with which users of MIDI editors, for example, will be familiar. But when, as described above, a clip has been moved in the DAW arrangement (perhaps only by a few milliseconds, for creative purposes), in Clip Mode the quantization destinations (i.e. the positions towards which notes will gravitate when quantization occurs) are visually obvious.
Quantization works the same way in Track Mode as in Clip Mode, being based invariably upon the Time Grid of the original file. In Track Mode, however, you see the Time Grid of the DAW, which, in the exceptional cases described above (such as when you have shifted a clip slightly to the left or right in the DAW) can be misleading, as the quantization destinations may be offset slightly from the gridlines. This, however, is merely an optical discrepancy. Switch to Clip Mode and you actually see the grid that is defining the quantization destinations.
Copying and pasting notes
Within a clip, you can copy and paste notes without any restrictions. Whether you can copy a note from one clip and paste it into another depends upon whether or not the two clips are accessing the same audio file.
Example: You have sliced up a drum recording in the DAW into individual clips, sorted them in the DAW arrangement, and are looking at them now in Melodyne’s Track Mode. In this case, you can copy and paste notes freely (because they were originally part of a single long recording) without paying attention to the clip borders.
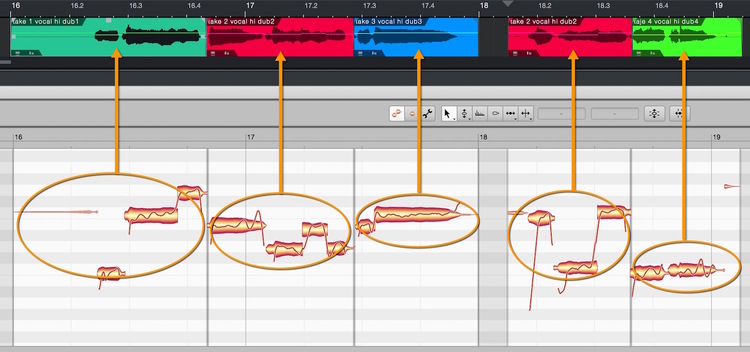
If, on the other hand, you have made a collage in the DAW arrangement of snippets taken from different recordings – from successive vocal takes, for instance – and are looking at these in Track Mode, you cannot copy and paste notes with the same freedom. In the following illustration, the clips have been color coded to indicate from which of five different takes they are derived:
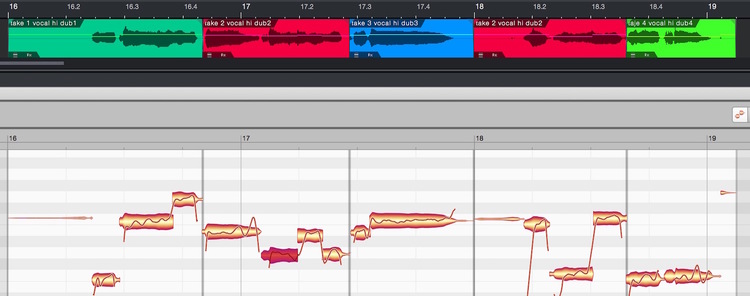
Here you cannot copy the note selected at the beginning of Bar 17 (or, indeed, any other note derived from a red clip) and paste it into Bar 16, because the destination contains a clip of a different color – in this case, green – which is therefore derived from a different recording. You can, however, paste it into Bar 18, because the content there is derived from the same red take.
The Sound Editor
The Sound Editor in the case of ARA integration works – as in the stand-alone implementation – on a per track basis. So if you are working in Track Mode and the track in question comprises multiple clips, any changes made in the Sound Editor will affect all the clips in the same way. If, for example, you have lowered the third overtone by 10 dB, this setting will be applied to all clips on the track.
If, however, you now switch to Clip Mode and raise the third overtone of the selected clip by 4 dB, the resulting value for the overtone in question in the selected clip will be the sum of the two adjustments – i.e. -6 dB – whereas in the other clips the third overtone will still be at -10 dB. By this means, you can apply different settings to different clips.
If you now switch back to Track Mode, you will see displayed in the Sound Editor a value somewhere between -10 and -6 dB for the overtone in question. This is a display compromise: an average of all the clips concerned.

By the same token, the other Sound Editor controls may also display approximate values if you keep switching to Clip Mode to adjust the parameters of individual clips. This is, as we have said, a compromise; but if ever it does lead to confusion, just give greater credence to your ears than to your eyes.
The behavior described occurs whenever all of the clips on a given track are derived from a different recording. Where some, but not all, of the clips on a given track are derived from the same recording, the behavior is somewhat different: now any changes to the Sound Editor settings of one such clip will apply only to those clips that are derived from the same recording.
For example: supposing you have assembled a vocal track from four different takes using the comping technique described above, and suppose further that one of the takes has a slightly different tone quality (because it was recorded, perhaps, on a different day, when the voice in question had a duller sound). Now it is only necessary with the Sound Editor to add brightness to one clip derived from the duller-sounding take and all clips derived from that take will benefit.
Audio-to-MIDI and further Tips & Tricks
Buffer Size
We recommend that you set your audio buffer size to 1,024 samples. Smaller values lead to a significantly higher CPU load. Should you need to set smaller values, e.g. when doing the headphone mix directly in your computer and not via an external channel strip or mixer, deactivate all Melodyne instances while tracking. Switch Melodyne back on when you start editing your new tracks.
Audio-to-Midi
ARA makes exporting MIDI to a Cakewalk track very easy: If you have previously opened a clip in Melodyne, all you need to do is drag it by its upper handle to a MIDI or instrument track within your Cakewalk arrangement. Note that the polyphonic conversion of audio to MIDI is only possible with Melodyne editor or an activated trial version of Melodyne 4. Otherwise the conversion of audio to MIDI is always monophonic, and also functions, of course, in Melodyne’s playback mode.
Tip: It is not, in fact, necessary to create a Region FX with Melodyne in order to convert audio to MIDI. It suffices to drag it to a MIDI or instrument track in the manner already described. The requisite exchange of information with Melodyne is performed by Cakewalk in the background using the ARA protocol.
*The time-stretching behaviour of Cakewalk and Melodyne’
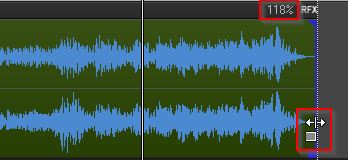
In Cakewalk, simply by holding down the CTRL key as you drag the right-hand edge of a clip, you can stretch or squeeze the corresponding audio material (Slip Stretch). The resulting stretch factor is displayed at the top of the clip.
As long as Melodyne is inserted into the clip as a Region FX, it is Melodyne’s algorithms that will be used for the stretching of the audio material. In this case, the Time ruler in the Melodyne display will adjust automatically.
Tip: Working with long files: With ARA, Melodyne always analyzes in its entirety the audio file that is being referenced by an audio clip, even if you have narrowed the clip’s boundaries before using Melodyne. This has several advantages. It allows you, for instance, to widen the clip boundaries again later without any further analysis by Melodyne being required.
It does mean, however, that there can be a noticeable hold-up when Melodyne is first used on an audio clip; this would be the case, for example, if the audio file being referenced by the clip was a live recording lasting several hours (which Melodyne would analyze with the Polyphonic algorithm).
So if you just want to edit part of such a recording, we recommend that, before you begin editing with Melodyne, you convert the passage in question into a new clip (Clips>Bounce To Clips). This will then be based on a new, shorter audio file that Melodyne will be able to analyze that much faster.