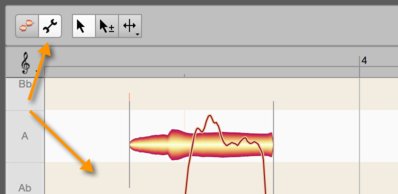
Note Assignment Mode
Since Melodyne invariably conducts an analysis (we call it “detection”) of the audio material before you can do any editing, the correctness or otherwise of this analysis has a considerable influence upon how well you are able subsequently to work with the material and how authentic the results of your editing will sound. For this reason it is important to check whether Melodyne has identified the notes within your material accurately and if necessary correct any mistakes. This where Melodyne’s Note Assignment Mode comes in.
What editing the detection involves
When you are working in Note Assignment Mode, none of the changes you make has any audible effect on the notes themselves. All you are doing is ensuring that the notes that are displayed do actually correspond to those that were played or sung. In other words, you are bringing what you see into line with what you hear. In the process, you are working at all times on the display of the original recording and, with it, so to speak, on the basis for all musical changes made later with Melodyne. The sounder the basis, the better the eventual sound of your edits.
The fact that it is sensible and necessary to check and edit the detection and, with it, the interpretation of the audio material may seem tiresome at first sight. But it brings with it enormous advantages, for there are often several possible interpretations of the audio material, and which is the correct one in a given acoustic and musical context is for you, ultimately, to decide.
But don’t worry. The detection process in Melodyne is mainly automatic and delivers logically coherent results. How much there is to edit in this mode depends upon the algorithm used and the audio material in question. With a dry recording of a single vocalist, for example, you will very rarely encounter problems. It may happen from time to time that a note is detected in the wrong octave, in which case, if you later transpose it, it will sound unnatural. Correcting the detection in such cases is a task swiftly accomplished. The same goes for percussive material, where it is generally only necessary to introduce or remove the occasional note separation.
What is edited and where
Like the choice of algorithm, Note Assignment Mode applies invariably to all the notes of i) a particular audio file, ii) a particular recording, or iii) a particular transferred segment – we will use the term “audio source” to cover all three. When the Note Editor contains notes from different audio sources, begin by selecting a note belonging to the source the detection of which you plan to edit.
Now click the wrench (spanner) icon next to the toolbox of the Note Editor to activate Note Assignment Mode. The background in the Note Editor changes color to show that you are no longer in normal Edit Mode but have switched to Note Assignment Mode. In Note Assignment Mode, what you see and hear is the original state of the audio source; any editing you may have performed on it previously is ignored here.
Any time you click on the blob icon (to the left of the wrench), you will leave Note Assignment Mode and return to Edit Mode. There you will hear once again the results of any editing you performed before switching to Note Assignment Mode. This only applies, however, if you have not changed algorithm in Note Assignment Mode, as any change of algorithm triggers a fresh analysis, and any time you trigger a fresh analysis – any time, in other words, the detection process is repeated – all editing that has been performed on the notes previously is lost.
Various types of notes
A Melodyne “blob” represents a note, but Melodyne distinguishes between several types of note, and it is important – especially when you are working in Note Assignment Mode – to understand the difference between them. They are:
- active notes
- inactive/potential notes
- silent notes.
Most blobs represent active notes. These are what Melodyne, having carefully analyzed the recording, believes to have been the notes (i.e. the fundamentals) that were actually played or sung. Active notes correspond to the notes that would be displayed on the sheet music: here a D, here an F#, here another D or an A etc. As well as a definite pitch, active notes have a definite length; and naturally, you can alter these and other characteristics of the notes in Melodyne.
When the Melodic algorithm is used, only one note can ever be active at a time; that is because this algorithm is the one designed for monophonic sound sources (the human voice, say, or an instrument such as the clarinet or trumpet that is only capable of playing one note at a time). With the polyphonic algorithms, which are designed for instruments like the piano or the guitar that are capable of playing chords, or multiple melodic lines simultaneously, two or more notes can be active at the same time, with a separate blob assigned to each. When the audio material has been analyzed using the Percussive or Universal algorithms, however, all the notes of a chord are represented by a single blob. So it is better, with these two algorithms, to think of a blob as representing a “slice of time” rather than a musical note. To illustrate the difference, here we see a guitar chord detected (on the left) using the Polyphonic algorithm, and (on the right) using the Percussive one:
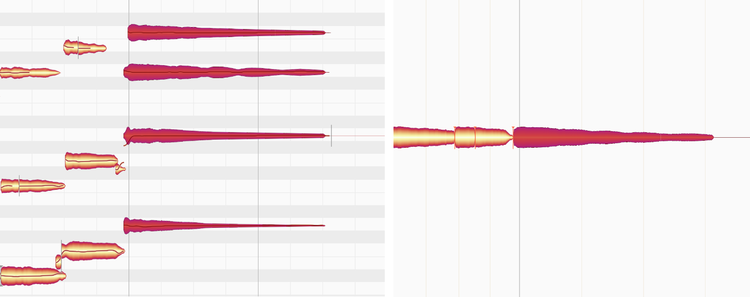
From the blobs on the left, you can see exactly which notes comprise the chord. From the “time-slice blob” provided by the Universal algorithm, on the other hand, it is impossible to tell which, or even how many, notes comprise the chord.
In terms of their editability using the tools, there is not a great deal of difference between the ordinary blobs provided by the Polyphonic algorithm and the Universal algorithm’s time-slice blobs – except, that is, when it comes to editing chords: When represented by a time-slice blob, a chord can only be transposed en bloc; so a chord of F major, for example, could become G major or A major. In other words, the intervals between the various notes that make up the chord cannot be changed because all the notes hidden behind the (single) time-slice blob move exactly the same distance when the chord is shifted upwards or downwards. With the Polyphonic algorithm on the other hand, a separate blob is assigned to each of the notes that make up the chord and you can move each blob individually – perhaps in a different direction and/or by a different amount to the blobs above or below it. In this way you can turn an F major into an F minor – or any other chord you like.
Melodyne’s potential notes form our next category.
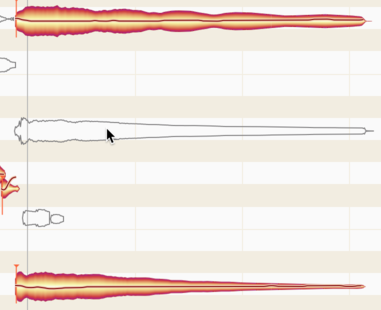
Represented by outlines (or “hollow silhouettes”), they lie at pitches where Melodyne thought about drawing a regular, solid blob, but decided in the end to place this somewhere else, leaving the silhouette as a hint at to what might be a possible alternative for that particular note.
So you might consider turning this potential note into a regular note. This, you can only do in Note Assignment Mode, so it is only in Note Assignment Mode that you will ever see a hollow silhouette. Once you return to normal edit mode, only solid blobs (representing the active notes) appear in the display. It should be added that potential notes are only ever encountered with the Melodic or Polyphonic algorithms.
Finally, there are what Melodyne calls silent notes. These can be seen in both Note Assignment and normal Edit Mode, regardless of which algorithm is used to detect the material. A silent note appears wherever there is a break between two notes; it corresponds, therefore, to a rest or pause in the score.
Like a rest, then, it has a definite length but no pitch, so you cannot transpose silent notes. Their length, however, will change if the notes that precede them are shortened or lengthened, or if the notes that follow them are moved forwards or backwards in time, in the same way that an eighth note (quaver) rest in the score would become a sixteenth note (semiquaver) rest if the preceding note were lengthened, or the following note moved forward, by the same amount.
Silent notes are not in fact entirely silent, because even during breaks between normal notes the recording continues, picking up things like the hiss of the microphone preamp or the hum of the guitar amp, but they are generally far quieter than the notes around them.
Here we see three notes: an active note, followed by a silent one, followed by another active one:
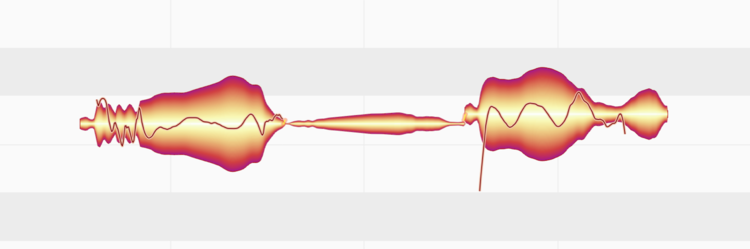
This illustrates the two significant visual characteristics of the silent note: i) it has no Pitch Curve; and ii) it is always placed level with the note to the left of it; if you shift the latter up or down, the silent note moves with it, but the change is purely visual; whatever sounds the silent note represents remain unaltered.
It is when you come to use the tools in Note Assignment Mode that a clear understanding of the nature and behavior of the various types of note found in Melodyne will pay the greatest dividends. That is the subject of the next tour. You will also learn there how to transform silent notes into normal ones – as well as silhouettes into solid blobs and vice versa, thereby activating and deactivating, respectively, the corresponding notes.