Melodyne in Pro Tools with ARA
- • Melodyne essential in Pro Tools
- • Invoking Melodyne
- • The Melodyne area
- • The contents displayed in Melodyne
- • Tip: Working with long files
- • Using the Melodyne algorithm for tempo adjustments
- • Arranging clips
- • Bypass and compare
- • Clear and Undo
- • Removing Melodyne
- • Melodyne > Render
- • Melodyne > Show/Hide Notes
- • Other ways in which ARA streamlines your workflow
-
Melodyne 5 essential in Pro Tools 2022.9Are you already familiar with Pro Tools but new to Melodyne? Then this is the video for you!
-
The ARA workflow in Pro Tools 2022.9Pro Tools and Melodyne you know – now learn about the new ARA workflow!


Whether you’re a newcomer to Melodyne or have been using it in Pro Tools for some time, you’ll find important information here on the use of Melodyne with ARA in Pro Tools.
Melodyne essential in Pro Tools
These videos show you how to get up and running with the Melodyne 5 essential that came bundled with your Pro Tools, as well as how to make optimal use of it in Pro Tools.
-
Pro Tools with ARA part 1: First Steps – All you need to know to get started with Melodyne – explained in clear, simple language
-
Pro Tools with ARA part 2: Zooming, Navigating, and Playback – Effortless navigation and screen management in Melodyne
-
Pro Tools with ARA part 3: Comparing, Clearing and Rendering Edits – Taking the right decisions and keeping your work well-organized
-
Pro Tools with ARA part 4: Clip-Based Workflows – How to edit Pro Tools clips intelligently and efficiently
-
Pro Tools with ARA part 5: Comping – Get the best out of each take while you’re actually comping


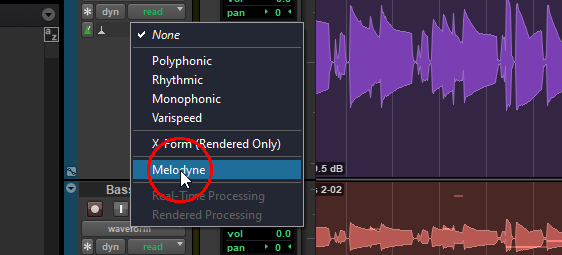
Invoking Melodyne
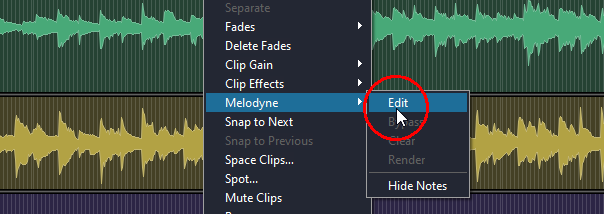
First of all, you need to choose the clips or tracks you wish to edit with Melodyne. You can select (in the normal way) one or several clips, in which case they do not all need to be on the same track. Now choose Melodyne > Edit from the context menu or from the Clip menu (shortcut: Shift + Ctrl + A). Melodyne will then be applied to all the selected clips. If, instead of selecting individual clips, you right-click on the name of a track and choose Melodyne > Edit, Melodyne will be applied to all the clips on that track.
When Melodyne opens, it displays the track contents in the form of Melodyne “blobs”. It has to conduct a brief analysis of the material first, but thereafter everything occurs in real time.
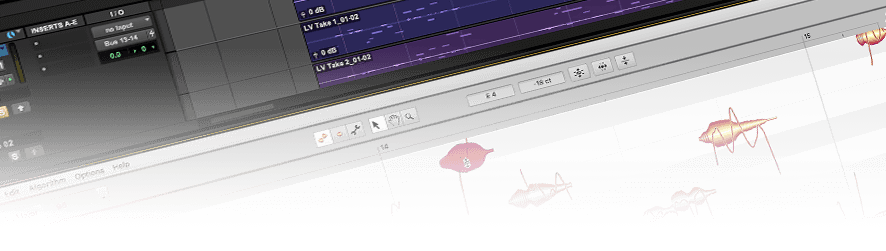
The Melodyne area
The Melodyne area is embedded in the lower half of the Pro Tools edit window. You can resize it by dragging its upper edge. With Ctrl + Option + 8 on the Mac or Win + Alt + 8 under Windows, you can expand the Melodyne area to its maximum height.
To close or reopen the Melodyne area, use Alt/Option + 8 or click on the “Melodyne” tab in the lower left-hand corner of the Edit window.

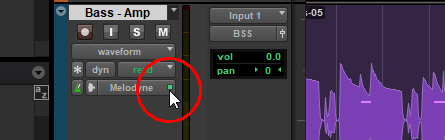
Alternatively, you can click on the green “light” next to the Elastic Audio / ARA Plug-ins selector in the track header.
The contents displayed in Melodyne
With the following options, you can determine what Pro Tools content is displayed in Melodyne.
If Options > Follow selection in DAW is activated in Melodyne, Melodyne always displays the clip currently selected in Pro Tools. Melodyne not only follows suit when you switch to a different clip or track in Pro Tools but also scrolls automatically to the same position in the timeline.
Whenever Options > Zoom to Selection in DAW in checked in Melodyne, Melodyne displays exactly the same area of the timeline as is selected in Pro Tools. The zoom range therefore adjusts to the length of the selected clip or to the selected range (if, for example, you swipe in Pro Tools to select only part a clip or a range comprising parts of adjacent clips). This option is somewhat similar to the E shortcut in Pro Tools, which zooms to show the selected clip only.
Tip: Even when Zoom to Selection in DAW is not activated, if you hold down the Option key and double-click on Melodyne’s horizontal zoom slider, the display will zoom to show the exact range selected in Pro Tools. Double-clicking on the slider without holding down the Option key, on the other hand, adjusts the zoom to the length of the entire track.
Tip: Working with long files
With ARA, Melodyne always analyzes in its entirety the audio file that is being referenced by a clip, even if you have narrowed the clip’s boundaries before using Melodyne. This has several advantages. It allows you, for instance, to widen the clip boundaries again later without any further analysis by Melodyne being required.
It does mean, however, that there can be a noticeable hold-up when Melodyne is first used on a clip; this would be the case, for example, if the audio file being referenced by the clip was a live recording lasting several hours (which Melodyne would analyze with the Polyphonic algorithm).
We recommend, therefore, that if you just want to edit part of such a recording, you create a new clip containing only the passage in question and then consolidate it (Edit>Consolidate Clip) before you begin editing with Melodyne. This will create a second, shorter audio file that Melodyne can analyze that much faster.
Using the Melodyne algorithm for tempo adjustments
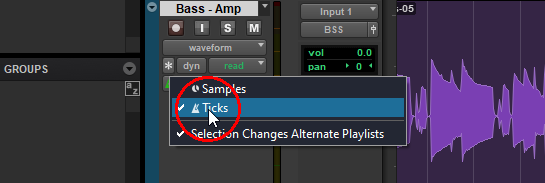
With a Pro Tools track’s Elastic Audio / ARA Plug-in selector, you can opt now to use Melodyne’s high-quality algorithms to perform tempo adjustments.
If you have applied Melodyne to any clip on the track, Melodyne will be selected here automatically. Before any tempo adjustment can be performed on a clip, the time base of the corresponding track must be set to “Ticks” not “Samples”.
Arranging clips
When you move a clip in Pro Tools to another position on the same track, the notes in Melodyne move along with it.
Copying a clip to another position on the same track creates duplicate notes in Melodyne that can be edited independently of the originals. The same applies when content is copied using the Repeat command in Pro Tools.
When you loop clips in Pro Tools (whether using the menu command or a tool), again, copies of the corresponding notes will appear in Melodyne. These, however, cannot be edited independently. If you change a note in any one of the loops or iterations, the same change will appear in all of them.
When moving or copying a clip to another track, please note the following:
If Melodyne has already been applied to at least one clip on the target track, this will work as expected: the Melodyne content of the clip will be moved or copied along with it. If, however, the target track is still empty, the Melodyne content will be lost. To prevent this happening, before moving or copying the clip, select Melodyne as the tempo adjustment algorithm of the target track (using the Elastic Audio / ARA Plug-ins selector).
When duplicating tracks, the following rules apply: If Melodyne has already been applied to the clips of the source track, it will be applied automatically to the clips of the new track as well, and any edits you have already made to the original clips will be carried over to the new track. From that moment on, however, both tracks will function like independent copies, so you can, for example, with just a few mouse clicks, use a lead vocal track you have previously polished as the source material from which to create vocal harmonies.
Bypass and compare
From the context menu or the Clip menu, you can select Melodyne > Bypass. You can only do this if at least one note in the corresponding clip has been edited, otherwise Bypass is grayed out.
As an alternative to the Bypass command in Pro Tools, you can use the Compare switch in Melodyne, which is easier and more useful in many situations than a simple bypass.

Clear and Undo
With Melodyne > Clear from the context menu, you can reverse all the editing you’ve performed on the clip in question in Melodyne. So the pitch, timing etc. of the notes are all reset to their original state. Any edits made in Note Assignment mode, on the other hand, are preserved.
Since it undoes all the changes made by Melodyne, this command has the same effect as Undo All Changes in Melodyne’s Edit or context menus.
If you have not yet edited any notes (or have already cleared all your edits), the Clear command is grayed out.
Removing Melodyne
You can only remove Melodyne from an entire track, not from individual clips. To do this, click on the Elastic Audio / ARA Plug-in selector in the track header and then choose None or a menu item other than Melodyne.
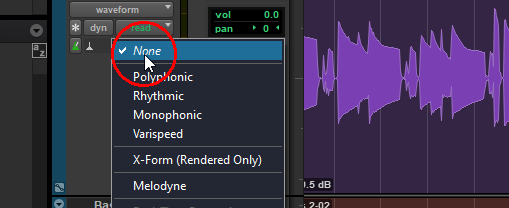
If you have not yet done any Melodyne editing on the track, Melodyne will simply be removed from it. If, however, you have already edited notes in Melodyne, a dialog will ask you whether you want to keep (“Commit”) or discard your changes.
If you choose “Commit”, a new audio file will be created to replace the original clip. The Melodyne edits will then be taken into account, but not the impact of any inserted plug-ins, which makes the Apply command in this dialog significantly different from the Apply command in the Track menu.
Melodyne > Render
This command in Pro Tools replaces the original clip with a new audio file reflecting all the editing you’ve done in Melodyne. On the new clip that results, however, Melodyne will not be present.
Melodyne > Show/Hide Notes
This command allows you to show or hide the miniature MIDI notes that Pro Tools displays above the waveform of the clips.
This affects all clips and not just the one currently selected. The miniature notes make it easier for you to see on which clips Melodyne has been used and on which it has not. It also reflects the bypass state: The miniature notes are not shown if you’ve selected Melodyne > Bypass for the clip in question.
Other ways in which ARA streamlines your workflow
One of the most important advantages of ARA is that it eliminates altogether the need for transfers. But in other areas, too, ARA brings notable benefits.
Clip-based editing: Melodyne no longer prevents you applying fades to clips or changing their volume in Pro Tools.
Comping: Now Melodyne can be used during the comping process rather than afterwards, when important decisions have already been set in stone. Thanks to ARA, every single playlist, i.e., every take, can now be optimized in Melodyne, which allows you to see each of your various options in the best possible light before choosing between them.
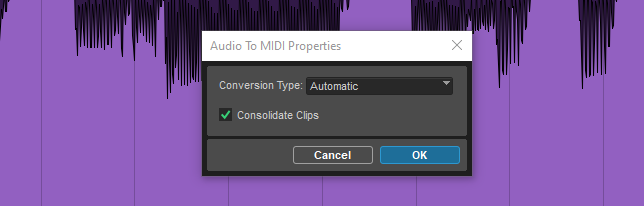
Audio-to-MIDI: Even in earlier versions of Pro Tools, audio-to-MIDI was supported by ARA (though the implementation was somewhat primitive): Whenever you dragged a clip onto an instrument or MIDI track, a dialog appeared inviting you to trigger a new Melodyne detection of the material, and the MIDI notes were then derived from this. The snag here was that this new analysis was of the original recording and completely ignored all the painstaking work you may have put in since then, optimizing the melody or the timing and phrasing in Melodyne.
Now, things have improved decisively. You will still see a dialog, but if you do nothing further (i.e., leave the default setting: “Automatic”) and click OK, the MIDI notes generated will be based on the current edited state of the material rather than the original recording.