Tracks and clips
Thanks to ARA, Reaper and Melodyne work hand in hand when you are arranging your song. The following tour will familiarize you with all the requisite functions.
Note: Each DAW manufacturer has its own terminology – “regions”, “audio events”, “media items” etc. – to describe segments of audio tracks. In the Melodyne user manual, we use for this purpose the catch-all term “clip”.
Track Edit Mode and Clip Edit Mode
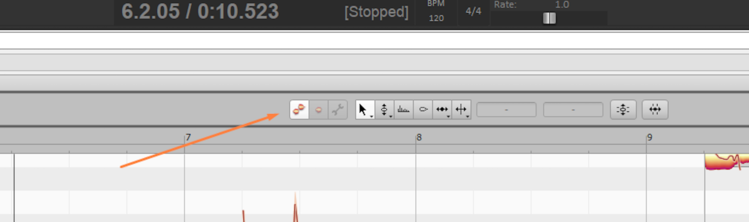
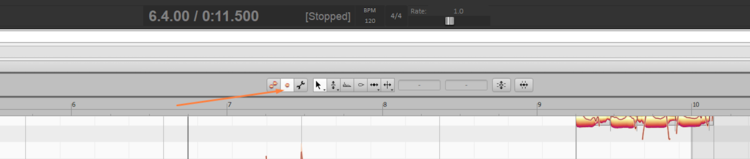
In Melodyne, two different modes are available for editing notes; you switch between them using the buttons above the Note Editor. The left-hand button activates Track Edit Mode; the button to the right of it, Clip Edit Mode.
In Track Edit Mode you see the contents of the entire Reaper track, regardless of how many clips it contains.
The borders between adjacent clips in Reaper are shown in Melodyne as vertical gray lines. The moving of borders is performed in Reaper – not in Melodyne. In Melodyne, you can see at once whether a clip change occurs at an unfortunate moment – such as in the middle of a note – which facilitates the task of finding a better place for it.
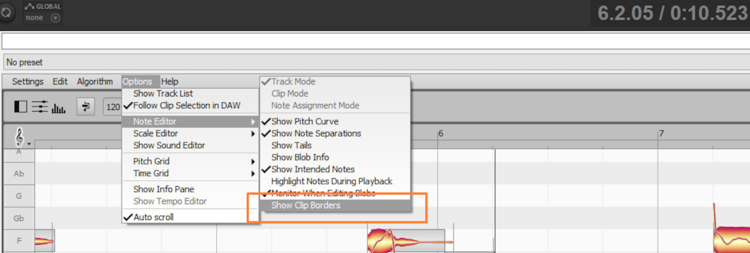
Tip: When multiple tracks – each containing multiple clips – are displayed simultaneously in the note editor, the display may become cluttered by a plethora of gray lines. This can be avoided by clearing the option “Show Clip Borders” in the Options menu.
Most of the time, you will probably prefer to work in Track Edit Mode, due to the one-to-one correspondence of its display to the arrangement of the track in question, and also therefore to what you are hearing. However, Melodyne also offers the alternative Clip Edit Mode, which under certain circumstances allows you greater flexibility.
In Clip Edit Mode, you see only one Reaper clip at a time. If in the Options menu the entry “Follow the Selection in the DAW” is checked, Melodyne’s display follows the clip selection in the DAW. (In Melodyne studio, the track list is still shown but in Clip Edit Mode, the Edit and Reference buttons are grayed out.)
Track Edit Mode and Clip Edit Mode differ in the way notes are displayed at clip borders: whilst in Track Edit Mode, only notes lying within the clip borders determined by Reaper can be seen, in Clip Edit Mode notes on either side of the borders remain visible; you therefore see in Melodyne – in the area with a gray background – what you would hear if you were to resize the clip in Reaper. This can be helpful, for instance, when you wish to shorten a note that is held too long, but where the ending of the note is located beyond the border of the clip. In Track Edit Mode, you would not be able to access the end of the note, as nothing outside the clip is displayed there. In Clip Edit Mode, on the other hand, you can simply grab the end of the note and adjust it neatly to the length of the clip.
Switching between Track, Clip and Note Assignment modes
You can also specify from within Melodyne itself which clip should be displayed in Clip Edit Mode. Your workflow might then look like this:
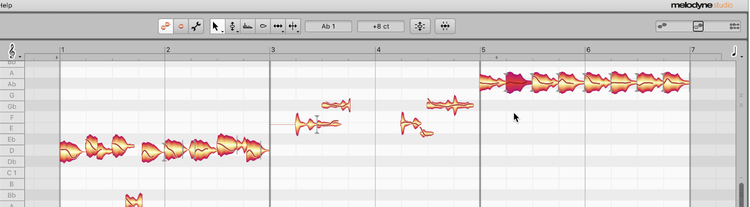
In the screenshot, Track Edit Mode is activated, so all the clips belonging to the selected track are displayed. Before switching to Clip Edit Mode, select one note belonging to the clip you wish to edit. In our example, a note from the third clip is selected. This being the case, selecting Clip Edit Mode would open this third clip for editing.

Suppose, however, that instead of just one, several notes were selected, at least two of which belonged to different clips. Under these circumstances, the Clip Edit Mode button would be grayed out, as Melodyne would have no way of knowing which clip you wished to edit. Before you can enter Clip Edit Mode, you must therefore limit your selection to notes (or a note) belonging to the single clip you wish to edit.
Tip: If you are already in Clip Mode and wish to change clips, it is not necessary to switch back to Track Mode in order to do so. Simply click on the desired clip in the DAW, and Melodyne will display its contents immediately. For this to happen, however, the function “Follow the Selection in the DAW” must be activated in the Options menu and Melodyne must be present on the track containing the newly selected clip.
Incidentally, the note selection must be equally unambiguous before you can switch to Note Assignment Mode (using the button to the right of Clip Edit Mode).
Restructuring of the arrangement
Until ARA came along, Melodyne’s editing was always performed on a copy of the contents of the Reaper track created in the course of the ‘transfer’ process. The snag was that if you changed the track subsequently – for example, by moving or muting clips – or if new clips were created e.g. by recording overdubs, the whole transfer process had to be repeated. With ARA, it does not, as all changes made to the clips in Reaper are automatically reflected in Melodyne.
Fading and muting clips
Within clips on tracks with Melodyne, fades and gain changes have the same effect acoustically as they do within clips without Melodyne. The size of the corresponding Melodyne blobs, however, remains unaffected.
If you mute clips in Reaper, the corresponding notes disappear from Melodyne, the guiding principle being: “only that which is heard should be displayed”. But don’t worry: the Melodyne notes are retained “in memory” and reappear – including any editing you may already have applied to them – as soon as you make the clip audible once more in Reaper.
Ghost and real copies
Whenever clips are looped in Reaper, the looped notes appear automatically in Melodyne as well. This is because what has been created is a copy (‘alias’ or ‘clone’) of the original clip. Any changes to the notes that you make in Melodyne will therefore appear in all the looped clips.
Reaper offers you two different ways of looping a clip. One is to mark the clip and then press the F2 key. This opens the “Media Items Properties” dialog, where you should check the option “Loop Source”. The other way is to right-click on a clip, and select under “Item Settings” in the context menu, the option “Loop Item Source”.
If you copy clips (by using Cmd-C and Cmd-V or by holding down the Alt key and dragging), the audio notes in each copied clip can be edited individually and independently of the source clip.
A typical application might be to introduce small musical variations to a repeating motif (such as a bass riff) that you have created by making multiple copies.
When you duplicate tracks, too, you will have real copies to work with. To duplicate a track, choose “Track” > “Duplicate Track” from the main menu or right-click and select “Duplicate Track” from the context menu. This will create a new track (with Melodyne already present as an insert) containing copies of the clips from the original track.
The Melodyne content of the duplicate track will then be independent of that of the original. A typical application here might involve copying a vocal track with the intention of creating a second voice from it using Melodyne.
Rendering
Rendering or “Bouncing” in Reaper is a very user-friendly, and at the same time extremely flexible, process. As a Melodyne user, however, you should familiarize yourself with the details of the Render dialog in Reaper.
In Reaper, a render normally includes the processing of plug-ins. As a rule, you will want your Melodyne editing to be included but not the effects of other plug-ins, such as compressors and equalizers. So, in this guide, whenever we recommend you to bounce a Reaper clip, the procedure we intend you to follow is this:
– bypass all plug-ins other than Melodyne;
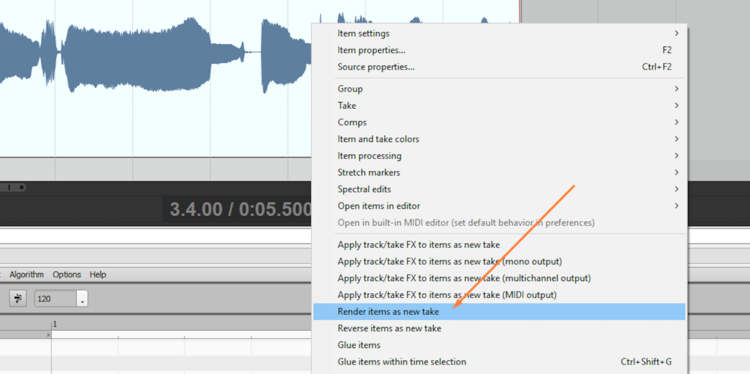
– right-click on the clip in question and choose “Render item as a new take” from the context menu;
– then reactivate the other plug-ins.
With this procedure, all the enhancements you have made to the clip using Melodyne will be frozen into the render, and this will then form the starting point for your future Melodyne editing.
Vocal comping
When comping, you are typically dealing with different takes of one and the same musical part that you have sliced into small clips. From these clips, you stitch together a patchwork consisting of the best individual performance of each word, phrase or segment. There are several ways of doing this in Reaper: Either you store all the takes in the same audio channel (by checking “Show all takes in lanes” under “Options”) and then combine the best renderings of each phrase or segment through judicious use of the scissors and mute tool.
Or you can display on a track at any one time only the current take, and navigate between tracks by pressing “T” or “Shift+T” to switch to the next or previous track, respectively. If you prefer this method, clear the option “Show all takes in lanes”.
Thanks to ARA, Melodyne is equally happy with either method, as, whichever you use, each take retains its own ‘Melodyne memory’. It is therefore possible to edit individual notes in one take, switch to a second and perform further editing there, before switching back to the first take and picking up where you left off. Thanks to Melodyne, you can begin making corrections even when you are still comparing takes; you no longer have to wait until you have settled on the final running order before doing so – as, incidentally, prior to ARA (to the chagrin of many producers) was invariably the case.
There is one problem, encountered most often when comping vocals, that is impossible to solve without ARA. Generally, when comping, you aim to position the clip borders between notes (or between a breath and a note); unfortunately, since there are generally slight differences in the phrasing of different takes, you will often find that there is no gap between the end of a note in one take and the beginning of the next note in another, which means there is no good place to make the cut; wherever you decide to switch takes, at least one of the notes involved will be sliced in two.
The solution to this problem lies – thanks to ARA – in Melodyne’s Clip Edit Mode. This allows you, as described above, to look (and reach) beyond the borders of a clip and adjust the timing of the sliced note until it fits neatly within the comping borders.