Tracks and clips
Thanks to ARA, Studio One and Melodyne work hand in hand when you’re arranging your song.
The following tour will familiarize you with all the requisite functions as well as offer some helpful tips.
Changes to audio events that Melodyne follows automatically
When you change the arrangement of audio events in Studio One, Melodyne, when integrated with ARA, follows automatically. Without ARA, every change made to the DAW track has to be reproduced manually in Melodyne. Changes to audio events that Melodyne with ARA follows automatically include the following:
- muting,
- shortening,
- moving,
- copying,
- changes in gain and fades,
- stretching of events with Studio One’s Time Tool (Alt + drag end) and
- changes to the “Follow Tempo” settings in the Inspector.
Special flexibility in the copying of events
When audio events are copied in Studio One, both the original and each of the copies are (to begin with) mutually dependent, as far as Melodyne is concerned. This means that any changes made in Melodyne to one such event automatically appear in all the others. This is behavior with which you are already familiar in Studio One from MIDI events – but only when these were created using the command “Duplicate Shared” rather than simply “Duplicate”.
“Shared copies” (as these are known) provide an ideal means of creating a new pattern quickly. Suppose, for instance, you take a two-bar audio event such as a bass riff, make a string of copies of it, and then, in Melodyne, change a note in Bar 6. This same change will appear in each iteration of the riff (i.e. in bars 2, 4, 8, 10…).
This means you cannot, if you begin simply by duplicating or copying a short audio event, create a musical variation that appears in Bar 8, without it also appearing in bars 2, 4, 6, 10…
If you want to do something different with Bar 8, you must first convert the event in question (in this case bars 7 and 8) into an independent copy. Unlike the case with MIDI, where (as we saw earlier) you can create independent copies in one go, simply by selecting “Duplicate” rather than “Duplicate Shared”, in the case of audio events, this is a two-stage process; all copies are initially shared copies and further action is required to turn them into independent ones, the procedure being as follows:
- First create the desired number of copies, either by dragging while holding down the Alt or Option key, or by using one of the “Duplicate…” commands (in the case of audio, it makes no difference which). Whichever method you choose, the result is initially the same: The audio events concerned (both the original and each of the copies) will initially be mutually dependent. This means that if you change a note in any one of them, the same change will be reflected in all the others.
- If you wish now to make changes to one copy only – say, bars 7 and 8 (though you can also select several events simultaneously) – select it, right-click and choose “Separate Shared Copies” from the context menu [Shortcut: Alt or Option+C]. Once you have done this, you will have an event that is completely independent of the others and can be edited separately.
Bear in mind, though, that if you subsequently duplicate this event, whilst it and the newly created copies will be independent of the first group, they will be mutually dependent (“shared copies”) with respect to one another. It could happen, then, that after a few duplicate/separate operations you end up with something like this:

The first, second and fourth events seen here are marked with a small “1”, whereas the third event is marked with a small “2”. From this screenshot alone, you can see how we got here: Initially there was one event; this was then duplicated 3 times, making 4 events in all. The third of these events was then selected and given its “independence” with the Shortcut: Alt+C, whereupon the number “2” was assigned to it. When this was then copied by Alt-dragging it to somewhere further on in the timeline, this newly created (fifth) event was also assigned the number “2”.
The five events, in other words, are split between two groups: The events in Group 1 are mutually dependent but independent of the events in Group 2. Conversely, the events in Group 2 are mutually dependent but independent of the events in Group 1.
If you now select any of the five events and press Alt+C, a third group, Group 3, will be created.
In this way, you can create complex, musically diverse, constellations.
Often, of course, you may not want to; you may simply wish to introduce some minor variation in Bar X or Y. In that case, just select the event in question and press Alt+C, and you will be able then to edit it freely without fear of making at the same time accidental changes elsewhere. The numbering in this case will be of little interest to you.
If, however, you are interested in creating a complex constellations, the numbering is a useful orientation guide, showing you instantly which audio events belong to each group. A tip: If you right-click on an event in the pool, you will see all the numbers listed. You can quickly select in the arrangement all the events belonging to a given group simply by right-clicking on them in the pool and choosing “Select on Track”. You could then, for example, assign a color to them to make them easily distinguishable from members of other groups. This provides an intuitive way of keeping track of complex variations.
And another tip: As an alternative to “Separate Shared Copies”, you can use the command “New Clip Version” (right-click and look under “Audio”). This basically does the same thing: It converts a shared copy into an independent copy (assigning, the next free number to the event). The only difference between the two commands lies in the way they behave when multiple events are selected: If you select three events, say, and choose “New Clip Version”, the same new number will be assigned to all three, indicating that they are mutually dependent (although they will, of course, be independent of all other events on the track). If, on the other hand, you choose “Separate Shared Copies”, a different number will be assigned to each of the three events, indicating that they are fully independent of one another as well as of all other events on the track.
The Track and Clip editing modes
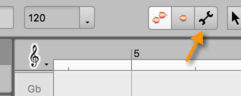
With ARA integration, after inserting the Melodyne plug-in and opening a DAW track, two alternative modes are available for editing the notes: Track Mode and Clip Mode. You can switch between them using the buttons above the Note Editor. The left-hand button activates Track Mode; the button to the right of it, Clip Mode.
Track Mode
Track Mode lets you see the entire contents of the track opened in Melodyne, however many clips it is composed of in the DAW.
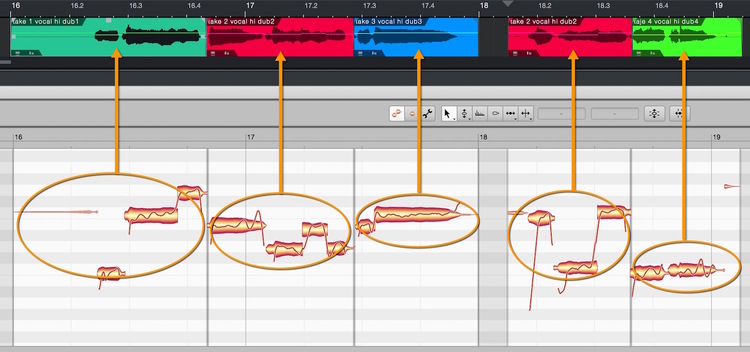
The clip borders are indicated in Melodyne by vertical gray lines. The moving of borders is performed in the DAW, not in Melodyne, but the lines in the Melodyne user interface move accordingly. This allows you to see at once whether a clip change occurs at an unfortunate moment, such as in the middle of a note.
Clip Mode
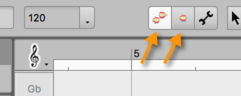
The alternative to Track Mode is called Clip Mode. You select this by clicking the right-hand mode button (the one with a single blob) above the Note Editor.
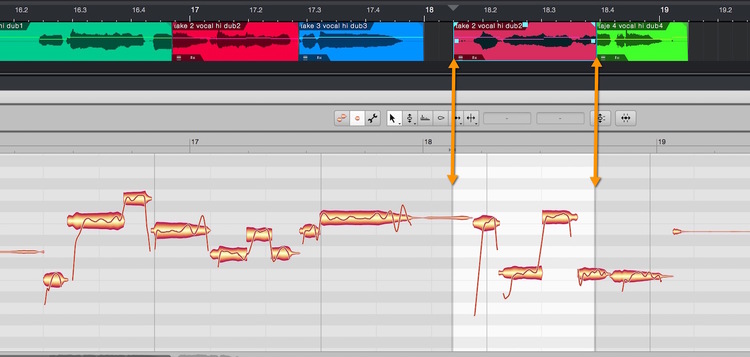
In Clip Mode, you see only a single clip from the DAW track at a time. The track list remains in view, but in Clip Mode the Edit and Reference buttons are grayed out.Track Mode and Clip Mode differ in the way notes are displayed at clip borders: whilst in Track Mode, only notes lying within the clip borders determined by the DAW can be seen, in Clip Mode notes on either side of the borders remain visible; you therefore see in Melodyne – in the area with a gray background – what you might hear if you were to resize the clip in the DAW.
The ability to reach beyond the borders of the clip has advantages when performing tasks such as comping. (Comping is the technique of selecting from multiple takes the best rendering of each passage and concatenating the chosen clips to obtain what, given the available material, you consider the optimal performance). Notes overlapping the borders of the clips in question pose particular problems when comping. In Clip Mode, such problems can be resolved on the note level simply by moving or shortening the offending notes until they fit neatly within the clip. In Clip Mode, it is also possible to copy notes lying outside the clip borders and paste them into the clip, which can also be very useful when comping.
Switching from Track Mode to Clip Mode and from clip to clip
Whereas in Track Mode it is always obvious what you are looking at – the contents of the entire DAW track currently selected – Clip Mode displays only one of a track’s clips, so before you can switch to Clip Mode, you must indicate clearly which clip you wish to edit. If in the Options menu the entry “Follow the Selection in the DAW” is checked, Melodyne’s display follows the clip selection in the DAW. If, however, it is unclear which clip you mean to edit, the Clip Mode button will be grayed out. In this case, while still in Track Mode, you must indicate which clip you wish to examine. You can do this in either of two ways:
- By selecting a note, in which case it is obvious which clip interests you: the one containing the note selected
- By making a selection, which, provided all the notes selected belong to the same clip, is equally unambiguous; if they do not, you must narrow your selection – if need be, to a single note.
If no note is selected, Melodyne looks to see which clip or clips are selected in the DAW. If only one clip is currently selected in the DAW, Melodyne opens its contents in Clip Mode. If several clips are selected, you can resolve the ambiguity by simply selecting a note belonging to the track you wish to examine.
Tip: If you are already in Clip Mode and wish to change clips, it is not necessary to switch back to Track Mode in order to do so. Simply click on the desired clip in the DAW, and Melodyne will display its contents immediately. For this to happen, however, the function “Follow the Selection in the DAW” must be activated in the Options menu and Melodyne must be present on the track containing the newly selected clip.
Entering Note Assignment Mode
You can only enter Note Assignment Mode from Track Mode if it is clear from the current note selection which clip you wish to examine. If necessary, therefore, click on one of the notes of the clip you wish to examine in Note Assignment Mode. You can enter Note Assignment Mode from Clip Mode directly, as only one clip can be selected in Clip Mode at a time and it is therefore obvious which clip you intend to examine.