Time-stretching, tempo and tempo matching
Melodyne in Studio One
Tips to help you make Melodyne and Presonus Studio One work even more efficiently as a team. Shown here: Melodyne 5 studio, smaller editions may differ.
-
Adapting loops – Synchronize any loop perfectly to the fluctuating tempo of a live recording
-
Creating a tempo map – How to track the tempo of each recording and create a click track subsequently
-
Stretching the tempo – Reshape the tempo of a live recording, with or without the 'human touch'
The time stretching behavior of Studio One and Melodyne
In Studio One’s Inspector (just to the left of the track list and accessible by clicking on the i button above the track list) you can select for each track between the options “Follow Tempo” and “Timestretch”. With regard to the option selected, Melodyne conforms with Studio One. All the following examples apply only when Timestretch has been selected for the track in question. If “Follow Tempo” or “Do Not Follow Tempo” are selected, no time stretching occurs.
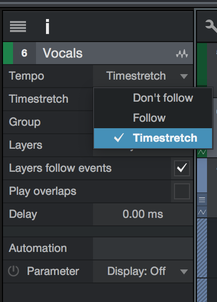
Select the option “Timestretch” if you want an audio file to adjust automatically to the prevailing tempo when you drag it into a song. Studio One can perform this adjustment correctly for some files without Melodyne’s help, but for others it does need Melodyne. If an audio event is opened with Melodyne, it is always Melodyne that performs the time stretching.
From a technical standpoint, time stretching is based upon a prior determination of the tempo, as both Studio One and Melodyne need to know the tempo of the file before they can decide whether to stretch or squeeze it, and by how much, to conform to the tempo of the song. The manner in which the tempo is determined varies depending on the origin of the file. Suppose, for example, the tempo of your song is 100 BPM:
If the audio file was recorded or bounced within the current Studio One song, one can safely assume it is intended to play back at the song tempo (i.e. 100 BPM). In this case, no tempo detection takes place. If you increase the song tempo to 120 BPM, the tempo of the audio file will also increase from 100 to 120 BPM.
If the origin of the file is another song, with a tempo of 125 BPM, for example, Studio One can’t know this and offers you two options:
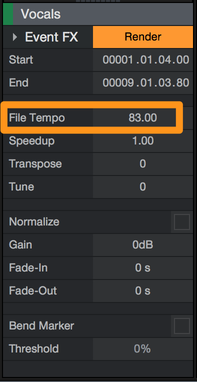
You can enter the value 125 in the “File Tempo” field in the Event Inspector. Melodyne, which has access to this field, will take 125 BPM to be the tempo of the file and stretch or squeeze the audio accordingly to make it match your song tempo.
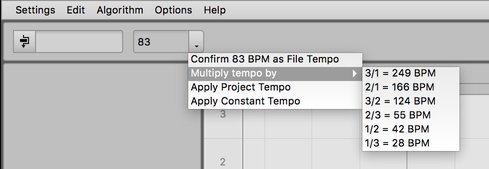
Melodyne detects the original tempo of the audio file automatically in the course of its analysis. Before Melodyne can stretch the audio to match the host tempo, you must, of course, select one of the four options in Melodyne’s Tempo Dialog that we are about to describe. You open the Tempo Dialog by clicking the button next to the tempo display.

“Confirm xx BPM as File Tempo”: Here the tempo detected automatically by Melodyne is displayed and (if the option is selected) confirmed. This value is then displayed in Studio One’s Event FX window.
“Assign File Tempo”: Clicking on this entry opens the Tempo Editor. Here you can make changes to the automatically detected tempo, which is particularly useful in the case of files containing tempo variations such as ritardandi. When you leave the Tempo Editor again, the value will also be displayed in Studio One’s Event FX window. If the file tempo is not constant, this will be indicated. Melodyne then employs time-stretching when playing back the file to adapt it to the project tempo.
“Apply Project Tempo”: Use this option to give the file the same tempo as the project.
“Apply Constant Tempo”: If you know the file tempo, you can enter it here.
Please note that in Melodyne essential and assistant the entry “Assign File Tempo” is not available, as the Tempo Editor does not feature in these editions.
Once Melodyne knows the original tempo, you can draw in any tempo path you like in Studio One and Melodyne will adjust the file to match it.
Tempo and the Time Grid
The discovery (or explicit definition in the Tempo dialog) of the “correct” file tempo serves other purposes as well as that of musically sensitive tempo adjustment. It makes the work of editing the notes easier, because the file tempo also determines the calibration of the Time Ruler as well as the positioning of the grid lines in the background to the Note Editor.
Imagine, in this case, that you want to move a note a semiquaver (sixteenth note) to the right or left. What you intend, in all probability, is that the exact length of this sixteenth note should be a function of the current song tempo (say 100 BPM). If the Time Grid, however, were still based on the tempo of the original recording (120 BPM, say), then when you attempted to move a note by a semiquaver, it would end up in the wrong place – (the rule here being: the quicker the tempo, the more closely spaced the gridlines). For this reason, the DAW and Melodyne, communicating via ARA, strive to ensure that their rulers and Time Grids provide at all times an “accurate” representation of the current tempo and that any quantization that is undertaken is therefore similarly “accurate”. In the following, an overview taking into account the various edit modes as well as the difference between local and DAW playback.
Tempo display in Track Mode:
- Melodyne’s Tempo field displays a single value: the song tempo in your DAW.
- Melodyne’s ruler and the Time Grid in the Note Editor background are synchronized and they are each calibrated according to the same principle: the faster the song tempo, the smaller the distance between lines.
Tempo display in Clip Mode
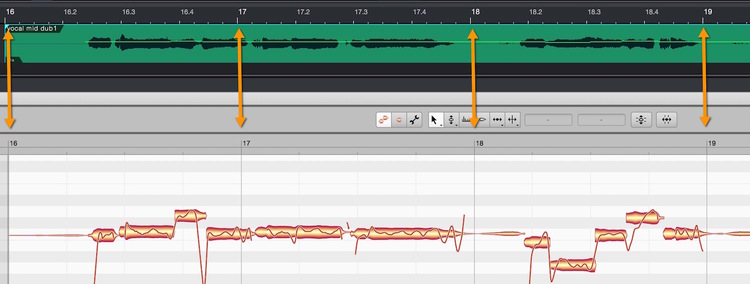
- Melodyne’s Tempo field displays two values (as described above): the song tempo, followed by the file tempo in brackets. A single value is displayed only when the tempo of the file and that of the song are identical.
- Melodyne’s Time Ruler and the Time Grid in the Note Editor background are now no longer necessarily in sync, as the ruler reflects the song tempo, whereas the grid represents the tempo of the file. If the two tempos are not identical, the dashes on the ruler will no longer coincide with the lines of the grid.
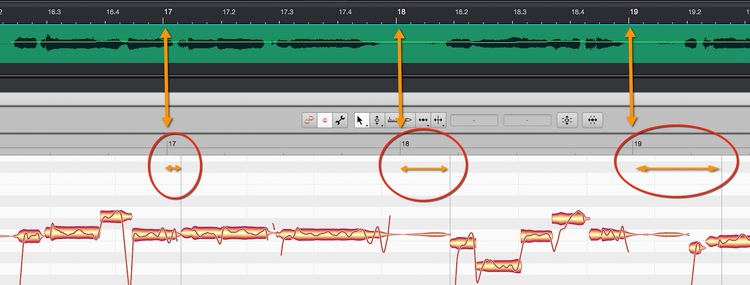
This is as it should be and reveals the effect of dynamic time-stretching during DAW playback: the Time Grid, and with it the notes of the original recording, are squeezed or stretched to accord with the song tempo and also, therefore, with the ruler. The results, of course, will only be musically viable if the Time Grid is calibrated on the basis of “accurate” tempo-detection or -input. For this reason, Clip Mode allows you to examine the Time Grid to ensure that it corresponds with the notes. Should this not be the case, you can make the necessary adjustments using the Tempo dialog options described above.
- During DAW playback, the clip follows the tempo of the song i.e. the value before the brackets. This is achieved by stretching or squeezing the original file to match this tempo.
- During local playback, the clip is heard at its original (file) tempo – i.e. at the tempo shown in brackets – and no time-stretching or -squeezing occurs.
Tempo display in Note Assignment Mode:
- Melodyne’s Tempo field displays a single value: that of the original file.
- The ruler and Time Grid are synchronized.
- DAW playback follows the song tempo. Local playback follows the file tempo. There is one difference here: Double-clicking on the Melodyne ruler in this edit mode also starts local playback and not (as in Track and Clip modes) playback from the DAW.
Quantizing notes
As described above in the section entitled “Tempo and the Time Grid”, it is possible – in Clip Mode only – for discrepancies between the ruler and Time Grid to occur. These serve initially as an orientation aid, reminding you perhaps that you have moved a clip in the DAW a sixteenth note backwards, the evidence being that the Time Grid is now a sixteenth note ahead of the ruler.
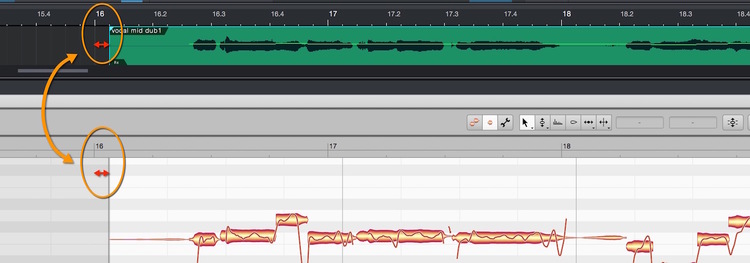
Such an offset, however, has an effect upon the quantization, because Melodyne uses its own Time Grid for the quantization and not the DAW ruler. In practice, of course, the two are nearly always identical and the quantization therefore mostly behaves in the manner with which users of MIDI editors, for example, will be familiar. But when, as described above, a clip has been moved in the DAW arrangement (perhaps only by a few milliseconds, for creative purposes), in Clip Mode the quantization destinations (i.e. the positions towards which notes will gravitate when quantization occurs) are visually obvious.
Quantization works the same way in Track Mode as in Clip Mode, being based invariably upon the Time Grid of the original file. In Track Mode, however, you see the Time Grid of the DAW, which, in the exceptional cases described above (such as when you have shifted a clip slightly to the left or right in the DAW) can be misleading, as the quantization destinations may be offset slightly from the gridlines. This, however, is merely an optical discrepancy. Switch to Clip Mode and you actually see the grid that is defining the quantization destinations.


