Chord recognition and the Chord Track
- • Triggering the harmonic analysis
- • Selecting between alternative designations
- • Entering chords manually
- • Keyboard shortcuts for editing the chords
- • Auditioning chords
- • Chord symbol conventions
- • MIDI export of the chords as a lead sheet
- • The Key Track and key changes
- • The Key Track and the Scale Ruler
- • Chords and keys in Note Assignment Mode
-
Working with chords– Hands-on film about the new chord functions and the adapting of samples. Shown here: Melodyne 5 studio, smaller editions may differ.

Melodyne is capable of recognizing the chords and detecting changes of key (or ‘tonality’) in your recordings. Here you will find all you need to know about Melodyne’s Chord and Key tracks.
Triggering the harmonic analysis
To get Melodyne to identify the chords, proceed as follows:
- Open the recording of a polyphonic instrument (e.g. piano or guitar). In Melodyne studio, you can open multiple tracks simultaneously in the Note Editor (e.g. guitar and bass) so the harmonic analysis can take all of them into account.
- Display the Chord Track (and the Key Track too, if you wish) by checking the relevant entries in the Options menu. Alternatively, you can click on the icons beneath the Time Grid Settings menu in the top right-hand corner of the Note Editor.
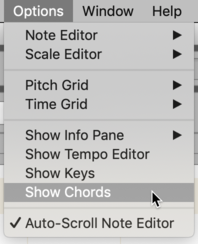
- Right-click in the Chord Track and select “Analyze Chords” from the context menu. You will then see a ‘lead sheet’ of your recording.
Please note: Before optimal results can be obtained from the chord recognition function, the detected tempo must be correct; otherwise the chord symbols may be aligned with the wrong beats. Melodyne detects the tempo automatically when you load an audio file. If the musical material is particularly complex, it may be useful to further optimize the tempo detection.
We explain how to do this here.
You can repeat the “Analyze Chords” command at any time to update the analysis.
You might do this, for example, after recording a new guitar part containing different chords.
- If it’s only certain chords that need to be reexamined, select the chords in question in the Chord Track and choose “Analyze Chords”.
- To select two or more chords, use the Shift and Cmd keys.
- If you click on one chord and then press Cmd+A, all the chords will be selected.
Note: The chord analysis is invariably based on all the notes in selected areas of the Chord Track. It is not possible to influence the analysis by selecting or deselecting individual blobs. That would in any case make no sense from a musical point of view, as the less information taken into account, the less accurately the chords displayed would reflect the overall musical content of the recording.
There could, however, be cases – if you were analyzing the chords of a complete mix, for example – when certain blobs (attributable to the kick drum, say, or the cymbals) might lead to confusion. The solution in such cases is to the copy the audio file to a new track, delete the offending blobs, and trigger a fresh chord analysis based on that track only.
Selecting between alternative designations
The context (right-click) menu of the Chord Track suggests alternatives for the chords detected:
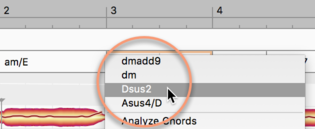
These, we must stress, are not compositional suggestions, as in “here you could also play this chord”. The alternatives suggested are simply alternative interpretations of the audio material.
A chord made up of the notes C, E, G and A, for example, could be interpreted as either C6 or Am7. Both interpretations are legitimate, but which is the more apt might depend on the degree to which the various notes are emphasized; Does the highest note sound loudly and clearly, for instance, or is it barely perceptible? The most appropriate interpretation might depend also on the surrounding chords or the prevailing key (or ‘tonality’) of the passage in question. These are questions of content but also of taste that are best left for you, the user, to answer. For this reason, Melodyne offers you all plausible interpretations and lets you choose between them.
Of course, in the case of very basic chords, there will be fewer alternatives and in some cases only one. If the chord, for example, consists of three notes: C, E and G, this can only sensibly be interpreted as “C Major”.
Entering chords manually
Independently of the results of the chord detection, you can also fill in the Chord Track manually, by typing in the names of the chords or standard chord symbols.
To do this, select an existing chord (a frame will appear, highlighting the chord selected) and type in text in the normal way:
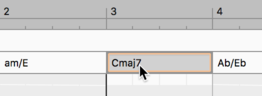
In areas of the Chord Track where no chord symbols are displayed, you can enter them simply by double-clicking in the appropriate places and typing them in.
Melodyne accepts all the standard conventions for denoting chords.
For “F minor”, for example, you can spell the chord in any of the following ways: “Fminor”, “Fmin”, “Fm” or “F-” (with the “F” in upper or lower case). By default, Melodyne prefers the set language.
You can eliminate specific chord changes by moving the cursor over the borders between chords (the cursor than changes its shape) and then double-clicking.
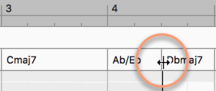
Conversely, you can insert additional chord changes by double-clicking on an existing chord. By default when you are inserting or moving chords, they snap to the nearest quarter note (crotchet) on the grid. By holding down the Alt key, however, you can temporarily increase the resolution of the grid and in this way reach intermediate destinations, an eighth or a sixteenth note to either side.
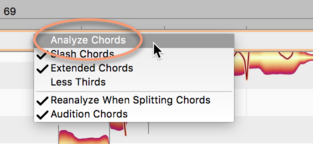
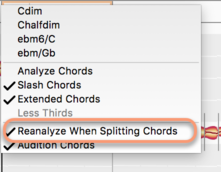
In the context (right-click) menu of the Chord Track, you can decide whether when you introduce a new chord change, a fresh anlysis of the newly created chord halves should take place:
Keyboard shortcuts for editing the chords
The following shortcuts, which are the same as those used for the selection and editing of blobs in the Note Editor, allow you more swiftly to enter and edit the chords to be displayed. If you wish, you can change the shortcut assignments in the Preferences dialog.
- Shift-click and Cmd-click: Extend the chord selection
- [Left/Right Arrow]: Select previous/next chord
- Shift+[Left/Right Arrow]: Extend selection to include previous/next chord
- [Up/Down Arrow]: Switch between alternate chord designations (as described above)
- Cmd+[Up/Down Arrow]: Shift the chord up or down diatonically i.e. using only the notes of the current scale, so major intervals are replaced where necessary with minor ones and vice versa to suit the key. For example, if the key is A minor and the chord selected is C major. After pressing Cmd+[Up Arrow], this will become D minor (not D major, which is not found in the key of A minor). If, on the other hand, the key were E minor, selecting a C major followed by Cmd+[Up Arrow] would produce D major. In this case, the quality of the chord (e.g. the type of triad) would not change.
- Shift Cmd[Up/Down Arrow]: Transpose the chord chromatically upwards without regard to the key. So C major becomes C# major, followed by D major, then D# major etc. So the quality of the chord does not change: major chords remain major, minor chords remain minor.
By editing the Chord Track in this way, you are not (initially) changing the recorded music. However, such changes to the Chord Track will make a difference when you come to edit the notes, if you select “Chord” or “Chord Scale” as the Pitch Grid.
Auditioning chords
In the Context (right-click) menu of the Chord Track, you will find an option to audition the chords:
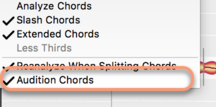
If this option is activated, as you step through the chords with the arrow keys or alter them through text input or using the keyboard shortcuts, you will hear the chords in question played with a guitar sample.
Chord symbol conventions
Melodyne’s Preferences dialog allows you to choose the chord symbol conventions used in the Chord Track. There are various conventions in common use and Melodyne is familiar with all of them. Some musicians, for example, write “Cm” to indicate a chord of C minor, whilst others prefer “C-” or “c-”.
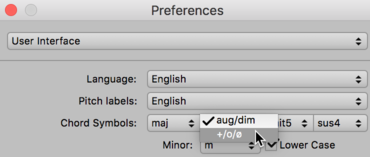
Even though you may have chosen a particular format (e.g. “c-”) for the display, you can still use a different convention (e.g. “Cm”) to input the data; Melodyne will simply translate “Cm” into “c-” for you. This is particularly useful if you have opted for a convention that involves special characters that are awkward to type in. In the Preferences dialog, you could specify, for example, that a chord of F major with a major seventh should be displayed as “F∆7”, but use a format that is easier to type (such as “F maj 7”) when entering chords in the Chord Track.
As well as choosing a naming convention for the display, you can also influence the complexity of the chords. For certain musical genres, you may prefer to make the lead sheet easier to read. The context (right-click) menu of the Chord Track offers the following options:
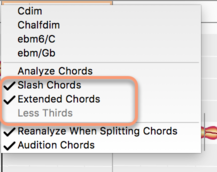
Slash Chords
If the guitarist is playing a chord of C major, for example, but the note sounding in the bass is not C but G, then – even though this does not change the chord (since the note G does appear in the chord of C major) – you may still feel it is important for the notation to take account of this fact using the familiar “slash chord” notation: C/G (i.e. C major with a G in the bass).
If you check this option, this convention will be used throughout the track.
Expanded chords
If you check this option, Melodyne finds expanded chords (such as those common in jazz). If the option is cleared, a simpler description will be preferred. For example, if the chord in question is C Major but a D is sounding at the same time. D is the ninth of a C major chord, so an exact description of the chord would be “Cadd9”. In this case, though, it would be a perfectly legitimate simplification to just write “C major” in the lead sheet. This would in any case have no effect (initially) upon the music itself. Whether or not this option is checked could have implications, but only on the manner in which you edit notes later on. (The editing of the notes in the chord context is dealt with in the next tour).
Less Thirds
Melodyne adds thirds in the course of the chord detection even when none were played, which is usually very helpful. But in the blues genre, for example, the musicians often omit thirds on purpose and in such cases the addition of thirds is undesirable. If you check this option, the added thirds are hidden. Thirds that were actually played, however, remain unaffected and are always shown. If no added thirds are present, this option is grayed out.
MIDI export of the chords as a lead sheet
In the Export dialog, you can select the option “Lead Sheet” in order to save a MIDI file in which the chord sequence of your song is displayed in the form of the corresponding MIDI notes.
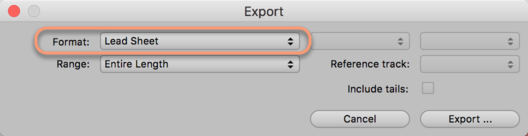
Typical applications: Transferring the chords to a notation program, or loading the MIDI file into your DAW as the starting point for the addition of synthesizer or sampler tracks.
The Key Track and key changes
The methodology for editing the Key Track is basically the same as that just described for the Chord Track.
The only real difference is that the context (right-click) menu has fewer entries:
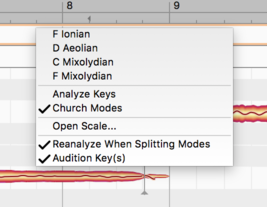
- The upper area offers you alternatives to the detected key.
- Analyze Key: This triggers a new detection of the key.
- Church Modes: Uses the church modes (Dorian, Phrygian etc.)
- Open Scale: Opens a separate window to let you select a key.
- Conduct New Analysis after Slicing Modes: By double-clicking in the Key Track, you can slice an existing segment in two, or merge two segments. This option determines whether or not a fresh analysis of the key of the segment or segments involved should be carried out automatically whenever you slice or merge segments in this way.
The Key Track and the Scale Ruler
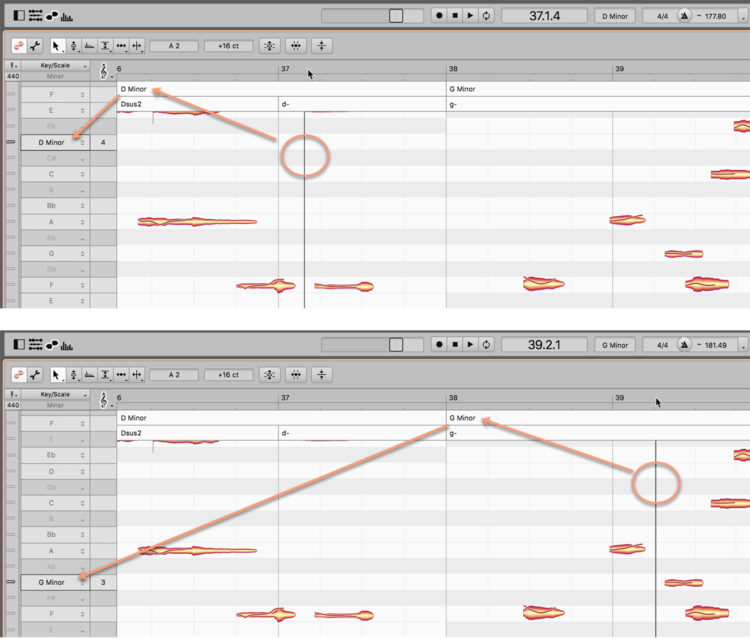
The Scale Ruler (the left-hand margin of the Note Editor) invariably displays a key, for which numerous variations are possible. If your song contains key changes, which scale is displayed will depend upon the playback position:
Chords and keys in Note Assignment Mode
In Note Assignment Mode, you do not see a shared Chord Track for the entire song, as is the case in normal Edit Mode, but only the chords played by the instrument you are examining.
If, in Note Assignment Mode, you make changes to the blobs using the Activation Tool and subsequently trigger a new analysis, the chords may change.
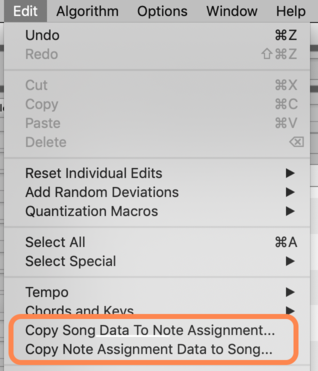
For this reason, we speak in the one case of “project chords” that relate to the entire song and in the other of “file chords”, which are only visible in Note Assignment Mode and relate only to the instrument in question. In the Edit menu, you will find commands that allow you to replace file chords with project chords, and vice versa.
It is the same with the keys: The song has a common Key Track (“Project Scale”), whereas what you see in Note Assignment Mode in each case is the current “File Scale”.