Melodyne in Live
This tour shows you how to make efficient use of Melodyne within Ableton Live.
Loading the Melodyne plug-in
Load Melodyne as an insert effect into one of the audio tracks of the Live mixer. You will find the Melodyne Plugin in the Live browser under ‘Plug-Ins’ in the Melodyne or Celemony/Melodyne folder.
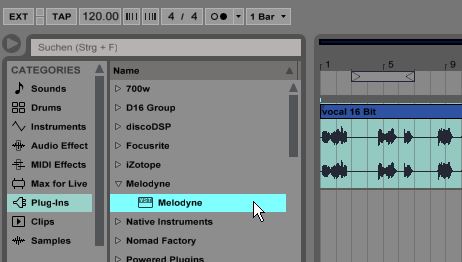
You are advised, as a rule, to use Melodyne as the first plug-in in a track – i.e. before the compressor, EQ or other effects. The reason is this: during the transfer, Melodyne records the input signal you intend to edit – and with it all effects ahead of it in the signal chain, which are then frozen into the signal and can no longer be adjusted. In order to use your compressor, EQ and other effects in the usual way, you therefore need to make sure they are inserted after the Melodyne Plugin in the signal chain.
Melodyne in Live’s Session View
If you are using Melodyne in Live’s Arrangement View, you can transfer audio to Melodyne, edit it and play back the results using exactly the same procedures as with any other DAW, all of which are described in our online user manual. However, Live also offers a Session View, and if you wish to use Melodyne in it, you should bear the following points in mind:
In Session view, Melodyne can sometimes be heard in the wrong places or not at all. Furthermore, Melodyne ignores clip changes in Session View and does not record transfers in the correct places. All these phenomena stem from the principles upon which Live operates and its special way of handling time. The clips in Session View represent small loops within the linear running time of the Arrangement in Live. It is from this Arrangement time that Melodyne derives its timing information; Melodyne is not informed about loops hidden within clips. Schematically, the picture looks like this:
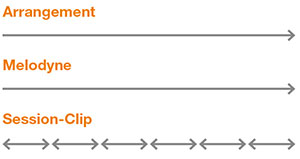
Whilst the clip is still cycling within in the loop, Melodyne has long since moved on. If you nonetheless do wish to use Melodyne with clips in the Session View, you should activate Live’s global (Arrangement-) loop and set it to the length of the clip that you wish to edit with the plug-in in Session View. Then the loop of the linear time (and therefore also of Melodyne’s time) will correspond to the loop of the clip to be edited:
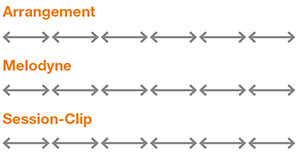
The upshot of all this is that it is impossible to record and subsequently play back the switching of clips on a track in Melodyne in any sensible way: if you switch clips during the transfer, Melodyne will still record the contents, but do so along the linear time axis that is determined by the arrangement. And the contents will be played back accordingly. It is therefore not possible to reproduce in Melodyne clip changes implemented in Live’s Session View, as Melodyne is always guided by Live’s linear Arrangement Time rather by that of individual clips.
You are therefore recommended to use Melodyne only when working in Live’s Arrangement View. But you would presumably do this anyway when editing vocals or other instruments. Besides which, Live offers user-friendly functions for transforming clips into building blocks of the arrangement, editing them there in Melodyne and then rendering them once more as clips.
Backing up and exchanging projects
During the transfer, Melodyne captures the track’s signal, creating recordings of the corresponding passages. The resulting audio files are stored in a transfers folder of their own that you create in Melodyne’s Project Browser. It makes sense to create a transfers folder like this within the project folder of each Live project. Then, in the Project Browser of the first Melodyne instance that you create in each project, choose “Set Path for Transfers” from the settings menu and navigate to that folder.
Following this procedure ensures that when archiving or passing on your work, all the files you need will be in your project folder and not elsewhere on your computer.
If you are saving a copy of your Live project to another location, after doing so you should immediately open the copy followed by an instance of Melodyne within it. Then, from the settings menu of Melodyne’s Project Browser, choose “Set Path for Transfers” and navigate to the newly copied transfers folder before saving your Live project.
If you didn’t set the transfer path prior to the first transfer, you can do so at any time later. Melodyne will automatically gather the data for the tracks already edited and move it to the storage location you have chosen.
When archiving and passing on projects, you do not need to worry about Melodyne’s audio cache, the size and location of which can be selected from Melodyne’s Preferences dialog. Melodyne will automatically restore the parameters found there, so there is no need to archive or copy them separately.
Duplicating tracks
Sometimes you may want to copy a track including its Melodyne instance and Melodyne editing – in order, for instance, to generate a second voice. To do this, right-click on the “Duplicate” command in the mixer or audio track area.

Saving plug-in settings for Melodyne
Just as with an effects plug-in you can store different settings as presets, in Melodyne you can save different edits. You may wish to do this in order, for example, to allow a performer or artist to hear and choose between different edits of the same take. To save and reload Melodyne settings, follow the same procedures as for all other plug-ins.
Use for the purpose within the relevant effects chain the preset manager for the Melodyne plug-in. Save your current settings using the corresponding symbol and assign a name. You can store alternative edits as additional presets and switch between them using the preset selector.
Bouncing/printing Melodyne edits (freezing/flattening)
When you are using Melodyne in a project and have finished editing, you have two choices:
i) You can allow the Melodyne instance(s) to remain active until the final mixdown. If you do this, you will retain access to your Melodyne editing and will be able to make further refinements up until the very last moment. This is convenient, but as long as the plug-in remains active it is draining the resources of your system.
ii) You can transform your Melodyne edits into new audio files. This will deprive you of further access to your Melodyne editing but free up resources, as the plug-in will no longer be in use. Turning your Melodyne edits into new audio files has the further advantage of allowing you to pass projects on to colleagues who don’t have Melodyne.
To transform a clip edited using Melodyne into a new audio file in Live, either of two techniques suggest themselves: one is simply to ‘freeze’ the track in question and the other to ‘freeze’ and then ‘flatten’ it.
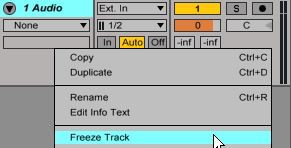
"Freeze Track": With this option, which you will find in the track’s context menu, you can transform temporarily your Melodyne editing and any subsequent insert effects into audio. The advantage? The track is now a pure audio track and Melodyne is inactive, freeing up resources. Furthermore, you can unfreeze the track (also from the context menu) at any time in order to modify your Melodyne editing. The disadvantage? Any additional insert effects are also frozen and cannot therefore be modified either without unfreezing the track. Similarly, it is impossible to add new effects to the track while it is frozen. Freezing a track is best used, therefore, as a quick temporary measure designed to economize on resources rather than as a permanent solution.
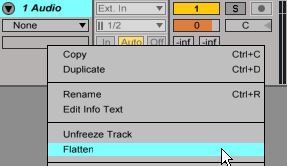
"Flatten": If, rather than merely freezing a Melodyne track temporarily, you wish to transform it permanently into a new audio file, after freezing it you should select ‘Flatten’ from the track’s context menu. This command transforms the frozen track into a normal audio track reflecting permanently the result not only of your Melodyne editing but also of any effects that follow it in the signal chain. To avoid these insert effects being flattened along with your Melodyne editing and to make it possible to modify them later, before freezing and flattening the track, you should remove from it the insert effects in question (e.g. by dragging them to an empty track). Once the flattening process is complete, you can drag the effects back onto the Melodyne track and use them as freely as before.
Constant tempo and tempo automation
When you have set a constant tempo in Live – changed from 120 BPM to 124 BPM, for example – in Melodyne, when you next start playback, the button next to the Tempo display will flash to indicate that your attention is needed.

Click this button to open the Tempo window.

Select “Constant” (the option “Variable” is not supported by Live) and place a checkmark to stretch or squeeze the audio signal. Then exit with “OK” to make your choice effective.
Important: If you work with variable tempo (by automating the song tempo in the master track within Live’s Arrangement View), Melodyne and Live will no longer run in sync or the transfer may break off prematurely. One workaround for this consists in transferring all tracks without any tempo changes to Melodyne first and then rendering the tracks edited with Melodyne, before using the tempo automation.
Miscellaneous notes
Buffer size
We recommend an audio buffer size of 1,024 samples. Smaller values lead to a marked increase in the CPU load.
Should you require a smaller buffer, e.g. when adjusting the headphone mix directly in your computer and not via an external channel strip or mixer, switch all instances of Melodyne during the recording to bypass. Reactivate Melodyne as soon as you begin editing your new track.
Time signature changes
Melodyne not only follows the time, as described above, but also the timeline of the Live arrangement. If you are working on the clip level, however, with different time signatures and insert these clips into the arrangement, discrepancies can arise between what is heard and the time signatures displayed. The problem here, however, is purely a visual one; the correctness of the audio output and editing functions of Melodyne, including the quantization, are in no way compromised by it.