Inserting and preparing to use Melodyne
-
Melodyne in Logic Pro X– Learn here how the ARA integration in Logic works, what you may need to consider and how your workflow benefits from all this. Melodyne studio, smaller editions may differ.

The following tour will show you how to integrate Melodyne into your Logic song.
ARA in Logic on Apple Silicon: Melodyne 5.2 or higher runs natively on Apple Silicon Macs. In the case of ARA operation in Logic Pro, however, there’s a special point to bear in mind:
When Apple Logic Pro is run natively on Apple Silicon, it runs Audio Unit plug-ins outside Logic’s own process space. This is actually an important advantage for users, as it prevents Logic from quitting whenever a plug-in crashes. Unfortunately, although this method of hosting AU plug-ins enhances stability, it does not yet fully support third-party extensions like ARA.
If you want to enjoy the advantages of ARA despite this, you can open Logic under the Rosetta emulation layer (using the Finder, locate Logic in your Applications folder and right-click on it, choose “Get Info” and check the option “Open using Rosetta”). This will allow plug-ins to run directly within Logic, as they did formerly on Intel Macs, making it possible once again for you to work with ARA.
We are working closely with Apple on this issue and will let you know immediately as soon as there is any news.
Loading Melodyne
Insert Melodyne into the first slot of a channel strip. In the selection menu, you can see two implementations – one with, the other without, ARA.
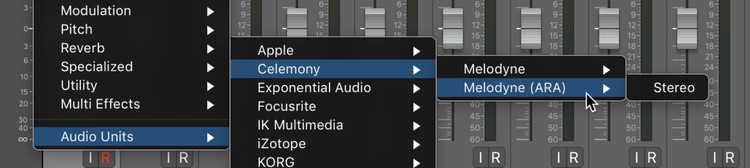
In what follows, we describe the use of “Melodyne (ARA)”. This applies to all passages relating to Logic Pro X. On the few occasions where we are referring to the non-ARA plug-in, this is expressly indicated in the text.
Select the desired track in Logic and insert “Melodyne (ARA)” into the first slot. When Melodyne is first launched, this window will be empty. Now press Play in Logic to initiate communication between Logic and Melodyne. Shortly after the execution of the Play command, you will see the contents of the Logic track in Melodyne and can begin at once editing the notes. Without ARA, you would at this point have had to play through the entire track. Instead of that rather protracted process, it is enough now to press the Play button once.
You can insert Melodyne (ARA) into as many tracks as you like simultaneously. To do this, select the corresponding channel strips in the Logic mixer (holding down the Cmd key as you do so) and insert “Melodyne (ARA)” into any one of the selected tracks. Multiple windows (one for each track) will then open, and as soon as you press Play, each will be filled with the contents of the track to which it corresponds.
But bear in mind that for the Melodyne window to display the right notes, you must select the corresponding track before inserting the Melodyne plug-in; if you adopt the workflow described above, you will do this automatically. The Logic mixer does, however, allow you the option of inserting plug-ins into a track that is not currently selected. In this case, though, the Melodyne window will be empty. If you do happen to make this mistake, proceed as follows:
- Close the “wrong” window
- Select the track in question in the mixer
- Open the window again (by clicking on the corresponding insert slot)
In the Melodyne studio edition, you have the further option of selecting from within Melodyne the track(s) you wish to see and edit there:
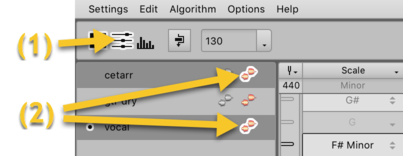
To do this, open the Track view (1) and fill the Melodyne window by clicking the edit button (2) of each of the tracks you wish to edit.
Multi-window vs. single window operation
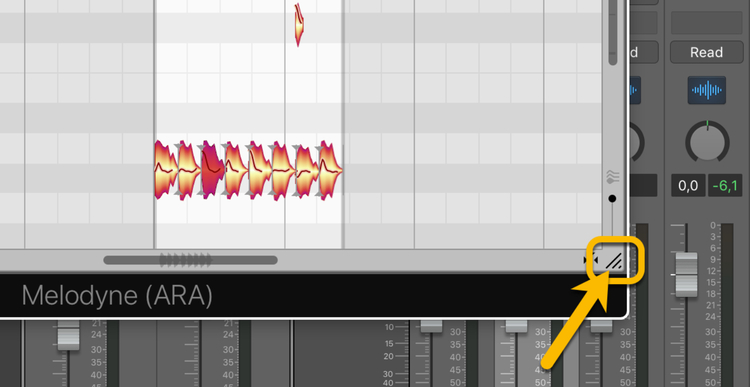
Like other plug-ins with which you are no doubt familiar, Melodyne opens a separate window for each track into which it is inserted.
You can position and resize these Melodyne windows at will. To resize them, however, instead of dragging the outer edges or corners of the windows, click on the place indicated by the three small lines in the bottom right-hand corner and drag from there:
To avoid an avalanche of windows, use the Link function in Logic (the chain at the top right of the plug-in window). Then only a single window, the contents of which will adjust automatically to the track selection, will appear.
Alternatively, you can use the shortcut “V”, which causes all open windows to vanish immediately; pressing “V” again will cause them to reappear in their most recent configuration and order.
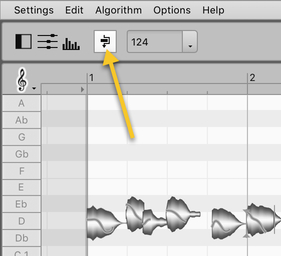
The Compare switch
When working in Melodyne, you will constantly be wanting to compare the current state of the edited recording with the original audio file. To do this, rather than the plug-in bypass switch in Logic, use the Compare switch in Melodyne.
This will reset the notes – not only acoustically but also visually – to their pre-edited state This lets you see at a glance which notes have, and which have not, been affected by your editing.
If you then decide that specific aspects of your editing have been a little heavy-handed, use the flexible possibilities of the “Reset Individual Edits” commands described here to repair the damage.
The Compare switch invariably affects all tracks governed by Melodyne, regardless of which track you are currently looking at in the Note Editor. The entire song is then temporarily returned to the state it was in before you began modifying notes with Melodyne.
Tip: Working with long files
With ARA, Melodyne always analyzes in its entirety the audio file that is being referenced by a region, even if you have narrowed the region’s boundaries before using Melodyne. This has several advantages. It allows you, for instance, to widen the region boundaries again later without any further analysis by Melodyne being required.
It does mean, however, that there can be a noticeable hold-up when Melodyne is first used on a region; this would be the case, for example, if the audio file being referenced by the region was a live recording lasting several hours (which Melodyne would analyze with the Polyphonic algorithm).
So if you just want to edit part of such a recording, we recommend that, before you begin editing with Melodyne, you convert the passage in question into a new audio file (Edit>Convert>Audio Regions to New Audiofiles). This will create a new region and also a new, shorter audio file that Melodyne can analyze that much faster.
First thing after loading a song: Hit “Play” at least once
Due to the different architecture of Logic and Melodyne, there might occur a problem, so we recommend the following procedure:
After opening an existing Logic project, the first thing to do is to hit “Play” once. Because even if this project contains Melodyne edits, which you saved some other day, Melodyne will – upon loading today – first show the notes in their original, non-edited state. As if Melodyne “forgot” its edits, but don’t worry: A “Play” command will update the Melodyne display to the state you had, when you saved the edited song the other day.
However, if after loading a song, you work too long with the song being stopped, this may lead under special circumstances to the loss of Melodyne edits. Therefore, take this as a golden rule to avoid any loss of data:
Load > Play > Stop
This is especially true for the following scenarios:
- You open a song and want to save a copy of it with the “Save As”-command. Then you need to press Play once, before using “Save As”, otherwise the new project would contain wrong Melodyne information.
- You open a song, realize that this is not the song you intended to work with, and open another song right away. So far, no problem, yet. But if you open a song AND change anything in Logic (e.g. renaming a track) AND you never ever hit “Play” AND you close the song again AND you answer the following dialog with “Save”: Well, then you may have lost important Melodyne edits (which you then need to restore with Time Machine or other backup strategies).
- The row of actions described above seems to be pretty much unlikely. But if you make use of the “Auto Save” function in Logic, this could have a similar effect. Therefore always remember: Load > Play > Stop, then you are always on the safe side. And, of course, deactivating “Auto Save” is an additional safety net.
Saving, archiving and passing on your songs
Thanks to ARA, when saving and archiving your work, it is not necessary to give special thought to Melodyne, because all the files used by Melodyne (which it will need again when the song is next opened) are stored in the Logic project. It makes no difference here whether you store your work as a project or as a folder: in either case, all the Melodyne-relevant data is automatically included.
If, however, you are passing on your Logic project to third parties – for remixing, for example – you do then need to make sure that the recipient also has at their disposal Version 4.2 (or higher) of Melodyne. Which actual edition of Melodyne the recipient possesses is not relevant. If, for example, they only possess the “small” Melodyne essential, where you have been working with the “big” Melodyne studio, they will still hear all your Melodyne editing exactly as if they too had the studio edition. Naturally, if they propose to modify or add to your Melodyne editing of the song, they will be limited in in the actions they can perform to the function set of the edition they possess.
If not, it cannot hurt to bounce your tracks before sharing your work with others. This may be advisable for other reasons too, such as any use you may have made in your project of third-party plug-ins.