Correct Pitch Macro
-
The Tuning Tools– How the tools for pitch-center, -modulation and -drift interact and are best used in practice. Shown here: Melodyne 5 studio, smaller editions may differ.

The Correct Pitch Macro is used to rectify poor intonation quickly and intelligently and rein in any undue wavering in pitch.
Opening and using the macro
Select the notes you wish to edit. If no notes are selected, macro editing will by default affect all notes.
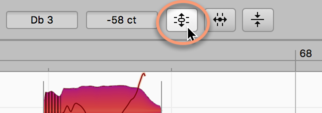
To open the macro, choose Edit > Quantization Macros > Correct Pitch or click on this button at the top of the Note Editor.
Here, with the upper slider, you can apply a degree of correction ranging in intensity from 0% (no influence) to 100% (full power) to the pitch center of the notes selected. By default, such notes are moved towards, or to, the nearest semitone:
If you prefer, however, you can have the notes snap to the nearest degree of the current scale or (if chords have already been defined) to the nearest member of the current chord; in either of these cases, check the option “Snap to Chord Scale”.
Depending upon the position of the intensity slider, the notes will then snap all, or part of, the way to the corresponding pitches.
The macro works in a musically intelligent manner: At lower settings it affects only those notes that are wildly out of tune, leaving untouched those that are already quite close to the intended pitch. As the slider is moved further towards the right, however, even those notes are influenced, and to an increasing degree, until at 100% all the selected notes are exactly in tune.
The pitch center, which the macro adjusts automatically, is the same parameter that is modified when pitch correction is performed manually using the Pitch Tool.
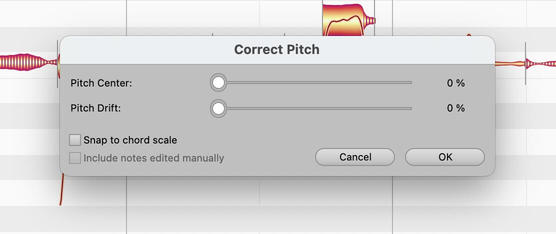
With the lower slider, you can progressively reduce the amount of pitch drift exhibited by the notes in question. By “pitch drift”, we mean the kind of slow wavering in pitch that is symptomatic of poor technique. More rapid fluctuations in pitch, such as pitch modulation or vibrato, remain unaffected.
You can modify both correction parameters in real time as the audio plays back; and hear, but also see (by the movement of the blobs in the Note Editor, the effect of different settings.
If you have already fine-tuned some notes using the Pitch Tool, Melodyne will assume you are satisfied with the results; this means that, by default, if you now open the Correct Pitch Macro with no notes selected and begin making changes, only the other notes will be affected. By default, in other words, notes that have been tuned manually are not affected by the macro. If you wish the pitch of these too to be affected by the macro, check ‘Include notes fine-tuned manually’. The option is grayed out, of course, as being of no relevance, if no manual editing of intonation has been performed.
Closing the macro and correction values when it is reopened
Exit with OK to keep your changes or Cancel to discard them. Naturally the fact that you have used the Correct Pitch Macro in no way precludes your fine-tuning notes at any time subsequently by hand.
If you select a note that has already been edited using the macro and then open the macro again, the settings previously applied to it will be displayed; the macro remembers, in other words, the parameters previously applied to each note. If the current selection includes notes to which different settings have been applied, when it is opened the minimum and maximum values for each parameter will be displayed.
Even after exiting with OK, you can still reverse the effects of the macro editing by using the undo function.
The Correct Pitch macro and sibilants
When the algorithm Melodic (the usual choice for vocals) is selected, Melodyne detects and marks what it defines broadly as “sibilants”. In the case of vocals, these include not only fricative consonants and digraphs such as “s”, “z”, “ch” and “zh”, but also word fragments like “k” and “t”, as well as the sound of the vocalist inhaling or exhaling between words. Whilst such sibilants do move upwards or downwards in the display under the effects of the macro, acoustically they remain unaltered.
By transposing only the pitched components of the sound in this way, the macro is able to maintain optimum sound quality throughout; to alter the frequency of sibilants would sound unnatural. But if, as a special effect, you ever do wish to apply pitch shifting to sibilants, this can be done manually using the Pitch Tool, as is described in detail here.