Multitrack editing
- • Multi-tracking in Melodyne
- • Differences between the stand-alone and plug-in implementations
- • The track headers
- • The Track Inspector in the stand-alone implementation
- • The Editing Mix Fader
- • The track pane and working with tracks in the stand-alone implementation
- • Copying between documents, tracks and instances
- • "Spread Unison Tracks"
-
Editing multiple tracks simultaneously– Display and edit as many tracks as you like simultaneously, so each note can be seen in context.

In Melodyne studio, you can work with multiple tracks – in both the stand-alone and plug-in implementations. You can move from track to track with the utmost ease, and even see and edit simultaneously notes belonging to different tracks.
Multi-tracking in Melodyne
In Melodyne, multi-tracking has a particular meaning, because here you are working not simply with audio files but with notes. For this reason, it is in the Note Editor that Melodyne’s multi-tracking comes into its own.
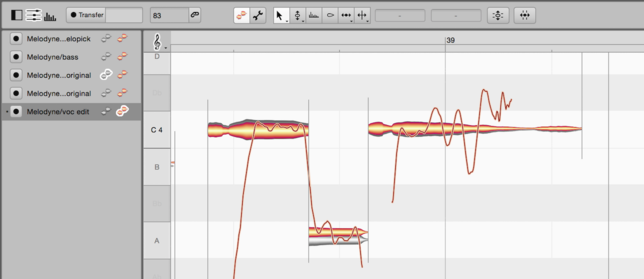
Consider the case where you have one track containing vocals and a second track with a guitar accompaniment. As soon as you switch the vocal track to edit mode, the notes of which it is composed appear in the Note Editor. Now, if you switch the guitar track to reference mode, its notes, too, are displayed in the Note Editor. The guitar blobs in this case are gray and can neither be selected nor edited. They are simply displayed for the purpose of orientation in the background to the vocal notes. This makes following the melody child’s play.
What happens if, while you are editing the vocal track, you notice something on the guitar track that you would like to alter? No problem. Just switch the guitar track to edit mode or double-click one of the gray blobs and immediately the two tracks will swap roles: it will be the guitar blobs that are colored and capable of being edited while the vocal blobs are displayed in gray in the background.
And you can change tracks on the fly like this while working with any number of reference tracks. This makes it very easy for you to edit your audio material in the desired context not only acoustically but also visually. In this, you are supported by intelligent monitoring that allows you to control the volume ratios between the edited track, the reference tracks and all other tracks. Whenever you break off editing one track to edit another, the volume mix adjusts automatically.
But these are by no means all Melodyne’s multi-tracking capabilities: If you wish, you can even switch several tracks to edit mode at the same time, selecting, editing, deleting and copying notes across tracks. This is the case in both the stand-alone and plug-in implementations of Melodyne.
In the following sections, we will set out in detail the concepts underlying multi-tracking in Melodyne and show how to take full advantage of the possibilities it affords.
Differences between the stand-alone and plug-in implementations
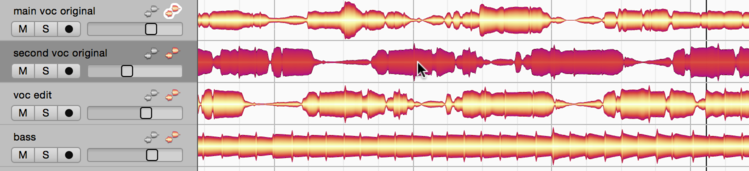
When Melodyne is running as a stand-alone application, multiple tracks are displayed in much the same way as in most DAWs: There is a list of track headers in the left-hand pane, with the audio files belonging to each track to the right of them.
In the plug-in implementation of Melodyne, multi-tracking is implemented as a collaboration between the DAW and the various instances of Melodyne. There, too, there is a list of headers on the left. In it, you will see which instance of the Melodyne plug-in is currently open, as well as any others inserted in the tracks of the current project. The idea behind this is to allow you to work at all times in one Melodyne plug-in window only, whilst being able to see and edit the contents of all instances.
In the plug-in, there is no track pane containing audio material, since the audio material is already present on the tracks of the DAW. All you see, then, is the list of instances and the Note Editor.
The track headers
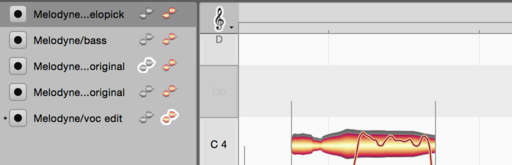
In the stand-alone implementation: Each track header displays the name of the track and a volume fader along with mute, solo and record enable buttons. The solo function is only ever active in the track whose solo button was clicked most recently. Hold down the [Command] key to solo multiple tracks. You can rename the track via the Track menu, the context menu in the track header pane, or the Track Inspector, which is described in the next section.
The colored blob icon in the track header is the edit button, which causes the notes to be displayed in the Note Editor. Double-clicking on the contents of a track in the track pane has the same effect. If you click the edit button or double-click in the track region of another track, its notes will replace those of the first track in the Note Editor.
If you hold down the [Command] key now and click on the edit button of another track, the notes of this track too will be displayed as colored blobs in the Note Editor. You will then be able, if you wish, to select and edit the notes of both tracks simultaneously. Proceed in the same way to add the contents of further tracks to the Note Editor. Clicking on an edit button that it is already active removes the contents of the respective track from the Note Editor.
The gray blob icon in the header is the reference button that causes the notes of a track to be displayed in the Note Editor for reference purposes only. The resulting gray blobs can neither be selected nor edited. They are there in this case solely for purposes of orientation– for instance, to facilitate adjustments in pitch or timing. By clicking on further reference buttons, you can add the contents of further tracks to the Note Editor – again, purely for reference purposes – and remove them in the same way.
If you switch a reference track to edit mode – either by clicking its edit button in the track header or by double-clicking one of the gray blobs currently displayed for reference – the gray track will turn orange and the track that was previously orange, gray. Putting it another way: the two tracks will swap roles.
Right-clicking in the header opens a context menu offering the same commands as the main Track menu.
You can change the order in which tracks appear by dragging the track headers upwards or downwards as desired.
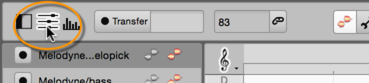
In the plug-in: You see a header for every instance of Melodyne that you have opened in your project. There are no mute or solo buttons and no volume fader in the header, as these functions are already provided by your DAW. Instead you will see a Transfer button for every instance, and you can transfer-enable as many instances as you like swiftly from a single plug-in window.
The edit and reference buttons work in exactly the same way as in the stand-alone implementation and determine which contents in the Note Editor are available for editing and which displayed purely for reference. You can switch freely between the contents of the instances and, as in the stand-alone implementation, edit the contents of multiple instances simultaneously – e. g. by selecting and copying across tracks. All the time you can be working in the same Melodyne window; there is no need to switch to the window of another instance or open a second window. A small star on the left near the track title shows you, for the purpose of orientation, to which Melodyne instance the window in which you are working at any given moment belongs.
To leave more room for the info pane or Note Editor, you can hide the header pane in the plug-in by clicking the corresponding symbol, and show it again in the same way.
In the stand-alone implementation and with certain DAWs, you can rename tracks by right-clicking on the track header and choosing Rename Track from the context menu.
You will find this option grayed out, however, if your DAW is one that passes on track names to Melodyne, as the correct name will then already be displayed in the track header.
Similarly, with certain DAWS, as in the stand-alone implementation, you can change the order in which the tracks are displayed by dragging the track headers upwards or downwards.
This option, again, is grayed out if your DAW has passed on to Melodyne the order of tracks, as they will then already be displayed in the correct order.
The Track Inspector in the stand-alone implementation
The info pane of the stand-alone implementation offers access to the Track Inspector.
The Track Inspector has the same settings as the track header plus a few additional parameters:
- The title field: This can be used to rename the track.
- The volume fader: This corresponds to the fader in the track header. A text box below the fader allows you to set the volume by typing in a new value or clicking on and dragging the existing one.
- The Pan pot: To move the track in question to the left or right in the stereo field, click the knob and drag downwards or upwards respectively or else type in a value.
- Mute, solo and record enable buttons: These work in exactly the same way as their counterparts in the track header.
- Pop-up buttons for selecting the track’s input (for recording) and output. If you are working with a multi-channel audio interface, you can use these to select the inputs and outputs for your tracks.
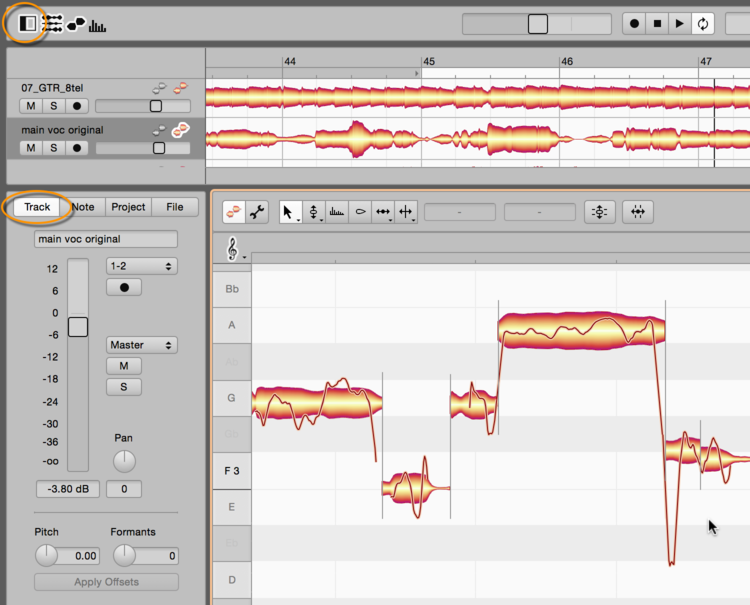
The Pitch and Formants knobs offer you a quick way of shifting the pitch or formants of the entire track. Initially, any changes you make here are merely ‘superficial’ and are not reflected by the blobs in the Note Editor. If you want to adopt them as actual edits, click the Apply Offsets button below. The pitch of the notes and/or their formants will then be shifted in line with your settings and the changes will be reflected in the blobs.
When the offsets are applied and made permanent, the pitch or formant shifts in question will sound better than they did when they were superficial and temporary. For this reason, you should use the Pitch and Formant knobs simply to find suitable values quickly, but then apply them, so that the shifting in question can be properly implemented. Once their values have been applied, both knobs revert to their zero positions.
You can reset all the above-mentioned parameters to their default values by [Command] double-clicking their respective fields in the inspector.

The Track Inspector refers to one or several selected tracks. The control elements act upon all selected tracks simultaneously.
Where two or more selected tracks have different values for the same parameter, a dash is displayed in the corresponding field. When these values are increased or decreased using the mouse, the ratios between tracks are maintained, the changes being relative. This is so even if, without releasing the mouse button, you touch on the upper or lower limits of the range before returning to some intermediate value. Only if you release the mouse button at the top or bottom of the range and then resume dragging, do the values of the selected tracks become uniform.
It is different if you type in the values. In this case, the value entered is adopted by all the selected tracks. If, for instance, in the volume field you enter “+2”, the volume of all the selected tracks will be set to +2 dB.
The Editing Mix Fader
When you are editing the notes of several tracks simultaneously in the Note Editor, the Editing Mix Fader is of great assistance. Our intention here was to provide you with the acoustic equivalent of focusing visually on particular blobs: when you are editing a track, you want to be able to concentrate entirely upon that track and not be distracted by others. Visually, that is easy to accomplish: You simply select one or two tracks to edit, show perhaps two or three others tracks in the Note Editor for reference, and hide the rest.
Acoustically, a similar focus is difficult to achieve. Naturally, you could solo the tracks being edited, but then you would lose the very reference that could best help you assess the intonation and timing of the tracks being edited. Ideally in this situation you would be able to employ an alternative mix: the track being edited would be the loudest; the tracks shown as reference would be somewhat quieter, and other tracks, quieter still or completely inaudible. You could accomplish this, of course, with the volume controls of the individual tracks, but the Editing Mix Fader makes it far easier.
If you move the Editing Mix Fader all the way to the left, you will hear only the track or tracks currently activated for editing in the Note Editor – in other words, the ones with the orange blobs. As you move the fader button gradually towards the center, the gray blobs displayed for reference will gradually become louder, until at the center position the colored and gray blobs will be equally loud. As you now move the button from the center position towards the right, the remaining tracks – i. e. those included in the arrangement but not displayed in the Note Editor – will gradually fade in.
In this way, you can quickly and easily arrive at the ideal acoustic balance between the notes displayed for editing, those displayed for reference, and the rest of the arrangement.
Please note that the soloing and muting of tracks also effects the mix: Tracks that are displayed for reference or editing in the Note Editor but switched to mute (either directly or because another track has been soloed) are nonetheless audible when the Editing Mix Fader is between the extreme left and the center of its range. However, as the button is moved from the center towards the extreme right of its range (causing tracks not displayed in the Note Editor to become audible), the tracks switched to mute are faded out, so the soloing of tracks once again functions normally.
As soon as you shift the focus from the Note Editor to the track pane by clicking in the latter, you will hear the entire arrangement once again; this is equivalent to the rightmost setting of the Editing Mix Fader. If you then click a further time in the Note Editor, the volume ratios will once again be determined by the Editing Mix Fader.
In the plug-in, the fader works on the same principle but with one small difference; If you start the DAW playback, the balance between all the tracks will be determined exclusively by the DAW’s own mixer. The Editing Mix Fader only intervenes when the DAW is stopped and you start local playback in Melodyne.
In this case, again, with the button hard left, only the colored blobs will be heard, the gray ones fading in gradually as you move towards the center, and the remaining tracks entering and becoming gradually louder as the button moves ever further to the right. The term ‘remaining tracks’ here, however, includes only those tracks the contents of which have been transferred to Melodyne. To hear literally all the tracks, unless all have been transferred, you must start the playback from within DAW.
The Editing Mix Fader is only operative when the focus is in the Note Editor – i. e. when the Note Editor is the pane clicked most recently. The pane with focus at any given moment is the one delineated by a thin orange frame.
The track pane and working with tracks in the stand-alone implementation
To the right of the track headers is the Melodyne’s track pane, in which the audio files are displayed. Audio files can be opened, dragged and dropped onto the tracks, or recorded directly to them.
A track can contain multiple audio files without Melodyne displaying them as separate regions, clips, segments or the like: On each track, regardless of the number of audio files it comprises, a single waveform is used to display the contents. This is because Melodyne adopts a note-based approach, and you perform typical actions such as transposing or copying segments within a track by selecting and editing in the Note Editor the notes of which they are composed, not by manipulating the segments as such.
The most you can do on the track itself is move its entire contents en bloc. To do this, simply drag the waveform to the left or right. When you release the mouse button, the contents of the track will snap to the selected grid (if active) or else remain where you have dropped them.
There are several ways of transferring audio files to the tracks:
- One is the Import Audio command in the File menu, which is suitable if the audio file is already on your hard disk. A new track will be created and the file positioned at the beginning of the track.
- Another is to drag an audio file from Melodyne’s file browser or the finder or explorer of your computer and drop it in the empty region beneath the existing tracks or onto to one of the latter. In the former case, a new track will be created; in the latter, the new file will be mixed with the existing content. In either case, the grid can be used to assist in the exact positioning of the file. If you wish the start of the file to coincide with the beginning of the track, drop it instead on the track header.
- A third is to record the audio. To do this, select the desired input of your audio interface from the track’s inspector, record enable the track and then commence recording using Melodyne’s transport controls.
Please note that when importing a file, whether from the menu or by drag ‘n’ drop, it is the Auto Stretch button in the Transport pane that determines whether or not the tempo of the new material is adjusted to match the existing content.

If Auto Stretch is active, Melodyne adapts the tempo of the file to that of your project, including any sudden or gradual tempo changes found therein. If Auto Stretch is not active, the tempo of the original source project will be retained; no change will be made, in other words, to the original tempo.
You will find further information on this subject in the tours dealing with tempo detection and tempo editing.
To select a track, either click on its waveform in the track pane or on the header of the track in question. To select multiple tracks, hold down the [Command] or [Shift] keys as you do so. With the [Shift] key, all tracks between the first and the most recently clicked will be included in the selection.
The Track menu, like the context menu in the track header pane, contains the following items:
- New Track: creates a new (empty) track.
- Rename Track: allows you to enter a new name for the track in question.
- Merge Tracks: where two or more tracks are selected and this command executed, the contents of all the selected tracks will be mixed down to a single track, this being whichever of the selected tracks appears first in the track list.
- Duplicate Track: creates a copy of the selected track or tracks, placing in each case the copy beneath the original.
- Delete Track: deletes the selected track or tracks.
- Split Track by Source Files: in certain respects the opposite of Merge Tracks. If a track contains more than one audio file or recording, or if notes from different audio files have been copied to it, this command has the effect of splitting the track and creating for each of the various audio sources a separate new track.
- Split Track by Selection: This command also splits the selected track(s) but on the basis of the notes currently selected in the Note Editor. Example: You select in the Note Editor all instances of Middle C (C4) in a recording and choose this command. Result: All Middle C’s are removed from the original track to a new one.
Copying between documents, tracks and instances
You can copy notes in Melodyne freely between documents, tracks and instances. To copy notes from a track in the stand-alone implementation of Melodyne or an instance of the plug-in to another track or instance respectively, proceed as follows:
- Select the desired notes and choose Copy.
- Select the destination track or instance respectively by clicking its header.
- Position the playback cursor by clicking in the Time Ruler and choose Paste.
To copy notes in the stand-alone implementation from one project to another, proceed as follows:
- Select the desired notes and choose Copy.
- Switch to the destination project and select the desired track e. g. by clicking in its track header.
- Position the cursor by clicking in the Time Ruler and choose Paste.
You will find further information about copying in the tour entitled “Copying notes”.
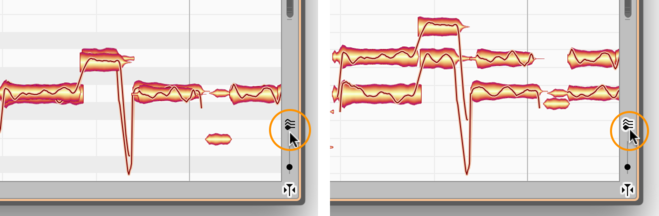
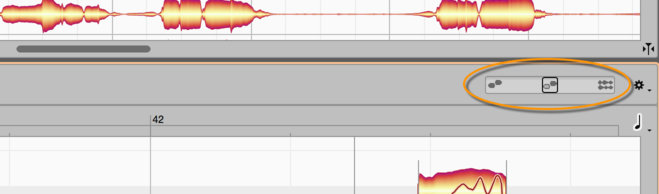
"Spread Unison Tracks"
When you are displaying several tracks simultaneously in the Note Editor, before long you may find certain notes overlapping, making it more difficult to see and edit the material. The switch shown here, which you will find near the bottom right-hand corner of the Note Editor, can be of assistance in such cases. What it does is separate and spread vertically the various tracks shown in the Note Editor – causing them to fan out, in other words – which makes it easier to see and select notes of the same pitch on different tracks. This obviously has no effect upon the actual pitch of the notes in question; only upon the way they are displayed. Since the Pitch Ruler provides only an approximate guide to the pitch of the notes when the tracks are fanned out in this way, the grey and white stripes in the background of the Note Editor (imitating the keyboard of a piano) disappear.
The Spread Unison Tracks switch can only be activated when several tracks are being displayed simultaneously in the Note Editor and their notes overlap.