The Algorithm Inspector
-
Tweaking algorithms– With these adjusting screws you can adapt the algorithm even better to difficult material. Shown here: Melodyne 5 studio, smaller editions may differ.

The Algorithm Inspector in Note Assignment Mode offers you a number of options that allow you to adjust and optimize the way the selected algorithm operates to suit the audio material to be edited.
Whenever Note Assignment Mode is active, the Algorithm Inspector is available in the info pane.

Algorithm: The pop-up button at the top shows the current algorithm. With the menu displayed, you can select a different algorithm from the list, thereby triggering a fresh analysis. Warning: Any time you switch algorithms, all editing previously performed on the audio source in question is lost! For this reason, you should make a habit of checking to make sure the best algorithm has been selected and, if this is not the case, choosing a more suitable one before you begin correcting the analysis or editing notes.
Tip: In the stand-alone implementation of Melodyne, it is possible, prior to switching algorithms, to save the assignment file of the audio source (see below) and, if not satisfied with the new algorithm, reload it. In this case, the previous algorithm – and, with it, all your previous editing of the detection – will be restored; but only of the detection; any normal editing of the notes you may have performed in edit mode will, even in this case, be lost. This is an inevitable consequence of switching algorithms.
The Preview parameters
In the Preview section, you will find the following important options to assist you with the editing of the detection and the fine-tuning of the algorithm parameters.
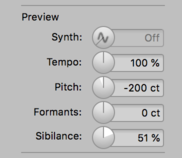
Synth: The objective in Note Assignment Mode is to ensure that the notes displayed really do match the notes intended and played. Since, however, in Note Assignment Mode you are listening to the full original sound of the audio file you plan to edit and editing of the blobs has no audible effect, determining whether notes have been correctly detected is generally only possible on a visual basis. This is where the Monitoring Synth comes in: Using a synthetic tone generator, the Monitoring Synth plays the blobs exactly as they appear, thereby providing you with acoustic as well as visual feedback. You can toggle the synth on and off by clicking on the “Z” icon; click and drag upwards or downwards to control the volume. The Monitoring Synth is not available when the Percussive or Universal algorithms are selected.
Tempo, Pitch and Formants: With these three controls, you can “simulate” changes to the corresponding parameters in order to examine their effect upon the current algorithm settings. Example: you have changed the formant character in the Algorithm Inspector. This change, however, has no effect until you shift the formants in normal edit mode, as in Note Assignment Mode you always hear the original state of the audio source. You would have, therefore, to leave Note Assignment Mode, shift the formants by way of experiment in normal edit mode, and then return to Note Assignment Mode if you felt any further adjustment to the formant character was necessary. The preview controls make such a procedure unnecessary: simply turn the formant control, and you can begin at once experimenting with the character slider without ever leaving Note Assignment Mode. The tempo and pitch controls operate much the same way. The values of all three preview controls only apply temporarily and are reset each time you leave Note Assignment Mode.
NB: When the synth is in use, the controls for pitch and formants are grayed out, as they cannot be used simultaneously.
Sibilance: With this control, you can simulate the effects of the Sibilant Balance Tool. This is useful when your intention is to modify a sibilant range in Note Assignment Mode, as it allows you to hear exactly where the sibilant in question begins and ends. With the Sibilant Preview Control slider at its rightmost extreme, you hear only the sibilant; at its leftmost extreme, it is the other way around: you hear everything except the sibilant areas. If you then notice that a sibilant is still sounding in a pitched zone, or pitched components in a sibilant zone, you know that the boundaries of the sibilant range are not perfectly drawn.
The Algorithm parameters
The other parameters in the Algorithm Inspector relate to the behavior of the algorithm, allowing you to fine-tune it for the entire audio source.
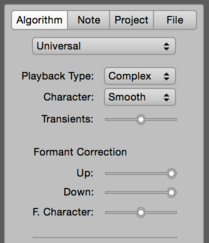
Playback Type: Melodyne applies two different processes for the playback of audio. The Melodic Algorithm employs as standard the playback type “Tonal”, whilst the other algorithms favor “Complex”. These choices are generally the best in practice but you can override them here if you wish.
The difference is most noticeable when time stretching is performed (and also when notes are transposed upwards): material with clearly recognisable pitches generally sounds better with the “Tonal” option. For material in which the pitch of notes is not clear and where noise components are more in evidence better results are generally obtained with “Complex”. Experimenting with the two playback types is therefore most useful when material falls between these two stools. Experiment with the tempo and pitch preview controls to see which playback type is best suited to your needs. Please note, however, that if “Tonal” is selected, the Character, Transients and Formant Character parameters described below are no longer available and therefore grayed out.
Tip: For the playback type “Tonal”, a variation called “Tonal (high)” is also available. If you are working with sopranos or very high-pitched melodic instruments (such as piccolos), instead of “Tonal”, you should try out the variant “Tonal (high)”, as this could enhance the sound quality. Voices or instruments with normal registers, however, are less well served by “Tonal (high)”, so its use in such cases is best avoided.
Character: This is a another pop-up button and allows you to select between a smoother and a crisper playback. If “Crisp” is selected, Melodyne uses a smaller processing window that allows fast acoustic movements in the signal to be reproduced more clearly. This setting is therefore best for percussive sounds and others with many fast tone changes. To soft, sustained sounds, however, the crisper setting can introduce a certain restlessness. To avoid this, opt for “Smooth” which employs a larger processing window and is therefore more suitable for the reproduction of smoother, more gradual tonal transitions.
Transients: This parameter is only available when the Universal and Percussive algorithms are in use. It determines how the transients in the signal should be handled during playback. With the slider fully to the right (the default position in the case of the Percussive algorithm), the transients are clearer and more acute. As the slider is moved to the left, the transients become softer. By default, with the Universal algorithm selected, the slider is in the middle. Experiment to see which setting delivers the best sound with your own material.
Formant Correction Up/Down: Whenever you transpose a note in Melodyne, the formants are automatically corrected to avoid, in the case of vocals, the dreaded “Mickey Mouse” effect. Or, in technical terms, whenever you transpose a note a whole tone upwards, Melodyne automatically corrects the resulting formants by shifting them back down a tone, in this way preserving the original timbre. In the case of the human voice, this is generally what is wanted, but with an acoustic guitar perhaps not: With many sounds, it can add charm if the formants are transposed in parallel with the fundamentals – i.e. not automatically corrected.
The Formants Up and Down sliders are provided, therefore, to allow you to determine the degree of the automatic formant correction – independently for upward and downward transpositions. With the slider all the way to the right, the full 100% formant correction is applied; fully to the left, no automatic formant correction at all is applied. When you return to normal edit mode, you will only hear the effect of these parameters if you shift, or have shifted, the formants of one or more notes in the Note Editor. To simulate and test their effect in Note Assignment Mode, use the pitch controller in the preview section of the Algorithm Inspector. If the current value for this is positive, you will be able to preview the effect of the Up slider; if the current value is negative, you will hear the effect of the Down slider.
F(ormant) Character: When formants are shifted, this slider alters their weighting in the frequency range and therefore alters the sound of the shifted formants. Experiment to see with which setting your material is best reproduced. This parameter has no audible effect when you return to normal edit mode unless and until notes have been transposed in the Note Editor. To simulate and test its effect in Note Assignment Mode, use the formant control in the preview section of the Algorithm Inspector.
The Formant Center parameter is only relevant to the algorithms Universal and Percussive, as the blobs are not sorted by pitch when either of these two algorithms are active, and the formant center is therefore not determined automatically. Not only with the Melodic and Polyphonic but also with the Percussive Pitched algorithm, the formant center is derived from the pitches themselves, so this control is grayed out when any of these algorithms is selected.
Sibilant Handling, Robust Pitch Curve, Separate Audio
Sibilant Handling The Melodic algorithm detects the presence in a recording of what we define broadly as “sibilants”. Included here along with fricative consonants and digraphs like “s”, “z”, “sh” and “zh”, and certain other word fragments such as “t” and “k”, is breath noise, such as the sound of a vocalist inhaling or exhaling between words. Melodyne 5 treats these differently from all other components of the sound when you begin to make pitch or timing adjustments, and the editing sounds more natural as a result. If you prefer, you can decline to give sibilants this special treatment by clearing the checkmark next to “Sibilant Handling”.
For vocals, Sibilant Handling is without question ideal; whether that is equally true of monophonic instruments varies enormously from case to case. If with a bass guitar, for example, the attack noise is marked as sibilant, you should listen critically to the results when you first change the melody or timing, and decide whether or not they are to your liking. If not, clear the checkmark next to “Sibilant Handling”.
By default, Sibilant Handling is always switched on when the Melodic algorithm is selected, whereas with the Percussive Pitched algorithm it is by default switched off. With the other algorithms, the corresponding functions are unavailable, so the option is grayed out.
Note: When you open older projects (from the time before Melodyne 5), you will find that the Sibilant Handling option on their vocal tracks is not checked. The reason for this is that you may already have perfected the vocals, in which case we assume you’ll want your project to sound exactly the same as it did before. If so, leave the Sibilant Handling option switched off.
If, on the other hand, you want the project in question to enjoy the benefits of Melodyne 5’s new functions, you should activate Sibilant Handling. Your older vocal tracks will then most likely sound better at once, and you will enjoy greater creative freedom in other areas besides.

Robust pitch curves: With the algorithms “Melodic” and “Percussive Pitched”, Melodyne detects the Pitch Curve in very high resolution. This is especially advantageous in the case of vocals, as there is then particularly detailed control over all aspects of the intonation, and the pitch tools are able to deliver optimal sound quality.
With certain recordings, however, this high resolution can be counterproductive. This is particularly the case with instruments that were in fact played monophonically but where sub-optimal recording conditions (resulting for example, from obtrusive room resonances) or the physical composition of their resonance chambers gives rise to what we might call “technical” polyphony.
Examples of this might be the electric upright bass or frequency modulated synthesizer sounds – sometimes, even, the human voice, when, for example, a (usually male) rock singer wrings deep throaty sounds from his voice.
In such cases the pitch tools (at least, when heavy use is made of them) deliver artifacts, and it is then that switching to a “robust pitch curve” makes sense.
The simple act of switching to a robust pitch curve initially results in no detectable change, but as soon as a note is edited with one of the tools in Note Assignment Mode, Melodyne searches afresh for the pitch curve of this note (and of this note only) and delivers then, when this option is checked, a simpler, more stable, more robust curve.
The simplest command to trigger this type of renewed search for the pitch curve, but which otherwise changes nothing, is a [Alt]+double-click with the first assignment tool.
The Polyphonic, Universal and Percussive algorithms have robust curves by default, so with these algorithms the option is grayed out.
Separate Audio: When you are editing the detection of an audio source, Melodyne sometimes has a great deal of processing to perform in the background and large volumes of data to move in and out of its cache. The option Separate Audio gives you control over this behavior. If the Auto box is checked, with each change you make, Melodyne performs all the requisite calculations immediately. The advantage? Whenever you use the preview controls to test your algorithm settings, Melodyne accesses the latest data, and everything sounds exactly as it would in normal edit mode. The disadvantage? Melodyne sometimes needs to introduce a processing pause during which the progress indicator appears and your work is interrupted.
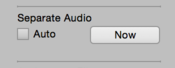
Since you do not always need the preview controls, you have the option of changing this behavior by clearing the Auto checkbox. In the case of certain editing actions, the requisite calculations are then not performed immediately but only when you click the Now button or leave Note Assignment Mode. The advantage of this is that your workflow is not interrupted. The disadvantage is that the preview controls in such situations cannot access the latest data and therefore do not always reflect the changes you have made. Should there be a discrepancy between the previous data and the current state, the Now button will flash to warn you. If you then click on it, Melodyne will perform all the outstanding calculations and update the totality of the data.
Save/Load Assignment Data
Melodyne can, if requested, store in the audio file assignment data such as: which algorithm was used for the source; how its parameters were set; and whether, and in what way, the detection was edited. As well as these aspects of note assignment, the assignment file also contains all the tempo information in Melodyne’s possession regarding the audio source; information that you may already perhaps have refined in Tempo Assignment Mode.
Melodyne can write all this assignment data into the audio file. It is then available whenever you reuse the audio file – in a different project with Melodyne stand-alone, for instance, or in a new song in an ARA DAW. In other words, it suffices to edit the note- and tempo-detection, and also the algorithm parameters, a single time, and the state of your editing will automatically be available once again when you reuse the file.
The following advice only applies to Melodyne studio:
Bear in mind that Melodyne does not save this assignment data automatically; you must instruct it to do so. You do this from the cog menu next to the name of the audio file at the bottom of the Algorithm Inspector:
- Save: Writes the current state of the note- and tempo-detection into the audio file.
- Load: Restores the state of the note- and tempo-detection data last saved.
- Remove: Removes previously saved assignment data from the file.
Loading note assignment data by menu command
If you click on the cog wheel at the bottom of the inspector, you will see the command: “Load from Compatible File”. This allows you to apply the detection data of another audio file to the current file. For this to happen, two conditions must be satisfied:
- The file must be exactly the same length as the current target file.
- The file must be present on another track in the current song. It is not enough for it simply to be on the hard disk; it must have been imported from there into the song.
Now, suppose there is a playing error that you wish to correct on all three tracks simultaneously. For the correction to be phase-locked and optimal sound quality to be preserved, all three tracks must be accessing exactly the same detection file. This is where the command “Load from Compatible File” comes in. The full procedure is then as follows:
- Examine the track GTR_DI in Note Assignment Mode and optimize the detection if necessary.
- Now open the file GTR_SM57 in Note Assignment Mode and choose the command “Load from Compatible File”. A list will appear with two entries: GTR_DI and GTR_U87. Select the track you have just optimized: GTR_DI. Now you will see exactly the same detection for the SM57 signal as for the DI signal.
- Next follow the same procedure for the GTR_U87 track, assigning the DI detection file to this track as well.
- Finally, exit Note Assignment Mode and you will be able to optimize the guitar performance on all three tracks simultaneously in normal Edit Mode.
The reason we strongly recommend you to begin by optimizing the detection of the DI signal rather than that of either of the microphones is this: the polyphonic detection of the DI signal is usually right first time, so adopting this approach will require less work on your part in Note Assignment Mode. The microphones, on the other hand, depending on your amp settings and any pedal boards you may be using, tend to capture a distorted signal which takes considerably longer to optimize. By using the trick we have just described (substituting the detection data of the DI track for those of each of the microphone tracks), you will obtain the best-sounding results in the shortest possible time.
A note on compatibility with Melodyne 4
Prior to Version 5, assignment data was not stored directly in the audio file but in a separate file with the suffix “mdd”. If along with the audio file there is the corresponding .mdd file created by Melodyne 4, Melodyne loads the assignment data it contains. Subsequently, the various commands function as follows:
- Save: Stores the current state of the note- and tempo-detection data in the audio file (rather than in an .mdd file).
- Load: If, as yet, no assignment data has been saved in the audio file itself, Melodyne loads the data from the .mdd file.
- Remove: Deletes the .mdd file.
If the audio file as yet contains no assignment data but there is no .mdd file either, the Load and Delete commands are grayed out.