Tools for note assignment
- • The Main Tool in Note Assignment Mode
- • The Activation Tool
- • The slider and the Energy Image
- • The Venetian Blinds
- • Starting point lines and designated starting points
- • The Note Separation Tool and the Separation Type Tool
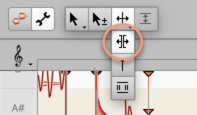
- • The Starting Point Tool
- • The Sibilant Range Tool
- • The Energy Share Tool
- • The Note Inspector
-
Telling tones and overtones apart– How to ensure that the notes displayed correspond exactly to those actually played. Shown here: Melodyne 5 studio, smaller editions may differ.
-
Optimizing complex material– How to obtain optimum sound and maximum creative freedom by inserting new note separators or changing their type. Melodyne 5 studio, smaller editions may differ.


The Main Tool in Note Assignment Mode
In Note Assignment Mode, the toolbox contains tools with functions other than those used in normal Edit mode. The most important difference is this: In Note Assignment Mode, the tools have no direct or immediate impact on the sound of the notes; their object, rather, is to bring the detected and displayed notes as closely as possible into line with the actual music. This makes it possible subsequently to edit the material more efficiently and obtain optimal acoustic results.
Which tools are available depends upon the algorithm, as, to a lesser extent, do their functions.
As is the case in normal editing mode, the Main Tool in Note Assignment Mode combines a number of the most important functions of the other tools, so as to allow you to perform a variety of common tasks without having to change tools.
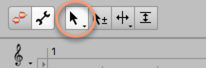
- In the lower part of a blob, the Main Tool functions as the Activation Tool.
- In the upper part of a blob, the Main Tool functions as the Note Separation Tool.
We will deal with each of these in turn.
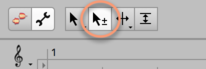
The Activation Tool
The Activation Tool has no function when the Percussive and Universal algorithms are selected. What follows, therefore, only applies when either the Melodic, the Percussive Pitched or one of the Polyphonic algorithms is selected.
If you move the Activation Tool over a blob, its overtone series will be displayed in the background. This enables you to see at a glance which of the blobs above it coincide in pitch with the partials of the note selected.
In addition to the normal solid blobs used in Melodyne to represent notes, you may see hollow blobs of which only the outlines or “silhouettes” are visible. These represent what we call “potential notes” and lie at pitches where Melodyne considered drawing a regular, solid blob, but decided instead to place this at a different pitch, leaving the silhouette as a hint that this might be a possible alternative for that particular note.
So you might consider turning this potential note into a regular note. This you can only do in Note Assignment Mode, so it is only in Note Assignment Mode that you will ever see a blob silhouette. Once you return to normal edit mode, only solid blobs (representing the active notes) appear in the display. It should be added that potential notes are only ever encountered when the Melodic or Polyphonic algorithms are employed.
In the case of polyphonic instruments, these inactive/potential notes play a particularly important role, because Melodyne may occasionally mistake for a note that was actually played what was in fact merely a particularly prominent overtone of some other note and, as a result, display it as a solid blob. Since your objective in Note Assignment Mode is to ensure that only the ‘fundamentals’ (the notes that were actually played or sung) are represented by solid blobs, your first task in such a case will be to replace that solid blob with a silhouette – i.e. to deactivate the note in question.
The opposite situation can also arise: If a note is played very quietly, Melodyne may mistake it for the overtone of some lower note, in which case it will not display it as a solid blob but as a silhouette. In this case, you will need to replace that silhouette with a solid blob – i.e. activate the note in question.
Double-click on a silhouette and it will be replaced by a solid blob, indicating that the note in question has been activated.
Double-click on a solid blob and it will be replaced by a silhouette, indicating that the note in question has been deactivated. Each time a note is deactivated in this way, the spectral energy that was originally assigned to it is distributed between the remaining (active) notes sounding at that time. So when you deactivate an overtone that has mistakenly been displayed as one of the notes played, its spectral energy will be correctly reassigned to the note to which it properly belongs.
Of course, if you deactivate all the blobs corresponding to notes sounding at a given moment in time, Melodyne has no note to reassign their spectral energy to, so in place of the deactivated blobs it creates a silent note. The same principle applies when there is only one note sounding. Such is always the case when either the Melodic or the Percussive Pitched algorithm is used; but even with the polyphonic algorithms, in a melodic passage (in which no more than a single note is ever sounding at a time), any note you deactivate will automatically be replaced by a silent note.
Deactivating all the notes, or the only note, sounding at a given instant (leading to the creation of a silent note) only makes sense, of course, if the instrument in question is meant to be silent at that time (e.g. where there’s a rest in the score). Silent notes – what distinguishes them, how they arise in nature, and how they behave in normal edit mode – are described in greater detail here.
Dragging blobs with the Activation Tool
A double-click is the gesture you will use most often when working with the Activation Tool. It is also possible, however, to drag blobs with it, as a means of persuading Melodyne to move the focus of its search to a different area. Particularly with material in which pitches are unclear, a new note can (in theory) be assigned to almost any pitch in this way, provided Melodyne finds something there. This is especially true when the option “Robust Pitch Curve” has been activated in the Algorithm Inspector.
In the case of the polyphonic algorithms, you have to drag a blob about an octave downwards to trigger the search for a new pitch. The new note will then in all probability appear an octave below the previous one.
If Melodyne finds a plausible destination for the note in the area to which you have dragged it, the blob will snap to it; otherwise, it will fall back to its original position. Melodyne only considers certain pitches to be plausible. This is one of the strengths of Melodyne: It brings to its analysis of the audio material real musical intelligence, and does not therefore automatically ascribe every cluster of spectral energy to the presence of a separate note. So, having eliminated all the pitches at which the note played could not possibly lie, Melodyne is left with a handful of candidates it considers “plausible” and invites you to choose between them.
Alt-dragging with the Activation Tool
With polyphonic material, however, you can tell Melodyne what it should, and should not, consider a plausible pitch. If, for instance, all attempts to drag the blob to the desired pitch have failed (because Melodyne does not consider the pitch in question to be plausible), just hold down the [Alt] key and drag the blob to the target pitch yourself. This allows you to “force” the blob to a position with a straight pitch curve.
If you hold down the [ALT[ key, you can drag blobs in either direction – upwards or downwards – even with the polyphonic algorithm.
Recalculation of the pitch center
When you move notes with the Activation Tool, a fresh search for the Pitch Curve within the note is conducted automatically, but this only occurs when one of the monophonic algorithms is selected.
While conducting the new search, Melodyne also recalculates the pitch center of the note. It does this even if you have only moved the blob a very short distance before returning it almost immediately to its original position. You can also trigger a fresh search for the Pitch Curve and a recalculation of the pitch center by holding down the [Alt] key and double-clicking – for instance, after activating or deactivating the option “Robust Pitch Curve” in the Algorithm Inspector.
This is particularly useful when you are importing a file from an older version of Melodyne, as the technology Melodyne 5 uses to determine the pitch center of notes is greatly superior to that of earlier versions. After the recalculation (most swiftly triggered by holding down the [Alt] key and double-clicking), the blobs will be realigned slightly on the vertical axis – some higher, some lower than before – with the results representing the musical content better than those of earlier versions of the program. This provides for better results – especially when you are quantizing pitch by double-clicking or using the Correct Pitch macro in normal edit mode.
If, on the other hand, the original detection was performed by Melodyne 5 itself, recalculating the pitch centers will change nothing, as the results – already optimal – will be no different the second time. The only circumstance in which [ALT]-double-clicking in Note Assignment Mode makes a difference is when the option “Robust Pitch Curve” is checked in the Algorithm Inspector. This option is discussed in greater detail here.
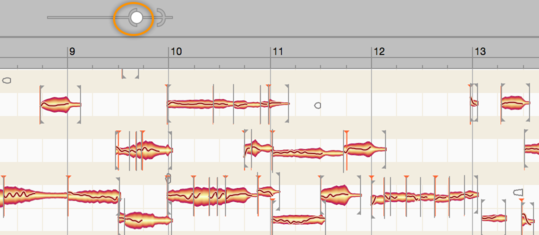
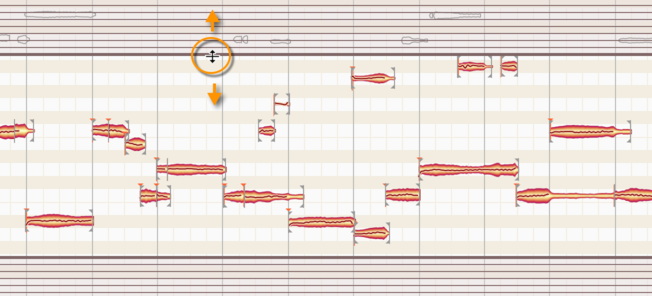
The slider and the Energy Image
When you are editing the detection of polyphonic audio material and have selected the Main or Activation tools, you will see a slider next to the toolbox. This allows you to determine the number of potential notes to be displayed and how many actual notes are derived from them.
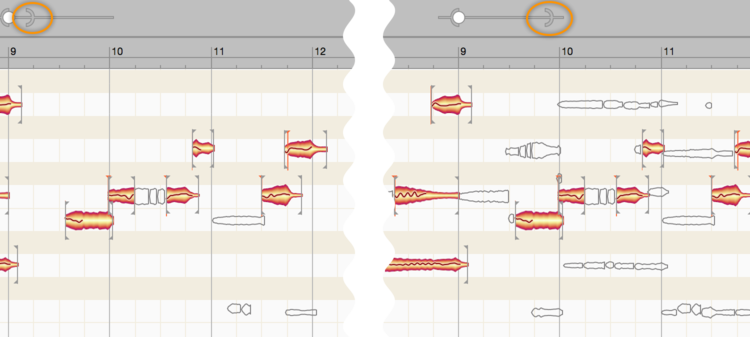
If you move the right-hand indicator (the “Parenthesis”) in the slider to the left, fewer potential notes will be displayed. If you drag it to the right, more potential notes will appear. Choose a setting that ensures that only as many potential notes are displayed as you may conceivably wish to activate in the course of the subsequent editing. That will give you a clearer overview.
Now drag the left-hand indicator (the “Ball”) from side to side. As you drag it to the left, you reduce the probability of the potential notes displayed becoming active notes, thereby reducing the number of active notes. As you drag it to the right, you increase that probability, thereby creating more active notes from the potential notes displayed.
There can never be more active than potential notes, so the Ball can never pass through the Parenthesis but merely pushes it to the right when it wants to go further, thereby causing additional potential notes to be displayed and activated simultaneously. Adjust the two indicators until the number of active notes displayed is as close as you can get to the number of notes that were actually played. Then proceed to the manual correction of individual notes.
Tip: If you move the indicator a long way, Melodyne is required to do a great deal of processing, which is why it can take a moment to display the results. You can reduce this delay by opening the Algorithm Inspector and, under the heading “Separate Audio”, clearing the checkmark next to “Auto”. This speeds up the display, but if you wish then to hear the result of the redistribution of the signal components between the notes, you have to click on the flashing “Now” button or activate the “Auto” option once more.
Now and then, it can happen that a note that can be heard in the material is not detected as an active note, and, even with the Parenthesis at its maximum setting, is not even shown as a potential note. If that happens, move the Parenthesis fully to the right (to its maximum setting) and then move the mouse pointer over the position in the Note Editor where the missing note ought to be. Around the mouse pointer, in the form of an “energy image”, notes will now appear that were detected neither as active nor as potential notes. When you have identified the missing note in this way, double-click on it to transform it into an active note. Thereafter, by subsequent double-clicking, you can toggle the status of these notes between “potential” and “active” just like that of any others.

The Venetian Blinds
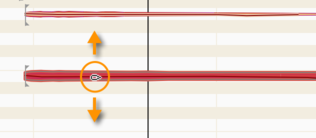
With instruments in particular that generate powerful overtones, it can happen that, over a wide range, notes are detected that you perfectly well know are far higher (or lower) than any that were actually played. In such cases, the “Venetian Blinds” come in handy; if you can’t see them at the top or bottom of the editing area, scroll upwards or downwards until you can. These “Venetian Blinds” are only available in conjunction with the polyphonic algorithms.
You can raise or lower the top blind by dragging its thick bottom edge and do the same with the top edge of the bottom blind, in this way delimiting the range within which Melodyne assigns notes. All notes partially concealed by the Venetian Blinds are automatically deactivated unless they have previously been activated by hand. You can still “reach through” the Venetian Blinds, however, to turn notes on or off. The Venetian Blinds provide a useful first approximation that you can later correct by activating and deactivating notes singly by hand.
Starting point lines and designated starting points
If, in Note Assignment Mode, you select one of the separation tools, vertical lines appear in the Note Editor. At the same time, a slider with two indicators appears next to the toolbox.
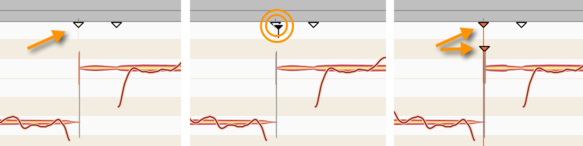
We call the vertical lines “starting point lines”. Rising in parallel from their respective blobs to the Time Ruler, they show the musical starting points that Melodyne has identified in the audio file. A “designated starting point” is indicated by a short vertical line (a “vertical”) topped by an inverted triangle and is invariably found near the start of a blob (though not necessarily at its leftmost extremity); when active, it indicates what, for the purposes of timing, Melodyne considers to be the effective musical starting point of the note. The musical starting point may, but does not necessarily have to, be aligned with the separator at the beginning of the note. Think of a brass instrument, for example, where each note is often heralded by a certain amount of wind noise. This noise also belongs to the note, so it falls to the right of the note separator. What is relevant from the standpoint of timing, however – as is the case also with quantization – is the moment when the sound really unfolds and the pitch first becomes discernible; that is the timing-critical moment, and it is that later instant that is designated the musical starting point. If Melodyne is unable to pinpoint the musical starting point of a note, no starting point line is displayed and the note has no designated starting point. For the purposes of quantization, the leftmost extremity of the note is then considered to be the starting point.
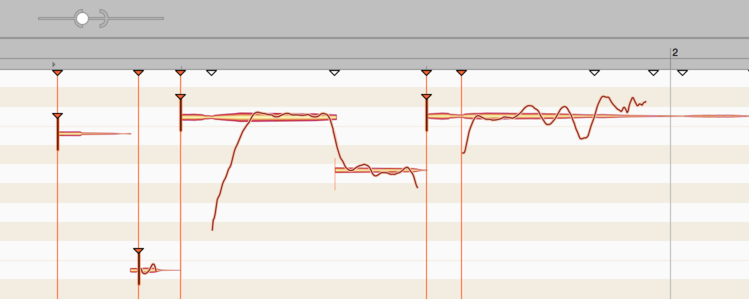
Each of the longer, starting point lines also culminates in an inverted triangular indicator, which you will see just below the Time Ruler. This indicator can be solid, in which case the corresponding starting point line is visible and active; or it can be hollow, in which case the line is invisible: we call it in this case a “potential” or “inactive” starting point line. An inactive starting point line invariably coincides with the beginning of a note. For the note in question, however, Melodyne has been unable to discern with sufficient confidence a musically relevant starting point; it is for this reason that the starting point line is only a potential one and that no vertical (no designated starting point indicator) is displayed at the blob.
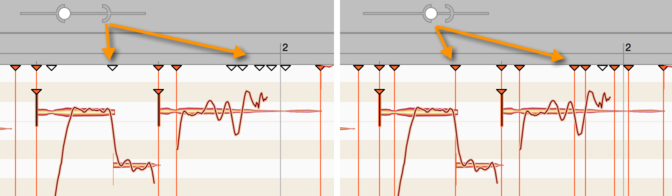
The two slider indicators, the Parenthesis and the Ball, govern, respectively, how sensitive Melodyne is to the presence of potential starting points and how willing it is to activate them, the result being reflected in turn by the total number of triangles displayed and the percentage of these that are solid red. As you move the Parenthesis gradually to the right, more and more hollow triangles (indicating the presence of “potential” starting points) appear beneath the Time Ruler; this reflects Melodyne’s increasing sensitivity that is allowing it to divine more and more points in the material at which a starting point might reside – “might” because the lines that are added remain invisible and do not (yet) have any effect upon the blobs.
You can alter this, however, with the slider’s second indicator: the Ball. As you move the Ball to the right, more and more of the previously invisible, “potential” starting point lines will become active; and directly below them, at the level of the blobs, designated starting points will appear at the same time.
You can activate a potential starting point line by double-clicking on the hollow triangular indicator beneath the Time Ruler and, conversely, deactivate an active line by double-clicking on the corresponding solid triangle. Double-clicking in a free place in the ruler generates a new starting point line.
By dragging its indicator, it is possible to move a starting point line forwards or backwards in time; this, however, will seldom be necessary, as Melodyne almost invariably identifies the ideal position. You may still wish, though, to do some fine-tuning. If, for the purposes of experiment, you move a starting point line from left to right, you will notice that as soon as you pass over the start of a blob, a vertical appears complete with inverted triangle (indicating the presence of a designated starting point) that follows the line for a while before disappearing as soon as the note begins to decay, as, clearly, it would be futile to look any further for the musical starting point.
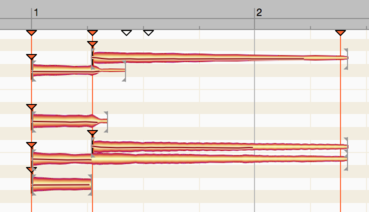
Starting point lines exhibit a kind of “magnetic” property seen not only when you move them but also when separating notes and designating starting points manually.
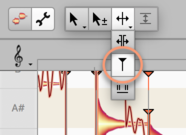
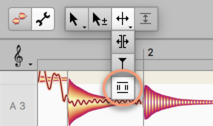
The Note Separation Tool and the Separation Type Tool
The Note Separation Tool and the Separation Type Tool (directly below it in the toolbar) are available with all algorithms and function in the same way as their counterparts in Edit Mode. You can set or remove note separations by double-clicking and also move them along the time axis. With the Separation Type Tool, you can toggle between hard and soft separations.
By contrast with normal editing mode: In Note Assignment Mode, the separation tools are not used to reshape the music but to edit the analysis or “detection”. The object is to ensure that the blobs represent as accurately as possible the actual music. Also, edits performed in Note Assignment Mode on chords are implemented, thanks to the magnetic quality of the starting point line, with sample accuracy. In normal Edit mode, this is not possible. Tip: To provide two or more notes of differing pitch with a soft separation, you can select “Convert Selection to Connected Sequence” from the context menu (see below).
Since the placing of note separations and the editing of starting points often go hand in hand, you can also edit starting points with the Note Separation Tool. Simply move the pointer into the vicinity of the triangular starting point markers near the Time Ruler and it changes appearance to resemble the Starting Point Tool.
It is possible at any time to deactivate a designated starting point (i.e. withdraw the designation). A new starting point can only be designated if an active starting point line is present in a plausible place i.e. the left-hand end of a blob. Look for a moment at the starting point indicators: In the relevant place, a hollow triangle (indicating the presence of a potential starting point) will probably already be displayed. Double-click on the triangle to activate the starting point line.
If no potential starting point line has been identified at the desired position, using the slider near the toolbox you can cause additional potential starting point lines to appear: to do this, simply move the right-hand control element (the Parenthesis) further to the right.
Alternatively, by double-clicking on an empty area of the ruler at the level of the starting point markers, you can create a new starting point line and drag it into position with the mouse. If, in the case of polyphonic material, a chord appears at the corresponding position, the action will affect all chord members. When, with the Melodic, Percussive or Universal algorithms selected, you activate a potential starting point line or create a new starting point line, a note separation is automatically inserted near a note at the position in question.
Tip: When editing starting point lines, if ever you have the feeling that somewhere a note starting point exists but that it is not indicated even by a potential starting point line, scrubbing in the relevant area often makes it to easier to locate the exact position. At the position in question, a rather loud noise component will be audible. Where the noise is loudest, release the mouse button and double-click to place a starting point line.
The context menu: When you select one of the note separation tools, a context menu appears in the Note Editor in which you will find the following commands:
- Convert Selection to Connected Sequence: With this command, you can convert a selection comprising two or more adjacent notes between which there are hard separations into a connected sequence with soft separations. This is also possible with notes differing in pitch and allows you gather together melodic lines to make more coherent editing possible later.
- Separate Note: This command separates a note automatically at a point determined by Melodyne. It is useful when you need to make precise cuts in a vocal passage and isolate sibilants or breathing noise prior to editing using the tools.
- Reseparate Notes at Starting Point Lines: This command splits the selected notes at all active starting point lines passing through them. It offers you, therefore, a convenient way of inserting separations at the same point in multiple notes simultaneously, while removing any superfluous separations found elsewhere.
- Separate Notes as Trill: The effect of this command is to slice a selection of one or more notes into smaller segments determined by the instantaneous pitch of each note. This is done by inserting note separations into the slopes of the pitch curve as it rises and falls, thereby turning each ‘hill’ and each ‘valley’ of a vibrato into a separate note.
Please note that the fluctuations in the Pitch Curve must be fairly pronounced for the “Separate Notes as Trill” function to have any effect and that it is only available when the Melodic algorithm is active, being grayed out in every other case. If you wish to assign a shortcut to the command “Separate Notes as Trill”, this can be done using the Preferences dialog.
- Reset Separations Based on the Selected Grid: This command separates the notes at obvious starting points as well as at suitable positions on the selected Time Grid. This command is available with the Melodic, Percussive and Universal algorithms.
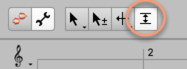
The Starting Point Tool
The Starting Point Tool is the second sub-tool of the Note Separation Tool.
It is available with all algorithms and is used to designate or undesignate starting points manually by double-clicking. This tool function is also available in Note Assignment Mode by checking the corresponding option in the Note Inspector. A designated starting point is indicated by a vertical (i.e. a short vertical line) with a red triangle on top located at or near the leftmost extremity of the blob.
By moving the Starting Point Tool in the region of the starting point markers beneath the Time Ruler, you can also edit these with the Starting Point Tool. As a rule, however, you will generally use the Note Separation Tool for this purpose, as described above.
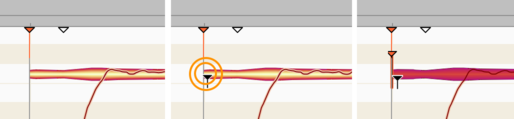
The Sibilant Range Tool
Melodyne defines as “sibilants” all components of the sound that have no detectable pitch curve. In the case of vocals, these include not only fricative consonants and digraphs such as “s”, “z”, “ch” and “zh”, but also other unvoiced consonants such as “k” and “t” as well as the sound of the vocalist inhaling or exhaling between words. When the various pitch tools are used, these components are treated differently from the pitched components – a policy that leads to particularly good and natural-sounding results when editing vocal tracks. For Melodyne to detect the presence of sibilants, either the Melodic or Percussive Pitched algorithm must be active.
Sibilants are detected, and their extent ascertained, automatically; but, if need be, you can overrule Melodyne and move the start and end points of sibilants at will. This is done in Note Assignment Mode using the Sibilant Range Tool.
When this tool is selected, the range of the sibilants detected by Melodyne is represented on the display by hatching. A sibilant might lie at the beginning and/or end of a note, but never in the middle. The tool has the following functions:
- Click and drag the edge of the hatched area to extend or shorten the range of the sibilant in question.
- Double-click on the hatching to remove it. (This instructs Melodyne to treat the sibilant in question the same way it treats all other components of the sound, which would allow you to apply radical pitch shifting to a “S”, for example, as a special effect). If multiple blobs are selected at the time of the double-click, all their sibilants will be declassified in the same way.
- Double-click on a note without any hatching (or from which the hatching has been removed): this instructs Melodyne to search the note for sibilants. Depending upon the note, one of the following states will result:
- Melodyne will find a sibilant at the beginning and/or end of the note and display its extent through hatching. Sometimes the entire blob will be hatched (e.g. in the case of breath noise). It makes no difference in the case where exactly in the blob you click; towards the beginning, towards the end, the result is the same. This case in fact only occurs if you have previously declassified any sibilants it contains by double-clicking. Melodyne will then rediscover the sibilants when you double-click a second time.
- If the note represented by the blob is in fact sibilant-free (i.e. it contains no sound components that Melodyne regards as sibilants), but you wish it to be treated as though it did contain them, the effect of the double-click is to create a sibilant range at the point clicked. To be more exact: if you double-click with the tool on the front half of the blob, the sibilant range will extend from the start of the blob to the point clicked. If you double-click in the second half of the blob (i.e. right of center), the range will extend from the point clicked to the end of the blob. You can also do both: create a sibilant range at the start of the blob and then another at the end, or vice versa.
Tip: To check the boundaries of the hatched area acoustically, use the “Sibilant” preview control in the Algorithm Inspector. With the control at the extreme right setting, you will hear only the hatched area of the note; at the left extreme, you will hear only the part of the blob without the hatching.
The Energy Share Tool
This tool is only available with the Polyphonic Sustain and Polyphonic Decay algorithms. It regulates the distribution of particular sound components among notes sounding simultaneously.
In the case of chords or certain harmonic intervals (e.g. an octave), the same overtone might be shared by two or more fundamentals, so Melodyne is obliged to share it out among the notes concerned. It may be that the resulting distribution is not to your liking, in which case you can exert a healing influence: By assigning more energy to one fundamental (at the expense of the others), you enrich its harmonic content, giving it, generally, a brighter sound with greater penetration. Conversely, you can deprive a fundamental of some of its energy (to the benefit of the others). In this way, you can adjust the tone color of the various notes to achieve the ideal balance.
Please note that this tool, by its very nature, only has any effect when two or more notes sounding simultaneously have been detected in polyphonic material and one of them is being edited. Furthermore, only as much energy can be shared as is actually present at the place in question and available to the blob in question. With this tool, you are therefore to some extent entering a desired value. How and to what extent it can be attained depends upon the realities of the audio material.
In the extreme case, the tool does ... nothing. If you have two notes sounding simultaneously, for example, the higher of which does not appear in the overtone series of the lower (you can see whether or not this is the case by using the Activation Tool to display the overtone series), then these two notes have no shared energy that could be reassigned using the Energy Assignment Tool. In such cases, therefore, the tool has no effect whatsoever, whether visual or acoustic.
Click with this tool on a blob and drag upwards to increase its allocation of energy or downwards to reduce it.
The Note Inspector
As is the case in normal edit mode, the Note Inspector in Note Assignment Mode governs the selected notes – only here, different parameters are on view.
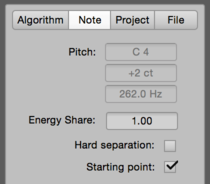
Pitch: The three fields correspond to those in edit mode and display i) the nearest note of the chromatic scale, ii) the deviation (if any) in cents from it, and iii) the equivalent frequency in hertz. It is not possible to input values into these fields but their content is updated whenever a blob is assigned to a different pitch (e.g. to correct an octave error).
Energy share: The inspector field reflects the changes made with the Energy Share Tool as well as allowing you to enter values directly.
Hard separation: The status of this field is determined either by changes made with the Separation Type Tool or by checking/clearing the box. You can only check this box if there is currently a soft separation between the selected note and an adjacent one.
Starting Point: The status of this field is determined either by changes made with the Starting Point Tool or by checking/clearing the box. Here, just as with the corresponding tool, you can attach the selected note to a starting point line or detach it from it.