Melodyne 5: Update guide
- • The Melodic Algorithm with Sibilant Detection
- • Compatibility with Melodyne 4
- • New tools (not only) for vocals
- • The Leveling Macro
- • Pitch correction by double-clicking and the Correct Pitch Macro
- • Chord Recognition and the Chord Track
- • The new Percussive Pitched Algorithm
- • Keyboard shortcuts
-
What’s new in Melodyne 5?– The new features in a nutshell. Shown here: Melodyne 5 studio, smaller editions may differ.

The following is a brief summary of all you need to know to get started with the new Melodyne 5. In the individual tours in the Help Center, you will find plenty of exciting tips, tricks and background info to read later, but the best place to begin is here.
The Melodic Algorithm with Sibilant Detection
First the good news: You don’t have to do anything; during its initial analysis of the material (the ‘detection’), the algorithm in its default setting automatically separates the pitched from the unpitched (noise-like) components of the sound and thus behaves correctly during the playback. The upshot is better sound, pure and simple.
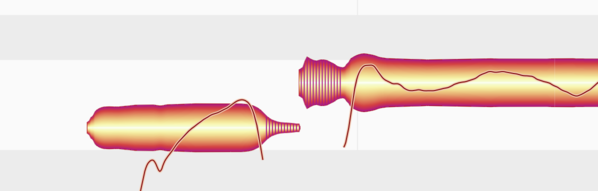
The extent of any noise-like components that have been detected – we call them ‘sibilants’ – is indicated by hatching. This is how Melodyne marks not only sibilants proper (“s”, “z”, “ch” and “zh”) but also other unvoiced consonants like “k” and “t” as well as the sound of the vocalist inhaling or exhaling between words.
If any part of the detection seems strange or incorrect to you, you can switch to Note Assignment Mode where you will find the requisite Correction Tools though doing so is seldom necessary.
When you alter the pitch of a note, Melodyne does not alter the frequency of the sibilants, as that would sound unnatural – after all, in real life no singer has the wherewithal to sing one “S” higher than another or pitch the sound of their own breathing. In the display, however, the hatched areas do move up or down with the rest of the blob when the corresponding note is transposed, but they do this solely in the interests of legibility, so that the visual integrity of each syllable is preserved.
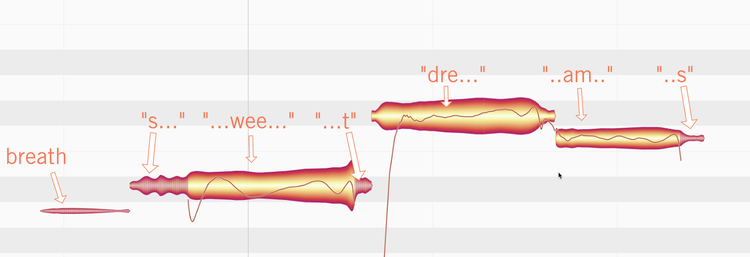
The way changes in the length of notes is implemented in Melodyne now also better represents the natural behavior of singers: if a note contains both sibilants and pitched components, the sibilants remain unaltered. When time-stretching is applied to the word “sweet”, for example, it becomes “s-weeeeeeee-t” (not “sss-www-eeeeee-ttt” or anything ghastly like that!).
The case is different where the note in question (or, in this case, the sound to which the blob refers) consists solely of sibilants and has no pitched components at all, as is often the case with breath noise: this would certainly be shortened to make room for a time-stretched word invading its space. But here, too, the principle is the same, because if the rest between two words were shorter, the singer would necessarily take a shorter breath. So even when it comes to lengthening or shortening breathing sounds, Melodyne 5 automatically achieves a natural effect.
And once they have been isolated, breaths can be stretched or squeezed using a different algorithm, with results that sound considerably better than those of earlier versions of Melodyne.
Since, however, sibilants often coincide with pitched components, it can happen that breath sounds do sometimes move; when this happens, it is because Melodyne has detected a small pitched element in them that has been transposed, and this fact must naturally be reflected in the display. This should not surprise you.
All editions of Melodyne profit from these improvements – even the entry-level Melodyne essential.
Compatibility with Melodyne 4
When you open projects that were saved by an earlier version of Melodyne, they sound exactly the same in the new version as in the old. This is because when you open old documents, two new functions are initially not activated:
- Sibilants are not detected.
- Pitch centers of notes are still calculated as in Melodyne 4.
The upshot is that everything sounds exactly as it did before, so if you open your old project today with the intention simply of making some minor change to the mix, you do not need to take any special precautions.
If, however, you plan to do substantially more work on the project, taking advantage of the new features of Melodyne 5, you can do so simply by switching on Sibilant Handling on the vocal tracks. This is done by:
- placing a checkmark next to the option “Sibilant Handling” in the Algorithm Inspector in Note Assignment Mode. This will trigger a fresh analysis of the entire track; when this is finished, any sibilants will be marked and the playback algorithm will behave accordingly. This may change the sound, usually for the better. Please note however that Sibilant Detection is only available with the Melodic or the Percussive Pitched algorithm; with all the others, the function is grayed out.
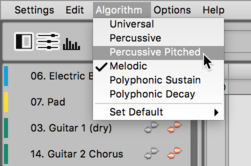
Unfortunately, this function is not available with the edition Melodyne essential. If you want to edit an old Version 4 project taking advantage of the new sibilant functions, you must trigger a fresh detection of the material by clicking the words ‘Melodic’ or ‘Percussive Pitched’ (as appropriate) in the Algorithm menu. Please bear in mind, however, that if you do this, all your previous editing will be lost, so it will seldom be worth it. Another option would be to upgrade to Melodyne assistant; then not only would the entire tool kit be at your disposal but you would also be able to switch Sibilant Handling on and off.
- triggering a recalculation of the pitch center of the notes. To do this, you must enter Note Assignment Mode and ALT-double-click on the relevant notes. While it is replotting the Pitch Curve of each note, Melodyne also recalculates its pitch center. As a result of the improved method of determining the pitch center of each note, the blobs may realign themselves slightly in the vertical plane, with some moving upwards and others down; the results in either case reflect more faithfully the perceived pitch of the notes.
More on the new way of calculating the pitch center.
New tools (not only) for vocals
With Version 5, Melodyne assistant, editor and studio have gained two new tools:
The Sibilant Balance Tool: This governs the ratio between the amplitude of the sibilants and that of the other (pitched) components of the sound. Its uses range from the defusing of problematic sibilants (de-essing) and the rapid adaptation of doubled vocal tracks, to creative sound design and improved mixing options.
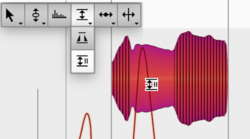
The tool is easy to use: Drag downwards to attenuate the sibilants, or upwards to attenuate the pitched components. You can make very fine adjustments but also – when double-tracking, say – mute altogether either the sibilants or the pitched components.
The tool can be used for the detailed editing of single notes or, when multiple notes are selected, to apply the same change throughout an entire passage.
You will find all the details here.
The Fade Tool: With Melodyne 5, you can fade in at the start of a note and/or fade out at the end. No doubt you’re familiar with the principle from your DAW. Using the tool is easy: just double-click to insert a fade; then use the left/right arrows to move it, and the up/down arrows to adjust its slope. That’s all you need to know.
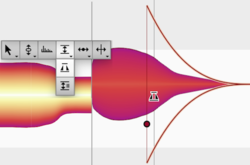
What is much more interesting, however, is that this function increases the control Melodyne offers over the playing dynamics of all types of instrument, because it operates on a per-note basis. So in polyphonic material, for example, you can fade in or out on individual notes within chords. The Fade Tool also makes possible the rapid elimination of extraneous noise in material of all kinds – most notably, polyphonic instrument tracks – as well as providing totally new scope for creativity.
You will find all the details here.
The Leveling Macro
The new Leveling Macro allows you to rein in volume disparities swiftly. Its effect is to reduce differentials between the amplitude of different notes on a track – not only in melodic but also in percussive and even polyphonic material.
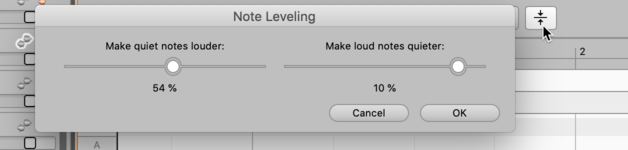
The left-hand fader makes the quiet notes louder, whilst the right-hand fader makes the loud notes quieter. With both faders set to 100%, all the notes will have the same amplitude.
Whilst this may sound simple, it can accelerate your workflow considerably – particularly in the case of polyphonic material, as it allows you swiftly and effortlessly to iron out or reduce disparities between the volume levels of different notes within chords.
You can find out more about the Leveling Macro here.
Pitch correction by double-clicking and the Correct Pitch Macro
Whether you double-click on out-of-tune notes to correct intonation errors or use the macro, the new, musically weighted calculation of pitch centers delivers better results. Whereas previously you often had to fine-tune individual notes manually, even after double-clicking or using the macro, now Select All followed by a double-click always results in musically correct intonation. Further editing is now required, at most, in a handful of specific genres to steady-up the beginning or ending of words – and even this can be performed in Melodyne 5 in next to no time.
Both the Correct Pitch macro and double-clicking also profit from the new Chord Track. To an extent you can control, and in an extremely musical manner, not only can the intonation of the notes be improved swiftly but they can also be transposed simultaneously to fit the chords of the song. This allows any instrument track or any sample to accompany any song.
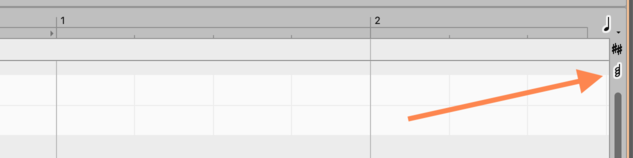
Chord Recognition and the Chord Track
If it is not already visible, click here to show the Chord Track.
There are now various ways of filling in the chords:
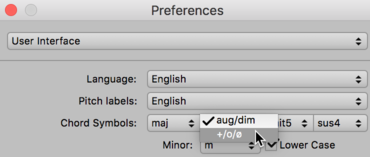
- by hand. If you know the chords, you can just type them in. From the Preferences dialog, you can choose between various chord naming conventions.
- via ARA: If your DAW is equipped with a chord track and makes it available via ARA, Melodyne can simply take the chords from the DAW. Any subsequent chord changes you make in the DAW will be reflected immediately in Melodyne.
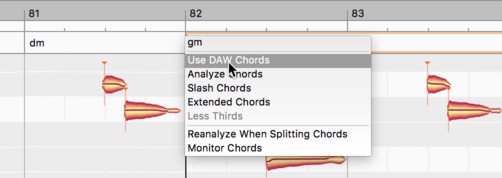
- using the Chord Recognition function. If you do not know what the chords of the song are, Melodyne can find out for you. Select for the purpose tracks with as much harmonic information as possible (e.g. guitar, keyboard or bass) and as little pitch fluctuation as possible (so preferably not vocals); do not include drum tracks.
Now right-click on the Chord Track and choose “Analyze Chords”.

Once the Chord Track has been filled in, you can set the Pitch Grid in the note-editing background to reflect the changing harmonies of the song. From this, you can tell at a glance which pitches are, and which are not, suitable destinations for notes.
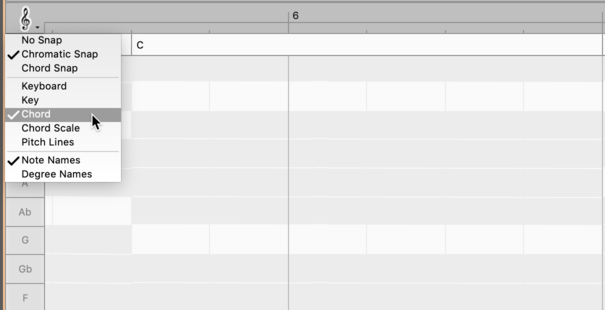
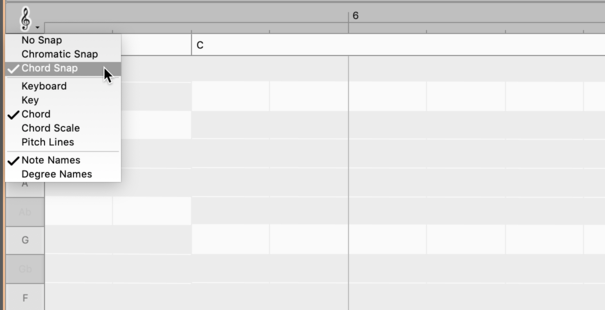
If you now activate the grid by selecting ‘Chord Snap’, whenever you drag and drop notes they will snap to pitches consistent with the named chord.
The same thing will happen whenever you double-click on a note or selection of notes; each note will move to the nearest pitch consistent with the named chord. It can happen, of course, that two or more notes then come to rest at the same pitch, so it is worth casting a quick eye over the results.
You will find everything relating to chords, the Chord Track and adapting new material to fit the chords here.
The new Percussive Pitched Algorithm
With Version 5, Melodyne has acquired a new algorithm. The Percussive Pitched Algorithm combines the strengths of two of the existing algorithms.
Like the Percussive algorithm, the new algorithm is optimized acoustically for drums and percussion, or – in more general terms – for noise-based material.
In other respects, though, with its display format in which pitches are clearly identified, the Percussive Pitched algorithm is more like the existing Melodic algorithm.
Suitable candidates for the new algorithm are all drum-like instruments that are capable at the same time of producing recognizable melodies: an 808 loop, for example, which in addition to the noise-based snare and hi-hat sounds includes a kick drum tuned to the bass of the song as well as tuned toms. A beatboxer track would be another typical candidate for the new algorithm; there, too, melodic (bass) with percussive (snare) elements are united in one and the same recording.
Keyboard shortcuts
In Melodyne, virtually any function can be controlled using a keyboard shortcut. Experienced Melodyne users know how to take advantage of this, and are able to perform tasks considerably more swiftly by using shortcuts tailored to their own specific working habits.
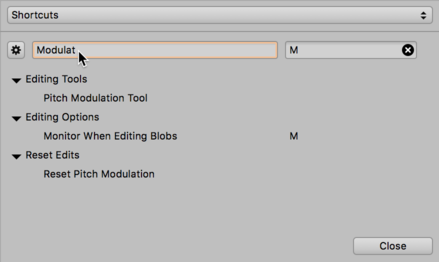
To facilitate the handling of keyboard shortcuts, the Shortcuts page of Melodyne 5’s Preferences dialog offers a search function that makes creating your own sets of shortcuts easier and more intuitive.
You can find out more about keyboard shortcuts here.