The Pitch Grid
-
A quantum leap in vocal editing– Hands-on film about the new vocal functions and Sibilant Detection. Shown here: Melodyne 5 studio, smaller editions may differ.

You can shift the pitch of notes in Melodyne either continuously or in discrete steps using the grid. When the grid is active, notes can only be moved to such pitches as the snap mode selected at the time will allow.
The functions of the Pitch Ruler and access to the Pitch Grid
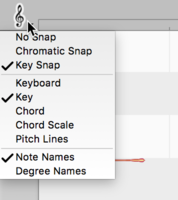
You can change the options relating to the Pitch Grid either from the sub-menu of the same name under Options in the main menu or by clicking the clef icon directly above the Pitch Ruler.
Clicking on the Clef icon toggles the grid on and off. When the grid is deactivated, you can slide notes continuously upwards or downwards in pitch. Only faint lines in this case separate the notes in the Pitch Ruler.
If you click on the Clef icon (or the little arrow next to it) while holding down the mouse key, the menu containing the grid options drops down.
The Pitch Grid and the background in the Note Editor
The Pitch Grid, when activated, causes notes to snap to particular pitches as you drag and release them. The white horizontal beams beneath the blobs in the Note Editor represent the pitches allowed by the currently selected grid. The gray beams represent pitches that are not included in the current grid and that the blobs therefore spring over as they are moved.
When you double-click on a blob with the Main Tool or the Pitch Tool, it will snap to the center of the nearest white lane – so whether it was perfectly in tune or slightly offset from its previous pitch, its offset from its new pitch will be zero. Thus, as well as moving notes to more suitable pitches, a simple double-click perfects their intonation at the same time.
If, on the other hand, you hold down the [Alt] key as you double-click, if a blob was offset 10 cents (say) from its previous pitch, it will be offset from its new pitch by the same amount. In other words, even though the blob may move to a different pitch, its “degree of imperfection” (in terms of intonation) will be preserved – such deviations are, after all, often musically desirable and used intentionally in order, for instance, to obtain a warmer, richer tone.
For the Pitch Grid and the background to the blobs in the Note Editor, the following options are available:
Pitch Grid
- No Snap: The Grid is deactivated and notes can be shifted continuously up or down in pitch.
- Chromatic Snap: Notes snap to the nearest note of the chromatic scale.
- Key Snap or Chord Snap: Notes snap to the grid currently selected as the display background in the Note Editor.
Pitch Background
- Keyboard: The background in the Note Editor mimics the pattern of black and white keys on the piano keyboard – only in this case, the pitches produced by the black keys are shown in gray. When the grid is active, these pitches are inaccessible, so you are effectively locked into C Major – which is fine if the song happens to be in that key but not much use otherwise.
- Key: Now the notes of the current key or tonality are displayed in white and notes foreign to the key in grey. Again, when the grid is active, only the white beams are accessible. If there is a change of key in the course of the song, the pattern of white and gray beams will change accordingly.
- Chord: Now the background pattern changes from chord to chord, with white beams representing chord members and notes foreign to the current chord shown in gray. So in the case of chords based on simple triads (C Major, F minor etc.), only three notes per octave will be available. In the case of more complex chords, more pitches will be available – four per octave in the case of a major seventh chord, for example.
- Chord Scale: With this option, once again seven white beams per octave are displayed. Unlike the case, however, when “Key” was selected, these are not the notes of the current key, but instead form a scale that reflects the current chord.
A brief explanation: It is perfectly possible, in jazz for example, for chords to be used that do not fit the key, without the listener immediately interpreting this as a key change. For example: You are in C major, and the chord played is D major, which does not actually fit the key. If the option “Chord Scale” is selected, for this one chord a black-and-white pattern will be displayed corresponding to the notes that fit the chord played within the key. So, in our example, F# would be a legitimate tone and would be shown in place of F.
- Pitch lines: When this option is selected, a ruled line appears in what was previously the center of each beam, and the beams are no longer displayed. The pitch lines invariably reflect the key – including any key changes – but not the chords; bold lines indicate the pitch of notes belonging to the key; that of notes foreign to it are denoted by thin lines. This display mode is useful when you are correcting intonation errors, as the lines show the exact pitches to aim for.
Pitch Labels
Here you can choose whether the names of the notes (C, D, E etc.) or degrees of the scale (I, II, III etc.) are shown on the Pitch Ruler.
A practical example
You are perhaps wondering what earthly purpose is served by all these options. An example may make things clearer. Let’s suppose you want to import a guitar part from your loop library and adapt it to the current song. Here’s how it’s done:
- First create a chord track (either by applying the chord recognition function to the instruments you already have or by typing in the chords).
- Now activate Scale Snap
- As the Pitch Background, choose "Chord"
- Insert the guitar part from your library and select all its notes (shortcut: [Cmd]+A)
- Then double-click any of the selected notes
Now the imported guitar part will follow the chords of the song. You may perhaps want to shift one or two of the chords upwards or downwards along the Chord Grid to obtain inversions.
With this procedure, of course, you may find occasionally that two notes that were different in the original guitar part end up on the same pitch. This is bound to happen where, for example, in the original recording, there’s a major seventh chord (which is made out of 4 notes) but a simple major or minor chord (consisting of 3 notes) in the current song. Such problems, however, are easily solved: just select one of the two notes and drag it by hand to a “free” white note. Or you could switch the display background from “Scale Notes” to “Chord Scale” to obtain a wider choice of suitable notes.
When you are dealing with vocal parts, on the other hand, you will hardly ever find the “Chord” setting useful – it would limit the voice to too few notes (often only 3 or perhaps 4 per chord). Choose instead “Chord Scale”, which will allow you greater flexibility when working with melodies. Where, on the other hand, you have multiple vocal tracks comprised of little more than “Ooh” or “Aah” sounds that you are using to provide layers of harmony, then “Chord” might be the most useful setting.
Once you have finished composing the melodic line and begin to address the finer points of intonation, switch the display background to Pitch Lines. This is because the lines – which represent perfect intonation – provide a clearer indication of which notes are out tune (and by how much) than that provided by the (far broader) beams.
The Scale Ruler and the Reference Pitch Ruler
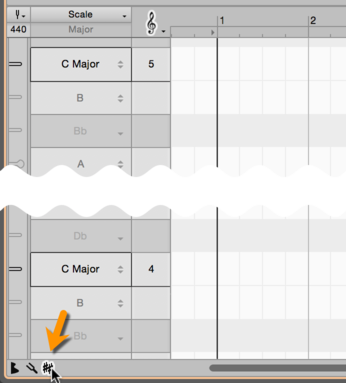
To select a scale for the Pitch Grid yourself or change other settings, click the rightmost icon (the two sharp signs) beneath the Pitch Ruler. Two new columns will appear to the left of it.
Adjusting the master tuning
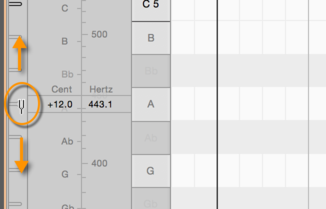
The narrow column on the very left is the Reference Pitch Ruler. Drag in either direction the mark alongside any note – A4, for example – and the Frequency Ruler appears, which you can consult as you fine-tune the note in question and, with it, of course, all the other notes of the scale. What you are doing here is adjusting the master tuning for the entire Pitch Grid. A tip: increase the vertical zoom factor, as this will make it easier for you to locate the value you want.
By right-clicking any of the marks on the ruler, you can open a small context menu. This offers a number of pointers to help you bring the Pitch Grid swiftly into line with a particular tuning:
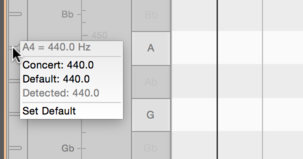
- At the top, you will see the current frequency of the note selected.
- Concert: bases the tuning on modern standard concert pitch (where A4 = 440 Hz).
- Default: bases the tuning on the frequency currently assigned to A4 in the Preferences dialog.
- Detected: bases the tuning on Melodyne’s analysis of the music being edited – the original tuning.
- Set as Default: tells Melodyne to use the current value as the default tuning for new documents and adjusts the value in the Preferences dialog accordingly.
The various settings for A4, incidentally, can be found quickly by clicking the tuning fork icon at the top of the Reference Pitch Ruler. By typing into the box immediately below this icon, you can assign to A4 any frequency you like.

Selecting the tonic and scale variety
The wider ruler next to the Reference Pitch Ruler is the Scale Ruler. Here you can select the ‘tonic’ (i.e. the first degree or keynote) of the scale as well as its mode or type. First click on the note you wish to use as the tonic. The following menu opens:
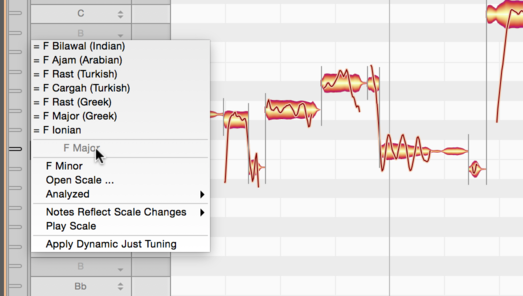
Related scales: in the top part of the menu, you will find a varying number of scales preceded by a “=” sign. These are scales that correspond to the current scale but are differently named. Please note that when you select a related scale from this menu, only the main structure of the mode in question is adopted: the scale is simply given a new name and, if applicable, a new tonic. It can be, however, that the exact definition of the related scale in question contains additional secondary degrees or fine-tuning. If you wish to use these, please choose Open Scale... from the scale drop-down menu.
- The current note: in the middle of the submenu, grayed out, you will see the name of the note you have clicked on and which you can now make the tonic.
- Major / Minor: Allows you to select a major or minor scale with the note selected as tonic. To select C Major, for example, click C in the ruler, followed by C Major from the submenu.
- Open Scale... : opens Melodyne’s Scale Window, which offers access to a wide variety of additional scales. This window will be described in the next section.
- Analyzed: this offers you rapid access to two options derived from Melodyne’s analysis of the material: the closest major or minor scales and an exact microtonal scale.
- Notes Reflect Scale Changes: normally when you change the scale, Melodyne adjusts the Pitch Grid but does not change the notes themselves unless you double-click on them first, in which case they will snap to the grid. If, however, you wish the notes to adjust automatically to any change of scale, select either Tuning or Tuning and Mode. Then any changes will take effect immediately and you will hear them at once during playback.
- Play Scale: plays the current scale. When this function is active, the loudspeaker icon appears above the Scale Ruler. By clicking on this icon, you can deactivate the function without needing to access a menu.
- Apply Dynamic Just Tuning: fine-tunes the selected notes applying the principles of just intonation to ensure that pure intervals result.
Dynamic just tuning: Dynamic just tuning eliminates the slight dissonances and resulting interference (or ‘beating’) between notes that come with equal temperament. By this means a smoother sound can be obtained, as is demonstrated, for instance, by real orchestras. We speak of “dynamic” just intonation because not only are the intervals pure but the pitches are also shifted minutely to ensure that the chord member most affected by the just intonation is as near in pitch as possible to its counterpart in equal temperament. Example: Melodyne shifts a justly tuned chord of C major (C ± 0 ct, E – 13 ct, G +2 ct) six cents up, so that the E is not too far removed from its even temperament counterpart. Furthermore, this fine-tuning of notes is not static but governed by the current harmonic context. So in the time dimension, too, it is dynamic, to ensure that at each instant optimal tuning is obtained. Dynamic just tuning is particularly effective and pleasing to the ear in a multi-track context, as it’s when you select notes from multiple (or all) tracks and apply just intonation to them that its benefits are most apparent.
Tip: Initialize the key prior to the transfer/load: In the case of monophonic or polyphonic audio material, Melodyne also recognizes the key of the music. With short melodic phrases, however, the key chosen is often not the one intended, simply because too few notes are available for a correct appraisal. To prevent this happening, you can set the key using the Scale Ruler of an empty instance of the plug-in or an empty document (if using the stand-alone implementation of the program) before the transfer or loading of an audio file. To do this, simply click on the desired keynote in the Scale Ruler and select the desired scale from the context menu. Melodyne will then retain this initialized value, regardless of its own subsequent analysis.
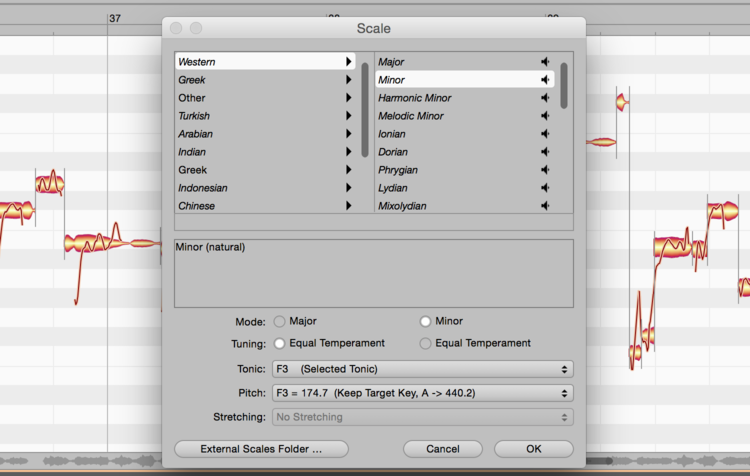
The Scale Window
Melodyne’s Scale Window offers a multitude of scales you can select, listen to, and make use of. To access this window, choose “Open Scale” from the context menu of the Scale Ruler.
The selected scale applies to all instances of the Melodyne plug-in. In the stand-alone implementation of Melodyne studio, it also applies to all the tracks of the current document.
To open the Scale Window, select Open Scale from the context menu of the Scale Ruler.
Now choose a category from the left-hand pane followed by the desired scale from the pane on the right. Click the loudspeaker icon to the right of each entry to hear the scale selected.
If you have activated the option Notes Follow Scale Changes, during playback you will hear immediately the effect of applying the scale selected to your audio material. The window allows you to try out (or ‘audition’) different scales quickly and easily. If you wish to adopt the changes, exit the window with OK; otherwise click Cancel.
From the lower pane of the window, you can select between the parameters of your existing scale and those of the scale selected in the Scale Window.
- Mode and Tuning: you can adopt either the parameters of your existing scale (on the left) or of the scale currently selected in the Scale Window (on the right).
- Tonic: you can choose between the selected tonic or the tonic from the preset.
- Pitch: here you can choose between current tuning, the pitch from the preset or various standard tunings.
- Stretching: here you can select whether or not stretched tuning should be applied to the scale.
- External Scales Folder...: this button allows you to open a folder containing scale definitions in Scala format (filename extension “.scl”) which will then appear as an additional category in the Scale Window.
On the Internet, you will find at http://www.huygens-fokker.org/microtonality/scales.html a collection of over 4,000 Scala files that you can copy to any part of your hard disk and audition and try out in this way using Melodyne.
You can also load scale definitions created in Melodyne studio (filename extension ‘.mts’) with this button.
Saving a scale
The Scale Window allows you to experiment swiftly and easily with a large number of scales as well as combine elements of your existing scale with those of the presets in the Scale Window. In the process, you are bound to hit upon interesting combinations that you will want to save and use again later. The command “Save Scale As...” allows you to do just that: store your own scale presets so that you can access them later in the Scale Window. For this purpose, it opens a window that looks very like that of the Scale Window and offers you the following options.
- Name: here you can enter a name for your scale.
- Category: select the category under which you wish the scale to be filed. Click New Folder to create a new category.
- In the text field below, you can enter a comment to be stored along with the scale.
- In the lower part of the window, you can assign names to the mode and tuning. All aspects of a scale are invariably stored along with it. By placing ticks (checkmarks) here, however, you can specify which aspects of the scale are considered relevant when it is opened subsequently.