Playback, navigation, zooming
-
The basic workflow– Learn how to operate Melodyne quickly and efficiently.

This tour will give you an overview of the functions Melodyne offers for navigation and the playing back of audio.
Controlling playback using the keyboard and transport bar
The plug-in implementation of Melodyne is integrated into the DAW and keeps perfectly in step with its playback. When you reposition the DAW, this information is conveyed to Melodyne, which mirrors the new position. As soon as the DAW starts, Melodyne also starts. It is not possible to start, stop or reposition the DAW’s playback cursor from within Melodyne.
With the stand-alone implementation of Melodyne, you start and stop the playback using the buttons in the transport bar at the top or by pressing the space bar. If you hold the [Alt] key at the same time, playback will be confined to the current selection.

You can also control playback in Melodyne Stand-Alone using the numeric keypad of your computer. The shortcuts can be selected from the Preferences dialog, the default settings being as follows:
- Playback/Pause [space bar]: Stop or Start playback from the current position of the playback cursor
- Start [Enter] when stopped: Commence playback from the current position of the playback cursor
- Start [Enter] during playback: Jump to, and continue playback from, the last starting point
- Stop [0 on the numeric keypad] during playback: Stop and jump to the last starting point
- Stop [0 on the numeric keypad] twice in succession: Jump to the beginning of the project
In both the stand-alone and plug-in implementations of Melodyne, the arrow keys on the keyboard can be used to step through the blobs. When playback is stopped, the blob currently selected will sound.
Before you can play back the blobs in this way in the stand-alone implementation of Melodyne, it may be necessary to click once in the Note Editor so that it has focus. It is the focus that determines to which part of the user interface any shortcuts you use apply. The pane with focus at any given moment is the one enclosed in a thin orange frame.
Please note that you can define a wide variety of keyboard shortcuts – including new playback shortcuts – using Melodyne’s Preferences dialog. If for any reason you are not satisfied with the default shortcuts, you can redefine them at will.
Controlling playback, scrubbing and zooming using the Time Ruler
The following playback functions are available in both the stand-alone and plug-in implementations of Melodyne – in the Melodyne plug-in, however, only when the DAW is stopped; as soon as it starts again, Melodyne plug-in resumes its shadowing of the DAW as described earlier.
Double-click in the Melodyne Time Ruler (or directly in the background of the Note Editor) to commence playback from the position in question. If you hold down the [Alt] key as you double-click in the Time Ruler, playback will be confined to the current selection.

If you double-click again in the Time Ruler while the playback is in progress, the playback will stop and the playback cursor will move to the point clicked.
A single click in the Time Ruler moves the playback cursor to the point clicked. If you do this while playback is in progress, instead of halting, playback skips to the position clicked and continues from there. If you do it while playback is halted, the playback cursor moves to the position clicked but playback remains halted and only resumes if you double-click in the Time Ruler.
When playback is halted, you can scrub through the audio material by clicking and dragging in the Time Ruler.
By dragging upwards or downwards, you can zoom the display at the current position. Scrubbing and zooming can be used in combination, allowing you to navigate and position the cursor intuitively, setting the zoom factor at the same time.
Please note: In Melodyne studio, when you start playback or scrubbing via the Time Ruler of the Note Editor, it is the Editing Mix Fader (near the right-hand end of the toolbar) that determines what you hear; if the fader button is moved all the way to the left, you will hear only the notes corresponding to the colored blobs in the Note Editor. As the fader button is moved back towards the center, the gray blobs, which are only displayed for reference, will become gradually louder. Finally, with the fader button moved all the way to the right, you will hear all Melodyne tracks, including those not currently displayed in the Note Editor.
Resizing the window
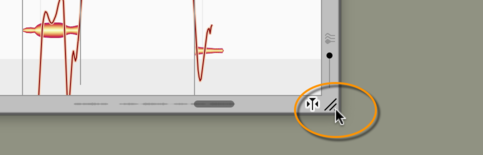
To change the size of the window, click and drag the bottom right-hand corner. The procedure is the same for both the stand-alone and plug-in implementations of Melodyne.
Scrolling and zooming in the Note Editor
Select the Scroll Tool (the hand icon) from beneath the main tool or hold down the [Command] and [Shift] keys to move the display area with the mouse.
Select the Zoom Tool (the magnifying glass) from beneath the Main Tool or press [Command]+[Alt] to zoom the display with the mouse. You can zoom horizontally and vertically at the same time – with different levels of intensity in each case.
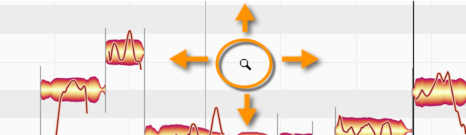
[Command]+[Shift]+double-click zooms in on one blob or several (if several are selected). A corresponding double-click in the editing background returns you to the previous zoom level.
If your hardware supports the corresponding functions, you can also scroll and zoom with the mouse and trackpad:
- The mouse wheel and swiping with two fingers on the trackpad can be used for horizontal and vertical scrolling.
- Pinching with two fingers on the trackpad zooms the display simultaneously on the horizontal and vertical planes.
Drag the horizontal or vertical scrollers (i.e. the scroll boxes or ‘thumbs’) to move the display. The horizontal scroller contains a miniaturized image of the contents as an orientation aid.
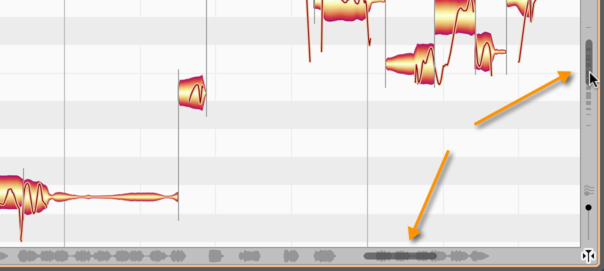
Drag the ends of the scroller to zoom the display.
If you are editing a particularly long audio file, you may find the reduced size of the scroller makes it difficult to achieve the desired zoom resolution. In that case, you can zoom in further by holding down the [Command] and [Alt] keys whilst dragging in the edit pane or else by dragging vertically in the Time Ruler.
If you pull one end of the horizontal or vertical slider as far as it will go and hold it, you can increase the vertical or horizontal size of the area displayed. This can be useful in the plug-in, for example, when you have only transferred the first three bars (measures) of your material but wish to insert something at bar 20.
Double-click in the center of the scroller to zoom in or out just enough to ensure that all the blobs are displayed. If cycle mode is active, double-clicking on the horizontal scroller zooms the display just enough to ensure that the entire contents of the cycle range are visible.
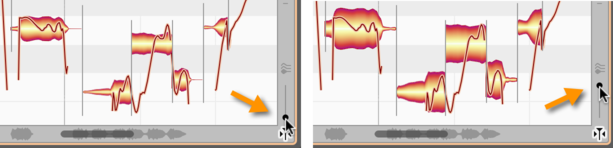
Use the slider in the bottom right-hand corner near the Note Editor to alter the height of the blobs. This does not alter their volume. Your likely motive will be to obtain a clearer view of material containing a lot of particularly quiet or particularly loud notes.
A note about automatic scrolling in the Note Editor
If you have selected one or several notes, Melodyne assumes that you wish to see and edit them, and exercises the requisite restraint by deactivating the auto-scroll function temporarily. Only when you deselect the notes (for example, by clicking in the background of the Note Editor) and restart the playback does the display resume its pursuit of the playback cursor.
Similarly, if you move the horizontal scroller so far during playback that the playback cursor actually disappears from the screen, automatic scrolling will be deactivated. Stopping and restarting in this case will reactivate the auto-scroll function.
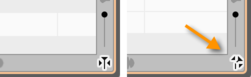
If automatic scrolling has temporarily been deactivated, the auto-scroll icon in the bottom right-hand corner of the Note Editor takes the form shown here.
Navigation and zoom functions
- To resize the window (also in Plugin), drag the bottom right corner
- Hold down the [Command]+[Shift] keys and drag the editing background of the Note Editor to move the area displayed
- Use the mouse wheel to scroll up and down or else (holding the [Shift] key) left and right
- A two-finger swipe on the trackpad can be used to scroll the display
- A two-finger pinch on the trackpad can be used to zoom the display.
- [Command]+[Alt]+drag in the Note Editor serves to zoom the display horizontally and/or vertically
- Drag vertically in the Time Ruler to zoom in on the area indicated
- Press [Command]+[Alt] and use the mouse wheel to zoom both axes simultaneously
- Press [Command]+[Alt] and double-click to zoom in on a blob or the current selection of blobs
- Press [Command]+[Alt] and double-click in the editing background to restore the previous zoom setting
- Drag the scrollers to move the display horizontally or vertically
- Drag the ends of the scroller to zoom the display horizontally or vertically
- Pull the left- or right-hand ends of the horizontal slider as far as they will go to increase the length of the section displayed (important in the plug-in e.g. when you have only transferred the first four bars and are able to navigate only in this area but wish to insert something at bar 20)
- Double-click the scrollers to zoom in or out horizontally or vertically until all notes are displayed
- The slider in the bottom right-hand corner governs the height of the blobs