Preferences and keyboard shortcuts
From the Preferences property sheet, you can select fundamental options governing the modus operandi of Melodyne as well as define a number of keyboard shortcuts.
Opening the window and user interface settings
In the plug-in implementation of Melodyne, you open the Preferences property sheet from the Settings menu; in the stand-alone implementation, choose Preferences from the program (macOS) or File (Windows) menu. The settings available in the stand-alone implementation differ slightly from those offered by the plug-in.
The following user interface options, however, are available in both implementations of Melodyne. Any changes you make in either implementation apply to both.
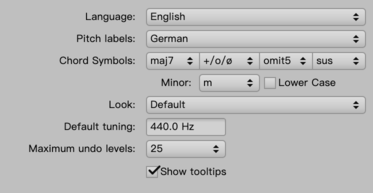
- Language: Determines the language of the user interface.
- Pitch labels: Determines which system is used to name the notes – i.e. (descending chromatically) English (C, B, Bb etc.), German (C, H, B etc.) or Latin (Do, Si, Sib etc.).
- Chord spelling: Here you can choose the spelling convention used on the Chord Track.
- Appearance: Here you can select between different contrast settings for the user interface.
- Default tuning: Determines the default frequency of the reference pitch A4 for newly created documents.
- Maximum undo levels: Melodyne allows you to undo up to 100 actions. The default value, however, is 25. You can, if you wish, increase this value, which will consume more RAM, or you may prefer to reduce it, if memory is running short.
- Show tooltips: Once you are thoroughly familiar with Melodyne, you may prefer to hide the tooltips, i.e. the explanatory text that appears as you move the cursor over the various icons and other elements of the user interface.
The audio cache
On the Audio Cache page of the Preferences dialog you will find the following two options:
- Audio cache: This shows the location of the audio cache Melodyne uses for its work.
- Audio cache size: This allows you to adjust the size of the cache.
The cache is used to store files Melodyne needs temporarily. The size of the files generated depends on the audio files being processed as well as upon the algorithm Melodyne is using for the detection.
If these files are deleted and the Melodyne project that created and was using them is later opened again, they have to be recreated, which, obviously, means it takes a little longer to open the project. If, on the other hand, the files are still available, Melodyne will just carry on using them as before.
You can adjust the size of the cache. If, when the program is next opened, the cache is full, Melodyne frees up space automatically for fresh data.
Please note: The location of the audio cache is predetermined and cannot be altered:
Windows: C:\Users\USERNAME\Documents\Celemony\Separations.
macOS: /Users/USERNAME/Library/Caches/com.celemony.Melodyne/Separations
Shortcuts
From the “Shortcuts” page, you can assign keyboard shortcuts to a large number of Melodyne functions and commands. The functions and commands in question are grouped according to category; click on the triangle alongside a given category to see a list of all the functions it includes. The following screenshot, for example, shows all the commands associated with the editing tools.

Click on a command (“Pitch Modulation Tool” in our example) and then press the key or key combination you wish to assign to it. Melodyne will remember your choice, so any time you press the key or combination in question, this will activate the Pitch Modulation Tool. Repeat the procedure for as many commands as you like.
To the right of each key combination assigned, you will see an “x”. If you click on this, you can choose one of the following functions:
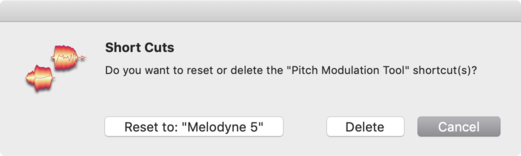
- “Delete”: This cancels the assignment, so it will no longer be possible to invoke the command in question using a shortcut.
- “Melodyne 5”: This restores the default shortcut for the command in question. (In the case of many commands – namely those for which there is no default shortcut – choosing “Melodyne 5” here will have the same effect as choosing “Delete”).
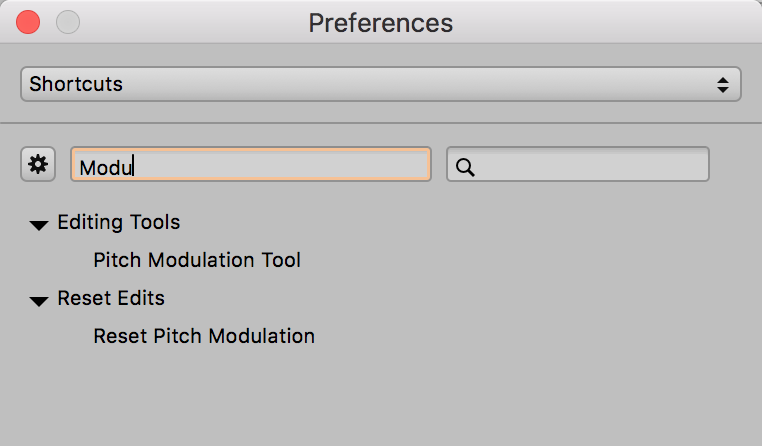
As an alternative to opening and closing the categories and scrolling through list of commands, you can find the command you’re looking for by typing in the left-hand search box. This rapidly narrows the choice and can save time. You don’t have to type the entire name of the command; just typing “Modulation”, for instance, throws up two search results:
If you change your mind, just click on the “x” in the left-hand search box and the original list will be restored in its entirety.
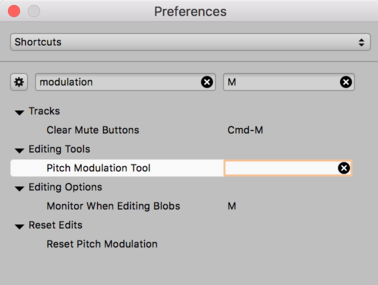
As well as searching by command or function name, you can search for the keys or key combinations already assigned; you do this using the right-hand search box. Here, too, an incomplete entry can yield multiple search results, which is very helpful in practice.
For example, suppose you wish to assign a keyboard shortcut to the command that activates the Pitch Modulation Tool. In that case, [M] (i.e. the “M” key on its own, standing here for ‘modulation’) would appear to be the obvious choice; or, if that key’s already taken, perhaps [Shift][M] or [Cmd][M]. To find out, just type “m” in the right-hand search box, and you will see what your options are:

[M] on its own, as you see, has already been assigned, but the combinations [Alt][M] and [Shift][M] are still available.
You could also combine both fields, like this, for example:
This makes it child’s play to find a suitable shortcut. And, naturally, in our example, you could still opt for [M], even though it’s assigned by default to another function; it appears in your filtered list to make it easy for you to reassign it, if you choose to do so.
You can save your preferred shortcut assignments as a set and also load custom-designed sets, such as those recommended for particular DAWs. To manage all such sets, use the gear/cog menu at the top left.
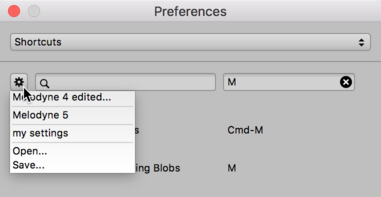
- “… edited”: This shows you which set of shortcuts you are currently using. If it says “Cubase”, for example, and nothing more, this means that the set of shortcuts currently loaded is the one designed for the Steinberg DAW of that name and that you have not yet modified it in any way. If, on the other hand, it said “Cubase (edited)”, this would indicate that, after loading the set designed for Cubase, you had made certain changes of your own. In such cases, you might wish to save the set under a new name (see below).
- “Melodyne 5”: Click here to load the factory default shortcuts for all commands and functions. If you do this, any unsaved assignments of your own will be lost.
- “Open” and “Save”: These commands allow you to load an existing set of shortcuts or save the changes you have made to the hard disk. By saving your preferred shortcut assignments, you can take them with you when you change studio and load them into Melodyne there.
When you use the Save function, Melodyne suggests you store your shortcuts in the following folder:
macOS:
/Users/Shared/Library/Application Support/Celemony/Shortcuts/Melodyne5
Windows:
C:\ProgrammData\CelemonySoftwareGmbH\Shortcuts\Melodyne5
The advantage of storing your shortcuts in the folder suggested (give them a name such as “MyShortcuts”) is that they will then appear in the list and be readily to hand at all times.
If, on the other hand, you’re travelling to a different studio where you will be working on a different computer, you should simply ignore the folder suggested and save your shortcuts to some other location, such as a USB stick or your Dropbox folder.
