Time-stretching, tempo and tempo matching
The time stretching behavior of Reaper and Melodyne
One of the strengths of ARA integration lies in the adjustment of the tempo of audio files to the existing song tempo. This functions from a technical standpoint in the following manner: Melodyne “detects” in the case of each audio file the tempo of the original recording. This works even with takes that were recorded without a click and that therefore contain tempo fluctuations – and works even if they were recorded in a quite different context from the current Reaper song e.g. with stems taken from a different song or loops from a loop library. The information “discovered” in this way by Melodyne is then shared with Reaper, which in turn might come back to Melodyne with the request that it “reshape” the playback tempo of the file in question to make it match the song tempo exactly.
This communication, governed by ARA, between Melodyne and Reaper does not preclude human intervention, as there are times when it is only sensible that you, the user, should have some say in it.
For example, in the question of whether or not Reaper should “believe” what Melodyne is telling it about the tempo. It may be that you know for a fact that the stems were recorded at a specific constant tempo, and therefore have no desire for Melodyne to engage in the search for a non-existent variable tempo. The procedures by which you can intervene in the process are described below.
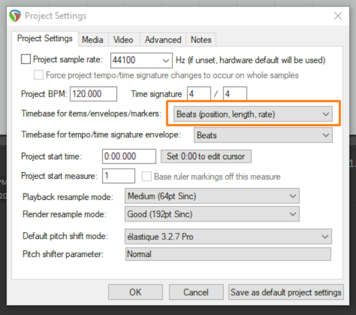
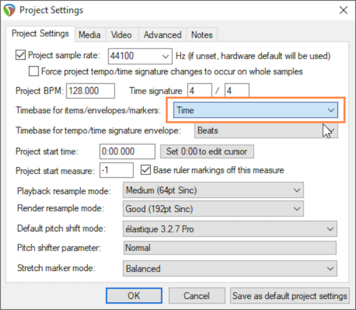
First make sure that the tempo of the media items can be adjusted. To do this, in Reaper’s “Project Settings”, under “Timebase for items/envelopes/markers”, choose the option “Beats (position, length, rate)”. Once you have done this, whenever you open a media item with Melodyne, it will be Melodyne that assumes responsibility for any time-stretching.
We can take for granted that if the audio file was recorded or bounced in the current Reaper song, it ought to play back at the song tempo. So if you speed up the song, the tempo of the audio file ought to be sped up by the same amount.
For this to happen, instead of conducting its own tempo analysis, Melodyne must simply take the tempo from Reaper. To ensure this happens:
- Select at least one blob in Melodyne.
- Choose the option “Copy Song Tempo to File(s)” from Melodyne’s Tempo dialog (this function is described more fully below).
This will result in a single value (and no brackets) being displayed in Melodyne’s Tempo field.
If, on the other hand, the file comes from another song – with a tempo, say, of 117 BPM – then you must choose one of the four options from Melodyne’s Tempo dialog described below to ensure Melodyne is able to squeeze or stretch the audio to match the song tempo.
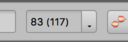
You can always tell when Melodyne has detected a file tempo different to that of the song, as in that case two values are displayed in the Tempo field. The first value is the tempo of the Reaper song (in this example 83 BPM). The value in brackets indicates the tempo Melodyne has detected in the audio file (here 117 BPM).
In Track Mode, too, the song tempo is displayed without brackets, whilst the tempo of the clip over which the playback line is currently passing is shown in brackets. (If, in a multi-track context, the playback line is passing simultaneously over two clips with different file tempos, only a dash (“-”) will be displayed within the brackets.) In Note Assignment Mode, where you are examining the “raw” source material, only the file tempo (in our example, the “117”) is displayed.
Now it is up to you to decide how the conflicting tempos are to be reconciled. To do this, open the Tempo dialog.
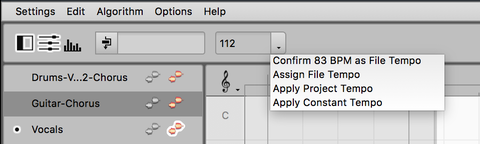
Next select one of the following options:
“Confirm xxx BPM as File Tempo”: This tells Reaper to accept the tempo detected by Melodyne. This triggers Melodyne’s time-stretching and the tempo of the audio file is adjusted to match that of the song (slowing, in our example, from 117 to 83 BPM). Typical application: You are using an audio file (the tempo of which you do not know) and simply wish it to match that of the song
“Assign File Tempo”: If you think Melodyne has slipped up in its detection of the file tempo, with this command you can open the Tempo Editor in Assign Tempo Mode and correct the tempo manually. Typical application: Your file consists of a vocal take containing many pauses during which Melodyne can find nothing upon which to base its file detection and as a result, if only in places, gets the tempo wrong. Through tempo assignment you can lend Melodyne a hand, so to speak, to ensure that any subsequent time-stretching proceeds upon the basis of accurate values and delivers musically appropriate results.
Please note that in Melodyne essential and assistant the entry “Assign File Tempo” is not available, as the Tempo Editor does not feature in these editions. Instead, you can multiply the detected tempo in order to assign a new tempo to the file.
“Apply Project Tempo”: In this case, regardless of the tempo detected by Melodyne, you do not wish the file to be subjected to time-stretching. In other words, you have determined that the file and song tempos are identical (which means that no time-stretching is necessary). Choose this option if the audio file was recorded or bounced in the current Reaper song. Another application: You had already, using functions supplied by Reaper, adjusted the tempo of the file to the song tempo, before deciding to open a passage within it in Melodyne. Now you wish to change the melody or key in Melodyne but without jeopardizing the tempo adjustment already performed.
“Apply Constant Tempo”: With this command, you can, if necessary, set the file tempo manually. To do this, select the command from the menu and type into the Tempo field the desired tempo. You might wish to do this when you already know the tempo of the recording that you are importing into your song. Suppose, for example, the song tempo is 83 BPM and you are importing from a sampling CD a drum loop the stated tempo of which, in the booklet, is 90 BPM. As a rule, Melodyne will detect the 90 BPM immediately and display “83 (90)” in the Tempo field. To trigger the time-stretching in this case, it would be enough to select “Confirm as File Tempo”. In the event of Melodyne here displaying a value other than 90 BPM for the file tempo, as, for instance, when it interprets the loop in double time and consequently displays “83 (180)”, you can use the “Apply Constant Tempo” command to correct the misapprehension by typing “90” in place of “180”.
Tempo and the Time Grid
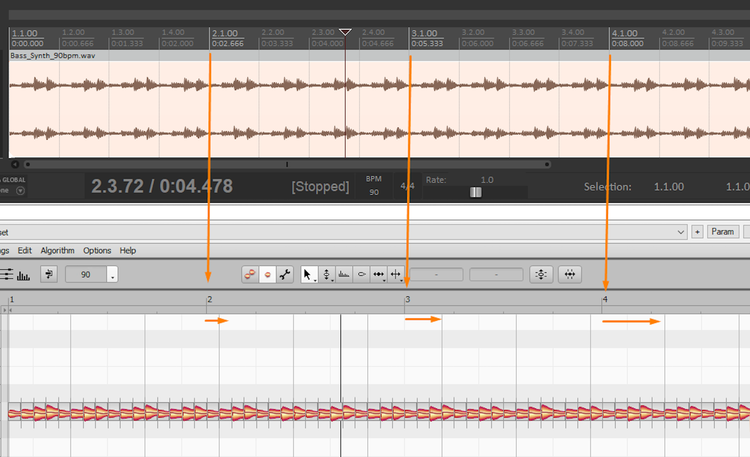
The discovery (or explicit definition in the Tempo dialog) of the “correct” file tempo serves other purposes as well as that of musically sensitive tempo adjustment. It makes the work of editing the notes easier, because the file tempo also determines the calibration of the Time Ruler as well as the positioning of the grid lines in the background to the Note Editor.
Imagine, in this case, that you want to move a note a semiquaver (sixteenth note) to the right or left. What you intend, in all probability, is that the exact length of this sixteenth note should be a function of the current song tempo (say 100 BPM). If the Time Grid, however, were still based on the tempo of the original recording (120 BPM, say), then when you attempted to move a note by a semiquaver, it would end up in the wrong place – (the rule here being: the quicker the tempo, the more closely spaced the gridlines). For this reason, Reaper and Melodyne, communicating via ARA, strive to ensure that their rulers and Time Grids provide at all times an “accurate” representation of the current tempo and that any quantization that is undertaken is therefore similarly “accurate”. In the following, an overview taking into account the various edit modes as well as the difference between local playback and playback in Reaper.
Tempo display in Track Mode:
- Melodyne’s Tempo field displays a single value: the song tempo in Reaper.
- Melodyne’s ruler and the Time Grid in the Note Editor background are synchronized and they are each calibrated according to the same principle: the faster the song tempo, the smaller the distance between lines.
Tempo display in Clip Mode
- Melodyne’s Tempo field displays two values (as described above): the song tempo, followed by the file tempo in brackets. A single value is displayed only when the tempo of the file and that of the song are identical.
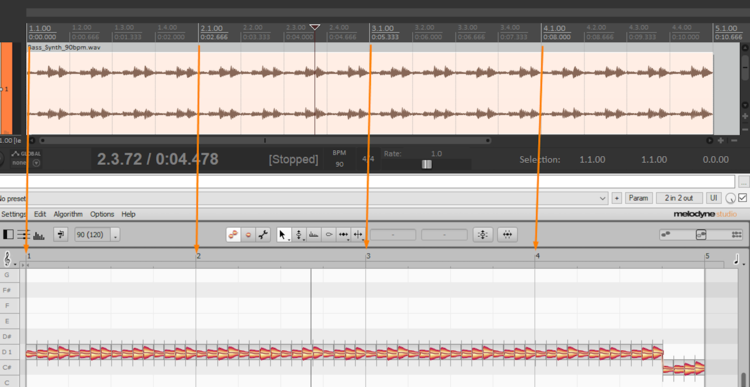
- Melodyne’s Time Ruler and the Time Grid in the Note Editor background are now no longer necessarily in sync, as the ruler reflects the song tempo, whereas the grid represents the tempo of the file. If the two tempos are not identical, the dashes on the ruler will no longer coincide with the lines of the grid.
This is as it should be and reveals the effect of dynamic time-stretching during playback in Reaper: the Time Grid, and with it the notes of the original recording, are squeezed or stretched to accord with the song tempo and also, therefore, with the ruler. The results, of course, will only be musically viable if the Time Grid is calibrated on the basis of “accurate” tempo-detection or -input. For this reason, Clip Mode allows you to examine the Time Grid to ensure that it corresponds with the notes. Should this not be the case, you can make the necessary adjustments using the Tempo dialog options described above.
- During playback in Reaper, the clip follows the tempo of the song i.e. the value before the brackets. This is achieved by stretching or squeezing the original file to match this tempo.
- During local playback, the clip is heard at its original (file) tempo – i.e. at the tempo shown in brackets – and no time-stretching or -squeezing occurs.
Tempo display in Note Assignment Mode:
- Melodyne’s Tempo field displays a single value: that of the original file.
- The ruler and Time Grid are synchronized.
- Reaper follows the song tempo. Local playback follows the file tempo. There is one difference here: Double-clicking on the Melodyne ruler in this edit mode also starts local playback and not (as in Track and Clip modes) playback from Reaper.
Quantizing notes
As described above in the section entitled “Tempo and the Time Grid”, it is possible – in Clip Mode only – for discrepancies between the ruler and Time Grid to occur. These serve initially as an orientation aid, reminding you perhaps that you have moved a clip in Reaper a sixteenth note backwards, the evidence being that the Time Grid is now a sixteenth note ahead of the ruler.

Such an offset, however, has an effect upon the quantization, because Melodyne uses its own Time Grid for the quantization and not Reaper’s ruler. In practice, of course, the two are nearly always identical and the quantization therefore mostly behaves in the manner with which users of MIDI editors, for example, will be familiar. But when, as described above, a clip has been moved in the Reaper arrangement (perhaps only by a few milliseconds, for creative purposes), in Clip Mode the quantization destinations (i.e. the positions towards which notes will gravitate when quantization occurs) are visually obvious.
Quantization works the same way in Track Mode as in Clip Mode, being based invariably upon the Time Grid of the original file. In Track Mode, however, you see the Time Grid of Reaper, which, in the exceptional cases described above (such as when you have shifted a clip slightly to the left or right in Reaper) can be misleading, as the quantization destinations may be offset slightly from the gridlines. This, however, is merely an optical discrepancy. Switch to Clip Mode and you actually see the grid that is defining the quantization destinations.
Importing a tempo map from Melodyne into Reaper
Melodyne has a powerful tempo detection function that is applied to every audio file opened. This allows it, for example, to trace the changing tempo of a live recording and create an accurate map of it. If you want, you can import the tempo map created by Melodyne into your Reaper project and adopt it as the tempo map of the entire project. To do this, proceed as follows:
First make sure that in Reaper’s “Project Settings” dialog, under “Timebase for items/envelopes/markers:”, the option “Time” is selected.
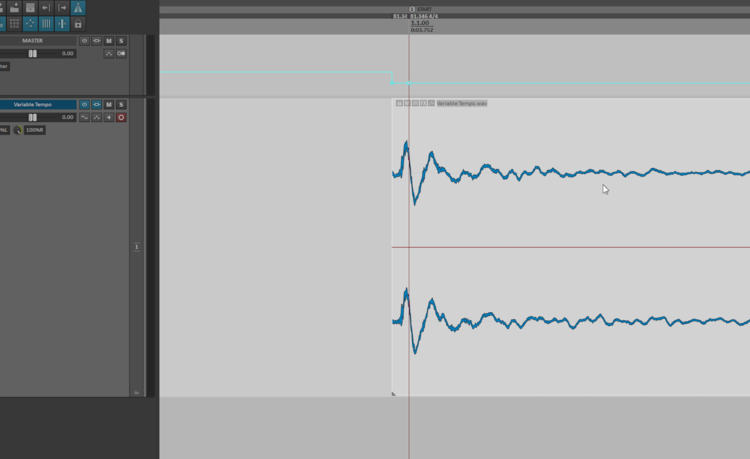
Now, once the recording has been opened in Melodyne and its tempo detected, click the “+” symbol in the Melodyne plug-in window and choose “ARA: import into project” > “Tempo, time signature and measure grid” from the cascading menu. The Reaper project will then adopt the tempo, the time signature and the measure (or ‘bar’) grid created by Melodyne. You can confirm this by examining the tempo curve in Reaper, which is displayed in the master track when you press ALT+T.

If when you open the same menu from the Melodyne plug-in window, under “ARA: import into project” you choose this time “Tempo” (as opposed to “Tempo, time, signature and measure grid”), you may find the audio file no longer begins at the same point on the Reaper measure ruler. In this illustration, it should coincide with the first beat of the bar (“1”) but in fact comes slightly earlier.
In such cases, the command “ARA: align media to detected grid” (in the same menu of the Melodyne plug-in window) can be useful. First, compare the audio file with Reaper’s time ruler and decide how far out of sync it is. Express this discrepancy as a note value (e.g. “1 sixteenth note”) and set Reaper’s time grid to the same value (in our example, to sixteenth notes). Having done this, choose “ARA: align media to detected grid” from the Melodyne window. The beginning of the file will then snap to the grid and all will be well.
