Editing scales
-
Scales and tuning systems– Find the scales and tuning systems used in any recording. Work quickly and with maximum freedom and musicality. Melodyne 5 studio, smaller editions may differ.

In the extended scale area, which opens to the left of the Pitch Ruler, you will find the functions for the editing of scales and creation of new scales.
Displaying the extended scale area
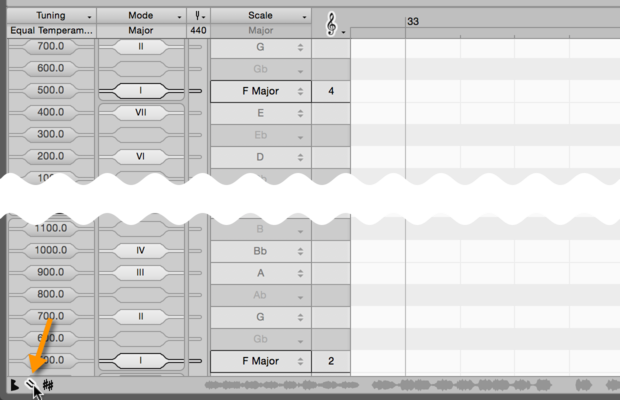
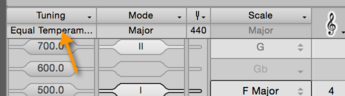
Click on the tuning fork icon beneath the Pitch Ruler to open the extended scale area. To the left of the Scale and Reference Pitch Rulers, two further rulers will appear: the Mode Ruler and the Tuning Ruler.
The setting options for mode and tuning or intervals described below are only available in Track Edit and Note Assignment modes – not in Clip Edit Mode.
Editing modes
The Mode Ruler allows you to define the degrees of your scale – the mode degrees – and their use. If your DAW offers a chord track and you have checked the option “Edit” > “Chords and Scales” > “Use DAW Keys”, you may find that some or all of the items in the Mode Ruler’s context menu are grayed out. This is because you control the settings in question in that case from the DAW. When you right-click on a degree in the Mode Ruler, a context menu appears, allowing you to assign to the degree in question any of the following designations:
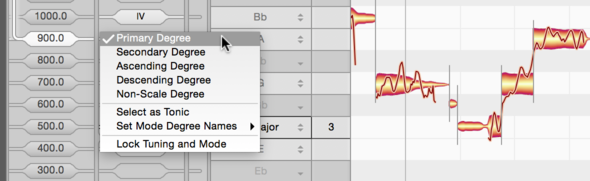
- Primary Degree: a degree always used in the scale.
- Secondary Degree: a degree that can be, but is not necessarily, used in the scale.
- Ascending Degree: a degree only used when ascending the scale.
- Descending Degree: a degree only used when descending the scale. A simple example of a scale in which different notes are used depending upon whether you are ascending or descending is the melodic minor.
- Non-Scale Degree: a degree made available by the tuning system but not employed by the scale. Non-scale degrees are grayed out in the ruler.
- Set as Tonic: tells Melodyne to regard the selected note as the first note (or “tonic”) of the scale. The tonic is indicated by a black outline.
- Set Mode Degree Names: allows you to choose whether the degrees of the scale are indicated by Roman numerals, solmization or their Indian designations. After double-clicking on a degree, however, you can type in any designation you prefer.
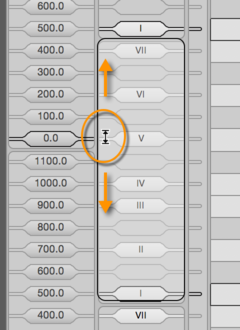
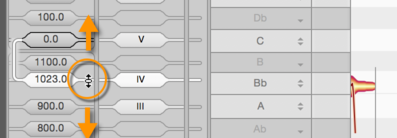
- Lock Tuning and Mode: By placing the mouse pointer alongside the degree indicator in the mode menu and dragging upwards or downwards, you can transpose the mode. Normally the transposition is performed without regard to the tuning of the mode.
In the case of a scale exhibiting unequal temperament – one, in other words in which adjacent degrees are separated by varying numbers of cents – a crude transposition of the mode, however, would disturb the ratios between the various degrees of the scale. Whenever this outcome is threatened, the “Lock Tuning and Mode” function is activated automatically so that the degrees of the scale move en bloc and the intervals between the degrees are preserved. If you prefer, however, you can activate or deactivate this function manually.
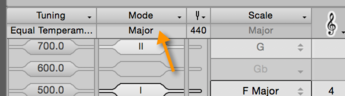
The text box at the top of the Mode Ruler (below the word “Mode”) allows you to assign a name to your scale.
Editing intervals
The degrees of a scale are defined by a tuning system whereby each degree is a specific distance from the tuning root. This distance is described as an “interval”. The tuning therefore says nothing about the absolute pitch but simply expresses the ratios between the various degrees of the scale.
In the Tuning Ruler, you can see these intervals displayed in cents and can edit them. Just drag an interval upwards or downwards with the mouse to alter its tuning.
Intervals displayed as frequency ratios
Alternatively, you can define an interval as a frequency ratio. The interval of an octave, for example, is formed by the ratio 1:2. This is the function of the Ratio Ruler, which appears at the bottom of the screen when you click on an interval. Melodyne displays there the frequency ratios that are most relevant: i.e. the ones lying closest to the selected interval.

The brighter the highlighting, the closer the ratio to the selected interval. If you double-click on one of the ratios suggested, the Ratio Ruler engages and the cent display of the interval in question is updated to reflect your choice.
By dragging the upper half of the ruler, you can set any ratio you want. To move the entire ruler, drag the lower half. If you check the box marked “All” in the Ratio Ruler, Melodyne will no longer preselect ratios for you but simply display all possible ratios that approximate to the current interval.
Defining intervals
Right-clicking on any interval in the Tuning Ruler opens the following context menu:
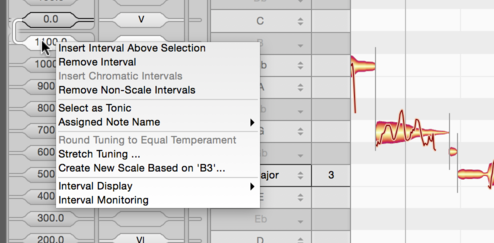
- Insert Interval Above Selection: inserts an interval above the interval selected.
- Remove Interval: removes the selected interval.
- Insert Chromatic Intervals: supplements the existing intervals chromatically through the addition of further intervals.
- Remove Non-Scale Intervals: removes all intervals foreign to the scale.
- Set as Tuning Root: makes the selected interval the point from which the intervals are calculated.
- Assigned Note Name: any new interval initially takes the name of the nearest note. Musically, however, it may be preferable to assign the name of the note above or below it, so this entry allows you to select an alternative name.
- Round Tuning to Equal Temperament: rounds all intervals to comply with equal temperament.
- Stretch Tuning: opens a window that allows you to apply stretched tuning to your scale (more on this below).
- Create New Scale Based On ...: opens a window that allows you to create from scratch a new scale (more on this below).
- Interval Display: This allows you to make the selected interval the display reference for your tuning system, deactivate the cyclic interval display, and select between cents, hertz and Turkish commas (=1/53 octave) as display units. These options only affect the display of the intervals and have no effect on their tuning.
- Interval Monitoring: if this option is checked, as you alter an interval you can hear the results.
The text box at the top of the Tuning Ruler (below the word “Tuning”) allows you to enter a name for the tuning system of your scale.
Tip: If you hold down the Shift key and click between two intervals, you can insert a new interval at the position of the mouse cursor. Hold down the Shift key and double-click on an existing interval to delete it.
Creating your own scales
To create a scale from scratch, right-click on an interval in the Tuning Ruler and select “Create New Scale Based on ...” from the context menu. A new window opens offering you the choice initially between a cyclic and non-cyclic scale.
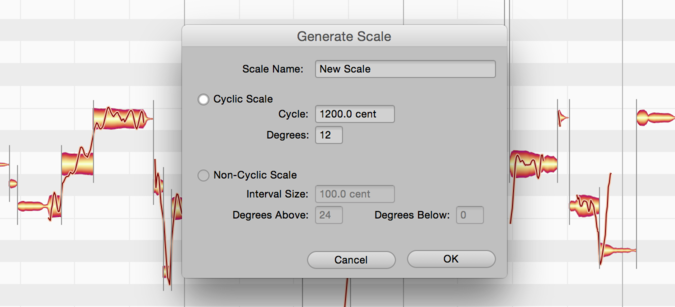
- Cyclic Scale: If you opt for a cyclic scale, you can specify the size in cents of the cycle and the number of degrees of which it is composed. For a scale that repeats every octave, for example, the cycle size would be 1200 cents. Tip: you can also enter the cycle size as a ratio: e.g. “2/1” for an octave cycle.
- Non-Cyclic Scale: Enter the size of the intervals between adjacent notes and the number of degrees above and below the selected tonic.
- Scale Name: Enter the name of your scale in the text box provided.
- If you exit with OK, Melodyne will generate a scale in accordance with your specifications and this will become the new scale grid for the current document. Exit with Cancel to revert to the current scale.
Working with stretch tuning
On upright and grand pianos, the higher registers are generally sharpened slightly and the lower registers flattened; the tuning, in other words, is “stretched”. If you were now to work in Melodyne with equal temperament, the desired stretch tuning would be lost. To avoid this, select Stretch Tuning ... from the context menu of the Tuning Ruler and a window will open allowing you to define the stretch curve.
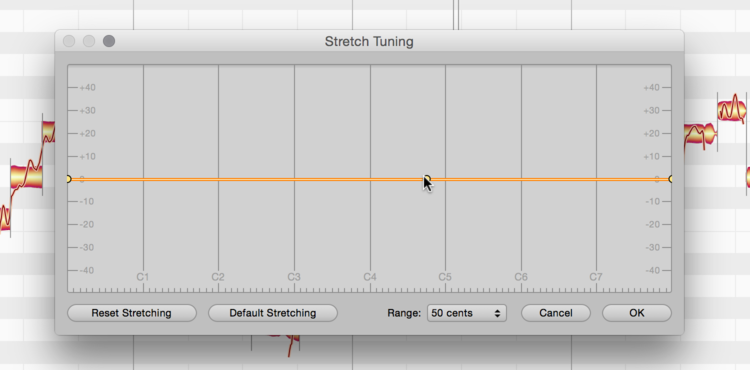
By double-clicking on the graph, you can create handles with which you can drag the curve to obtain the desired characteristic. Double-click on a handle to remove it.
- Standard Stretching: if you click this button, Melodyne will generate a typical stretch curve, which you can then further adjust should you so desire.
- Reset Stretching: restores the curve to its starting position.
- Pitch Range: defines the maximum deviation and therefore the vertical range of the curve.
- Exit with OK to implement the stretch curve you have defined or with Cancel to discard your changes.