The Sound Editor – Operation
- • The mean spectrum
- • Emphasis and Dynamics
- • Bypass, Gain and the global Sound Editor menu
- • The working areas
- • The Harmonics, Hi and Lo working areas
- • The harmonics bars and how to use them
- • The Harmonics, Lo and Hi macro controls
- • The EQ working area
- • The EQ macro sliders
- • Formants
- • The envelopes in the Synth working area
- • The Resynthesis parameters in the Synth working area
-
The Sound Editor– How to enhance or fine-tune the timbre of each track or else create unique effects.

This tour explains how to use the Sound Editor’s parameters to modify the tone color of your recordings. For more on the subject, such as how to make the desired note selection for editing in the Sound Editor, see the preceding tour: “The Sound Editor – Introduction”.
The Sound Editor in Track Mode and Clip Mode
The Sound Editor in the case of ARA integration works – as in the stand-alone implementation – on a per track basis. So if you are working in Track Mode and the track in question comprises multiple clips, any changes made in the Sound Editor will affect all the clips in the same way. If, for example, you have lowered the third overtone by 10 dB, this setting will be applied to all clips on the track.
If, however, you now switch to Clip Mode and raise the third overtone of the selected clip by 4 dB, the resulting value for the overtone in question in the selected clip will be the sum of the two adjustments – i.e. -6 dB – whereas in the other clips the third overtone will still be at -10 dB. By this means, you can apply different settings to different clips.
If you now switch back to Track Mode, you will see displayed in the Sound Editor a value somewhere between -10 and -6 dB for the overtone in question. This is a display compromise: an average of all the clips concerned.
The mean spectrum
Before we examine the functions of the Sound Editor in detail, there is one term has to be explained, as it runs like a thread through them all: the “mean spectrum”.
Once it has detected the notes of which an audio track is composed, Melodyne conducts a spectral analysis to determine which harmonic partials (from now on, we’ll call them “harmonics”) each note contains and how loud in each case these are. When the analysis is complete, Melodyne has an “acoustic fingerprint” (in spectral form) of each note. After averaging the spectra of all notes on the track, Melodyne obtains what we call the “mean spectrum” of the entire track.
The starting point for any spectral adjustments you effect using the Sound Editor is the mean spectrum of the track in question, which we can think of as the average timbre (or “tone color”) of its notes. For the purpose of orientation, the mean spectrum is displayed in the form of a thin line that remains stationary as you resize the columns or redraw the curve in the various working areas of the Sound Editor.
If multiple tracks are selected when you open the Sound Editor, it is the mean spectrum of them all that is displayed and forms the basis for editing.
Emphasis and Dynamics
The Emphasis and Dynamics sliders offer you a simple but effective way of influencing the tone color and amplitude of the track. They work independently of the other elements of the Sound Editor and have no effect upon their displays. It is sometimes worth opening the Sound Editor just to use either or both of these controls.
In case you haven’t already done so, check the option Show Tooltips on the User Interface page of the Preferences dialog, so that the names of the various control elements pop up as you pass the mouse over them.
Emphasis: As you move this slider from its neutral midpoint towards the right, any differences between the spectra of the notes actually sounding and the mean spectrum are increased. This makes their peculiarities more pronounced, as wherever their spectra departs from the mean spectrum, the difference is progressively exaggerated, in the manner of a caricature.
Moving the slider to the left has the opposite effect, assimilating the spectra of the notes in question ever more closely to the mean. In this way, their peculiarities gradually disappear, making the timbre throughout the track more uniform.
The Emphasis slider offers an outstanding means of raising the profile of certain sources within the mix and helping them cut through, whilst making others less obtrusive so that they blend in better – in each case, without changing their volume.
Please note that the Emphasis slider has a very wide range in each direction (± 200 %) making it also a powerful tool for generating effects. Valuable results can be obtained, however, depending upon the material, with far smaller values. We recommend, therefore, that you operate this particular control with a light touch. Holding down the [Alt] key as you move the slider will make it easier to increment/decrement the parameter one per cent at a time.
Dynamics: This slider influences the amplitude of the notes – specifically, their internal dynamics. As you move the slider to the right, the quieter parts of each note become quieter still; as you move it to the left, they become louder. In other words, moving the slider to the right exaggerates any fluctuations in amplitude within each note, whereas moving it to the left smoothes them out.
If you apply the Dynamics slider to a piano recording, for example, you can make the notes decay more rapidly (for a staccato effect) by moving the slider to the right, whereas moving the slider to the left gives them a longer decay, lending the passage in question more of a legato feel. Given the way it operates, the Dynamics slider obviously has no effect on notes with a uniform amplitude – with the same envelope, in other words, as an organ – other than, at most, to make them somewhat louder.
Tip: With polyphonic material, moving the Dynamics slider to the left can cause notes to overlap that didn’t do so originally, which, if there was scant headroom to begin with, can lead to the distortion threshold being crossed. This is easily avoided, however, by giving the Gain knob (described in the next section) a slight twist anticlockwise.
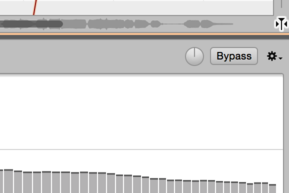
Bypass, Gain and the global Sound Editor menu
In the top right-hand corner of the Sound Editor, you will find a bypass switch that deactivates the Sound Editor altogether, so that what you hear is the unedited track signal. Use this switch for a quick comparison between the sounds of the edited and unedited signals.
Since editing the spectrum can involve dramatic changes in level, Melodyne automatically compensates, to ensure that the output level remains approximately the same. On rare occasions, however, you may find either that the distortion threshold is being crossed or that the output level is too low, in which case you can adjust the level manually using the gain control.
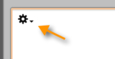
The drop-down menu contains three commands: Reset All governs all the working areas of the Sound Editor, returning it to the state it was in when first opened for the track in question. Similarly, Copy Settings copies the settings of all the working areas of the open Sound Editor, which you can then apply to another track using the command below: Paste Settings.
Please note that the Copy Settings command does not copy the mean spectrum of the source track; only the relative adjustments you have made to it – to make a particular harmonic louder or quieter, for instance. When the settings are pasted, therefore, the same offsets are applied to the mean spectrum of the destination track. The eventual level of the harmonic in question therefore depends partly upon how loud it was to begin with and only partly on the editing of the same harmonic in the source track that you have copied over (along with the other settings).
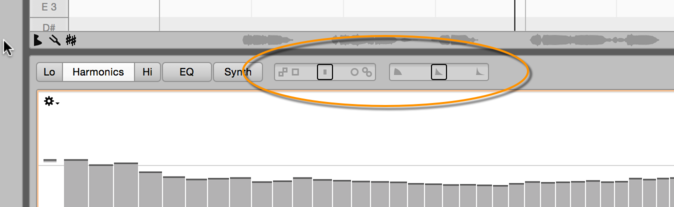
The working areas
Using the tabs, you can switch between the various working areas of the Sound Editor. If you hold down the [Command] key at the same time, you can open several working areas side by side, provided there is enough space. To close one of multiple open working areas, [Command]-click in the same way on its tab.
Each of these working areas contains a central display and, beneath it, a number of sliders. Before going into the details, let’s take a quick look at the various working areas.
Harmonics, Lo and Hi: These three working areas allow you to intervene directly in the overtone structure of the notes. They are laid out identically, Harmonics being of central importance as it governs all the notes. Lo and Hi merely allow you, if you wish, to make further adjustments to the harmonics of the notes whose fundamentals lie in the lower and upper halves (respectively) of the track’s register.
EQ: This is a graphic equalizer in which the frequency spectrum is sliced up into bands one semitone wide. The important difference between the EQ and the Harmonics, Lo and Hi working areas is that the latter govern the levels of the overtones of the notes (the frequencies of which depend upon the pitch of their respective fundamentals), whereas the EQ acts upon fixed frequency bands like a conventional graphic EQ.
Synth: This working area contains three envelopes that govern (respectively) the influence over the lifetime of each note of whatever changes you have made to the spectrum, the gliding upwards or downwards of formants, and internal changes in amplitude. Here you will also find two sliders that govern the resynthesis in the Sound Editor.
The Harmonics, Hi and Lo working areas
The Harmonics area displays and allows you to edit the harmonic spectrum of the notes of the selected track.
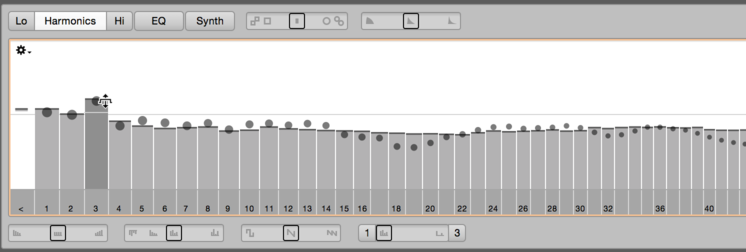
The bar chart dominating the pane may remind you of a filter bank or one of those plug-ins that allow spectral filtering. It differs, however, from such filters in one important respect: The spectrum here relates to the individual notes – i.e. the pitch of the fundamentals; this is only possible because Melodyne is able to recognize the notes heard on the track.
This means that when you increase or decrease the height of the third bar, for example, you are not altering the level of a fixed band of the frequency spectrum but that of the third harmonic of all the notes, the frequency of which, obviously, varies from note to note.
You are editing the sound, so to speak, at the source, exercising a very direct influence upon the timbre. The harmonics bars therefore have far more in common with the oscillators of an additive synthesizer or the drawbars of an organ than with the bands of an equalizer. They reflect and determine the relative amplitude of the harmonics – including that of the fundamental, which is the first harmonic – of all the notes on the track. The possibilities they afford for the shaping of the timbre are at once subtle and far-reaching.
The starting point for any editing is the mean spectrum of the entire track, which Melodyne has determined from its prior analysis. The balls that bounce up and down as the track plays back reflect the instantaneous level of the harmonics in question. You will notice that these are constantly crossing and recrossing the mean value indicated and determined by the top of the bar. When you increase or decrease the height of a bar, the original level of the harmonic in question in the mean spectrum remains visible, being indicated by a thin line.
The Lo and Hi working areas complement the Harmonics area. All three areas are active simultaneously and their effect is cumulative. The Lo and Hi working areas offer exactly the same function sets as the Harmonics area but affect only the harmonics of notes lying in the lower and upper halves, respectively, of the register of the track in question, the halfway point being determined by Melodyne automatically. The settings for the two regions morph into one another in the crossover zone to ensure a smooth transition in timbre.
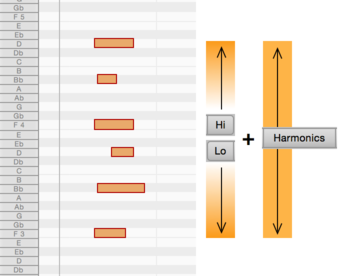
Example: You have a piano track on which the high notes are perfect but the low notes sound a little dull. If you tried making the lower notes and the midrange brighter using a conventional equalizer, the high notes would then be too bright. With the Sound Editor, no such problem occurs; you can edit the harmonic spectrum of the low notes in the Lo working area without this influencing the high notes – with, at the same time, quite different settings in the Hi working area governing the high notes without these affecting the bass. The settings in the Harmonics working area remain active, offering you complementary control over all the notes.
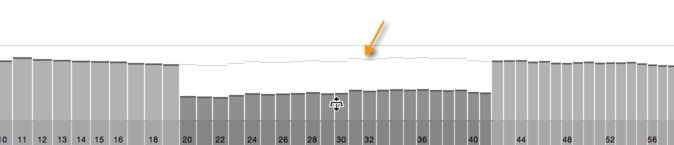
The harmonics bars and how to use them
The bars or columns in the Harmonics, Lo and Hi working areas represent the harmonic partials of the notes; they have nothing to do, obviously, with bars in the metrical sense (as in “the chorus is 8 bars long”). The bar marked “1” represents the first harmonic (the fundamental), and the bars to its right marked “2”, “3”, “4”, represent the second, third and fourth harmonics, the frequencies of which are (respectively) 2, 3 and 4 times that of the fundamental – and so on as you carry on up. The leftmost bar, marked “<”, influences the level of all frequencies below that of the fundamental. With many sources, pulling this bar down can make the sound cleaner.

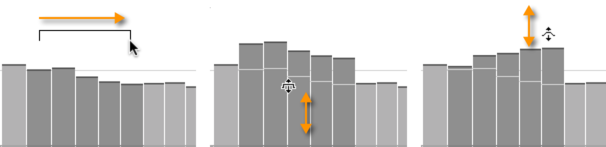
To adjust the height of the bars, proceed as follows:
- Drag the top of a bar upwards or downwards to alter its height (and the level of the corresponding harmonic).
- For finer adjustments, hold down the [Alt] key as you do so.
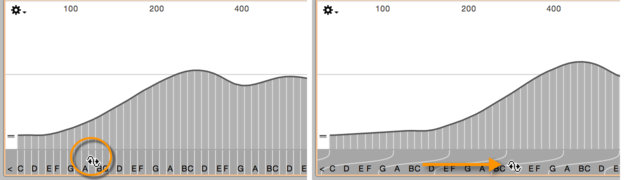
- Drag horizontally in the white zone above the bars to make a range selection.
- To adjust the height of all the bars within the selection by the same amount, drag upwards or downwards in the medium-dark area (not the darkest band at the bottom) within the selection. If, on the other hand, you drag from a point just above the selection (where the mouse pointer changes shape), the bar closest to the pointer will move the greatest distance and those further away progressively less.
- [Shift]-click to select (or deselect) non-adjacent bars.
- Double-click a bar to select all octaves of the corresponding harmonic.
- To restore a harmonic or selection of harmonics to their original levels in the mean spectrum, [Command]-click the bar or selection in question.
The local pull-down menus of the Harmonics, Lo and Hi working areas contain the following commands, which affect all the harmonics bars of their respective displays.
- Reset Spectrum: This restores the harmonics bars in the working area in question to their original positions, reflecting the mean spectrum.
- Copy Spectrum: This copes the spectrum of the selected area, so that it can be copied into another area or track. The copying of spectra can create interesting coloring and morphing-like effects. As the copy is performed, the current Contour setting is factored into the copied spectrum, whereas the values of the other macro sliders are simply copied and the formant settings ignored.
- Paste Spectrum: This command works in conjunction with the Copy Spectrum command described above, the result being to paste the copied spectrum into the currently selected working area (Harmonics, Hi or Lo) of the track being edited. You can copy and paste between tracks in the same document or from one document to another. As the paste is performed, the Contour parameter of the destination track is reset, so its entire range is available for future editing.
- Clear Spectrum: This is like pulling down all the faders of a mixer: the result is silence, which can be a good place to start if you wish to create a new timbre from scratch.
- Shuffle Spectrum: This sets all the harmonics to random levels.
- Show All Harmonics: You have the choice of displaying all the harmonics (however high) or only the lowest and most important ones, the bars of which will then be wider and easier to manipulate. When the highest harmonics are not being displayed but a selection includes the rightmost bar that is visible, all the harmonics above it that are excluded from the display are nonetheless included in the selection and edited accordingly.
The Harmonics, Lo and Hi macro controls
Each of these three working areas offers the same four sliders. These are macro controls that govern the level of the various harmonics, and their effects are immediately reflected by the display. [Command]-clicking on any of the macro controls resets it to its neutral position. This removes any influence it previously had on the level of the harmonics and height of the harmonics bars but any changes you may have made manually (i.e. other than with the macro) remain effective.

Brilliance: When you move this slider to the right, the level of the higher harmonics is raised, making the sound brighter. Moving it to the left makes the higher harmonics quieter and the sound duller.

Contour: Moving this slider to the right increases any difference in height between neighboring bars, making the peaks higher and the troughs deeper, and generally sharpening the contours of the display. Moving the slider subsequently to the left has the opposite effect, restoring gradually the original contours as it moves back towards the middle, before flattening them out as it moves further to the left.

Odd/Even: This gradually fades out the odd-numbered harmonics (when moved to the right) or even-numbered ones (when moved to the left). In the former case, the octaves are steadily reinforced, whereas in the latter, the source takes on a progressively hollower, clarinet-like sound.

Comb: This slider thins out the harmonic spectrum, creating increasingly weird effects, with the display resembling a comb losing its teeth. The buttons to each side of the slider allow you to slide the comb sideways (without removing further teeth) and this, too, has a dramatic effect upon the sound. If the slider is left in the central position, the effect of clicking the button to its right is to eliminate one by one the lowest harmonics from the spectrum.

You can combine freely use the four sliders with that of the bars representing the harmonics; this gives you an abundance of sound design options.
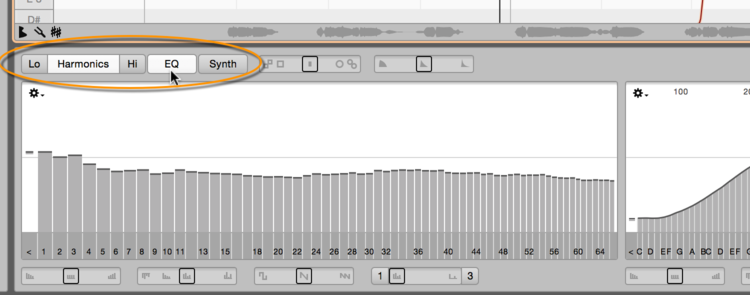
The EQ working area
This working area contains a graphic equalizer that – in the usual way – operates upon fixed bands of the frequency spectrum. The equalizer divides the frequency spectrum into bands a semitone wide and is calibrated with the note names at the bottom.
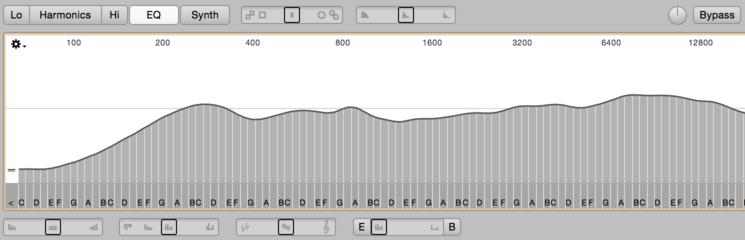
Since the equalizer operates on fixed frequency bands within the audio spectrum, it offers a quite different approach to the shaping of sounds than that offered by the Harmonics, Lo and Hi working areas, in which the bars represent the various harmonics. All four working areas can be used at the same time.
The starting point for any editing using the equalizer is the mean spectrum of the track being edited, which is referenced here to the entire audio spectrum. If the track contains a large number of high or very bright-sounding notes, the right-hand end of the EQ curve will naturally be more elevated or “mountainous” than if it did not.
When you reshape the curve, the original mean spectrum remains visible in the form of a thin line. During playback, the instantaneous spectrum is indicated by balls that cross and recross the current curve as they bounce up and down.
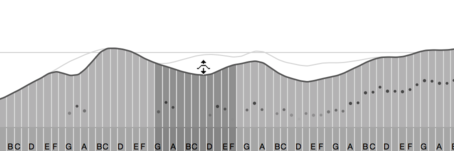
To avoid confusion between the EQ working area and the other, harmonics-based ones, the current levels of the individual bands are indicated here by a curve rather than horizontal lines. The same techniques, however, are used to adjust the level of the various frequency bands as to adjust the height of the harmonics bars in the other windows, so if you have not already read the section there explaining how to select and drag the bars, please do so now.
The equalizer employs as a basis the notes that have been detected in the track being edited. This means that a note in the audio material that has not been correctly identified will not be assigned to, or governed by, the correct EQ band. If a note in polyphonic material is not detected, its contribution to the overall sound will be wrongly attributed either to a lower or to a higher note.
In the former case, its energy will be distributed among the overtones of the lower note and will only be visible as such in the EQ spectrum. If it is attributed to a higher note, on the other hand, it will end up in the lowest band of the equalizer: the one marked “<”. This collects all frequency components lying beneath the fundamentals of the detected notes or that cannot be assigned to any note. To hear what signal components of the track are gathered in the “<” band, you can clear (i.e. set to zero) all the other bands before lifting this one.
Examine and if necessary edit in Note Assignment Mode the detection, activating all notes that have not been detected so that these too can be correctly handled by the equalizer.
In the local drop-down menu you will find the following commands for the EQ spectrum:
- Reset Spectrum: This restores the original mean spectrum.
- Copy Spectrum: This copies the current EQ spectrum so that it can be pasted into another track. As the copy is performed, the current Contour setting is factored into the copied spectrum, whereas the values of the other macro sliders are simply copied and the formant settings ignored.
- Paste Spectrum: This command works in conjunction with the Copy Spectrum command described above, the result being to paste the copied EQ spectrum into the EQ working area of the track being edited. You can copy and paste between tracks in the same document or from one document to another. As the paste is performed, the Contour parameter of the destination track is reset, so its entire range is available for future editing.
- Paste Spectrum: This command works in conjunction with the Copy command ( [Ctrl]-C ) also found in the Edit menu and the context menu of the Note Editor. If you select and copy in the Note Editor a blob (or a selection of blobs on the same track), you can paste the spectrum of the blob in question (or the mean spectrum of the blobs selected) into the EQ working area. The copied spectrum is then applied to the sound, by which means interesting tone colors can be obtained.
- Clear Spectrum: This sets all bands to the minimum, the result being silence.
- Shuffle Spectrum: This sets all the bands to random levels. Let your EQ surprise you!
The EQ macro sliders
The macro sliders affect the levels of all the frequency bands and their influence is immediately reflected in the height of the vertical bands. [Command]-clicking on any of the macro controls resets it to its neutral position. This undoes whatever effect it previously had on the height of the bands but any changes you may have made manually (i.e. other than with the macro) remain effective.

The controls are from left to right:
Brilliance: When you move this slider to the right, the level of the higher bands is raised, giving greater prominence to the high frequency content of the signal. Moving it to the left attenuates the higher bands, making the sound duller.
Contour: Moving this slider to the right increases any difference in height between neighboring bands, making the peaks higher and the troughs deeper, and generally sharpening the contours of the display. Moving the slider to the left initially makes the spectrum increasingly linear, before inverting it, so that what were formally peaks become troughs and vice versa.
Tonality: When moved to the right, this fades out notes foreign to the scale; when moved to the left, it fades out notes that do belong to the scale.
Comb: In the former case, the notes furthest from the tonic in the circle of fifths are removed progressively until finally only it and its octaves remain. With the buttons on each side of the slider, you can determine which note should be considered the tonic for the purpose, cycling clockwise or anticlockwise around the circle of fifths. The left button indicates the note currently designated as the tonic.
You can combine freely use the four sliders with direct editing of the individual frequency bands in the main EQ display.
Formants
Formants are peaks in the frequency spectrum, the position of which is not directly related to the pitch of the fundamental, that help to give each instrument or voice its individual character. If you have used Melodyne before, you will be familiar with the Formant Tool that allows you to alter the sound of notes by shifting their formants up or down.
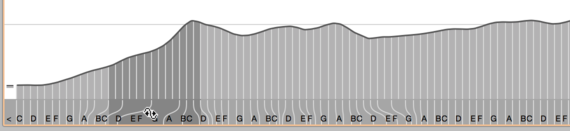
The Sound Editor, too, offers access to the formants: you can edit them in the EQ, Harmonics, Lo and Hi working areas, the resulting shift in each case affecting all the notes of the track in question. The formants are accessible in the dark gray zone at the base of the bars or bands, in which the number of the harmonic or name of the note are displayed.
- Drag horizontally in this area to shift the formants governing all the harmonics or EQ bands.
- Select adjacent bars or bands to shift the formants governing only these. By repeating the process successively, you can shift the formants of multiple selections in different directions and by varying amounts to arrive at complex formant transposition patterns.
- [Command]-clicking in the formant zone restores the original formants throughout the register.
The Formant Tool, the technique just described in the Sound Editor, and the Formants knob in the Track Inspector can be applied simultaneously. Their combined effect is as follows:
- The Formant Tool shifts the formants of the selected notes upwards or downwards. If you have already, in the Sound Editor, ‘bent’ the formants of the track to which the notes in question belong, it is these ‘bent’ formants that will be shifted. The Formant Tool, in other words, adds a note-based offset to the formant structure displayed in the Sound Editor.
- The Formants knob in the Track Inspector and the formant shifting functions offered by the Sound Editor affect the track as a whole and work hand in hand. Each time you turn the Formants knob, the entire formant structure in the Sound Editor (including any editing of it you may have performed) will be shifted up or down. If you shift all the harmonics in the EQ or Harmonics working areas, the Formants knob will move accordingly. If, on the other hand, you shift merely a selection of harmonics or frequency bands in the Sound Editor, the Formants knob will not reflect the change.
Since formants, almost by definition, do not move when the fundamental changes, strictly speaking it is only in one of the four working areas of the Sound Editor, namely the EQ working area, that they can be edited; in the Harmonics, Lo and Hi working areas, the bars are tied to harmonics that move in parallel as note follows note, so it would be better in their case to speak of “manipulation of the spectrum”. Useful results can nonetheless be achieved using the techniques just described in all four working areas, and their combined effects are as follows:
- A formant shift applied to all the bands of the EQ will be reflected in the Harmonics working area; similarly, a formant shift applied to all the bars in the Harmonics working area will be reflected in the EQ. The Hi and Lo working areas will reflect a shift applied to all the bands of the EQ.
- No shifting of formants in the Hi or Lo working areas, however, will ever be reflected in the Harmonics or EQ working areas. This is because the Hi and Lo working areas only access half each of the register of fundamentals, so changes effected in either area could not be displayed in the Harmonics or EQ working areas.
- If you have shifted the formants in the Hi and/or Lo working areas and then shift all the formants in either the Harmonics or EQ working areas, the resulting shift will be reflected in the Hi and/or Lo working areas. Whatever formant structure(s) you had established in the Hi and/or Lo would in this case simply be shifted en bloc. By the same token, you can reset the harmonics in the Hi or Lo working areas without this being reflected in the Harmonics or EQ working areas.
- If, on the other hand, you reset the formants in either the Harmonics or EQ working areas, all four working areas will reflect the change. In the Harmonics and EQ working areas the formants will be reset, whereas in Hi and Lo, only whatever editing was performed in those individual windows will remain effective.
- Whenever, in fact, you select anything less than all the harmonics or frequency bands before shifting formants, the change will only be reflected in the working area in which the shift is performed.
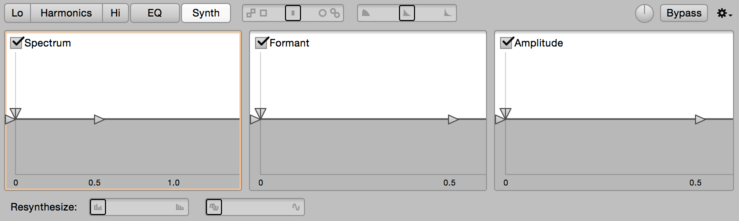
The envelopes in the Synth working area
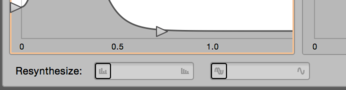
This working area contains three envelopes with which you can control dynamically the intensity of the spectral editing, the formant shifts and also the volume of the notes. Here you will also find two sliders that govern the resynthesis in the Sound Editor.
The envelopes allow you to influence the notes of the track being edited in a variety of ways. You could, for instance, lengthen slightly the attack of the notes of a piano track, giving the instrument a subtly different character. You could introduce spectral filtering that diminished in intensity within the lifetime of each note leaving the original spectrum in its stead. At the same time, you could make the formants of each note glide upwards.
These effects act directly on all the notes of the track you are editing. Each note, even in polyphonic audio material, follows the dictates of its own envelope, independently of the other notes. The operating principle is the same as that of the envelope generator of a polyphonic synthesizer, except that the Sound Editor’s envelopes are not triggered by MIDI messages but by the notes of an audio track – or, to be more precise, by the musical starting points of the notes. If a note has no definite starting point, the note separation preceding it serves as an envelope trigger. (You can examine and set the starting points of the notes in Melodyne’s Note Assignment Mode.)
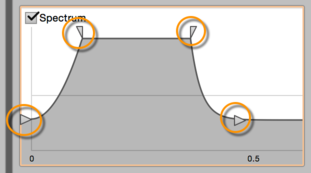
To shape the envelopes, either drag their triangular handles or drag directly in the gray area. Each envelope has six parameters: starting level, attack time, sustain level, sustain time, decay time and final level (i.e. the level subsequent to the decay phase).
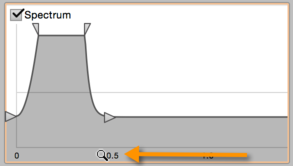
By dragging in the ruler beneath each envelope, you can determine the length of time in seconds represented by the envelope display and available for the creation of the envelope.
The checkboxes next to the words “Spectrum”, “Formant” and “Amplitude” in the various panes are used to activate and deactivate the corresponding envelope generators. [Command]-click an envelope to restore its original, neutral settings.
These are represented by the horizontal line in the middle of the three envelope displays. In the area above this central line, depending upon the envelope, the intensity of the spectral filtering is increased, the formants are shifted upwards, or the amplitude is increased. In the area beneath this central line, again depending upon the envelope, the intensity of the spectral filtering is decreased, the formants are shifted downwards, or the amplitude is reduced.
The Spectrum envelope governs the intensity of all changes to the original mean spectrum effected in the Harmonics, Hi, Lo and EQ working areas. The Formant envelope influences all the formant shifting in these areas by moving all the formant structures created there upwards or downwards.
The Resynthesis parameters in the Synth working area
The Sound Editor, evidently, breaks the signal down into different frequencies that are modified and then combined to form a new signal. The signals thus combined include not only harmonic partials (the frequencies of which are integer multiples of that of the fundamental) but also enharmonic partials and simple noise included in the signal, such as the squeaking of strings or pedals and background noise) scattered throughout the spectrum and only rarely or accidentally coinciding with the harmonic partials.
Admittedly the bars in the Harmonics, Lo and Hi working areas are centered on the harmonic partials, but with Melodyne, unlike a pure synthesizer that has only a finite number of sine wave oscillators at its disposal, signal components lying between the partials are not lost but reproduced in the signal, to remain faithful to the original. By moving the Harmonics bars, you can alter the sound – radically, if you so desire – but the basis of your work is always the material of your original recording.
The case is different when you employ the two Resynthesis sliders.
Magnitudes: As you move this slider to the right, changes in the amplitude of the individual harmonics are gradually reduced until, when the slider reaches its rightmost extent, no timbral changes at all take place within the lifetime of each note. The balls as a result stop bouncing up and down and come to rest on the tops of the harmonics bars. Moving the slider to the right has the additional effect of narrowing the band assigned to each harmonic so that any non-harmonic components gradually disappear from the signal.
Phases: The different phases of the various partials also have a considerable influence upon the natural reproduction of the signal. As you move this slider to the right, the original phase ratios between partials are gradually reduced until all the partials are in phase. This primarily affects the transients in the signal, making the sound more synthetic. You can use the Phases and Magnitudes controls singly or in combination.
With both sliders at their rightmost extremes, the results sound particularly “artificial” and reminiscent of a static synthesizer waveform. Aside from the fact that this may sometimes be precisely what you want, the sound that results can also be an excellent starting point for further sound design using the harmonics bars, envelopes and so on.