Inserting and preparing to use Melodyne
-
Melodyne and Studio One: the ARA workflow– This short film shows the advantages of the ARA integration of Melodyne into Studio One. Shown here: Melodyne studio, smaller editions may differ.
This tour will show you how to integrate Melodyne into your Studio One song.
Melodyne in Studio One
Tips to help you make Melodyne and Presonus Studio One work even more efficiently as a team.
-
Adapting short samples – Adapt polyphonic samples to match the chord progression and key of any composition
-
“Ghost” v. “real” copies – Enjoy maximum flexibility when copying audio events
-
Adapting samples to different chords – How to adapt samples or tracks from a different session to your current song
-
Adapting loops – Synchronize any loop perfectly to the fluctuating tempo of a live recording
-
Stretching the tempo – Reshape the tempo of a live recording, with or without the 'human touch'
-
Creating a tempo map – How to track the tempo of each recording and create a click track subsequently
Loading and installing Melodyne
Studio One Professional comes with a license for Melodyne essential. With Studio One Artist or Producer, you receive a trial version of our top-of-the-line Melodyne studio.
- If Melodyne has not yet been installed, please open the “Studio One Installation” window.
- Click on “Download Contents from PreSonus User Account”. There you will find the Melodyne installation program in the “My Software” section. Download the program, launch it and follow the onscreen instructions. If you purchased Studio One in a box, select the second option in the installation window to install Melodyne from the Studio One DVD.
- Before you can use Melodyne, you have to register and activate it. When you launch Melodyne for the first time, an activation assistant will guide you through the necessary steps.
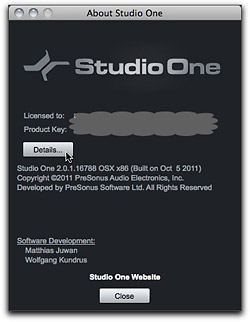
- You will find the serial number of your Melodyne essential in the “About Studio One” dialog when you click on the “Details” button.

Editing an audio event with Melodyne and ARA
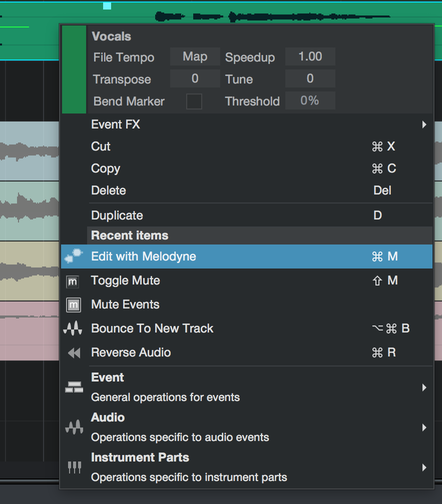
In Studio One, select an audio event and choose “Edit with Melodyne” from the Audio menu. You can also use the keyboard shortcut Cmd-M (Mac) or Ctrl-M (Windows). Melodyne is launched automatically, analyzes the audio event and displays its notes. Melodyne is now embedded in the lower pane of the Studio One window just like Studio One’s audio or MIDI editors. Any time you wish to access this audio event again, simply double-click on it and the notes will immediately be displayed in Melodyne.

From a technical point of view, the command “Work with Melodyne” results in Melodyne being inserted as an “Event FX”. Consequently, Melodyne also appears in the Event-FX window of Studio One:
You can also insert Melodyne in a channel strip, as is the case with most plug-ins, but in that case no ARA integration takes place. This means you have to perform transfers and Melodyne no longer follows automatically any tempo changes or modifications made to the audio events on the track in Studio One – not a workflow to be recommended, all things considered.
Bypassing or removing Melodyne, comparing edits
To switch Melodyne to bypass or remove it from an audio event, deactivate or delete Melodyne in the Event FX inspector of the audio event. Of course, if you switch Melodyne to bypass, time-stretching will no longer be performed by Melodyne but by Studio One.
The Compare switch:
In addition to the bypass function of your DAW, which deactivates Melodyne altogether, you will find next to the level display in Melodyne a Compare switch that serves a similar purpose.
Unlike the DAW’s bypass function, however, Melodyne’s Compare switch reverses not only the acoustic but also the visual consequences of all editing. It is also the case that;
- the Compare switch affects all clips governed by Melodyne, regardless of track and whether or not they are currently displayed in the Note Editor. The entire song is therefore returned to the state it was in before you began editing notes with Melodyne.
- all changes made to the notes are undone, whether made using the macros or tools.
- any adjustment of the tempo of clips to match that of the DAW will also be reversed.
Tip: Working with long files
With ARA, Melodyne always analyzes in its entirety the audio file that is being referenced by an audio event, even if you have narrowed the event’s boundaries before using Melodyne. This has several advantages. It allows you, for instance, to widen the event boundaries again later without any further analysis by Melodyne being required.
It does mean, however, that there can be a noticeable hold-up when Melodyne is first used on an audio event; this would be the case, for example, if the audio file being referenced by the event was a live recording lasting several hours (which Melodyne would analyze with the Polyphonic algorithm).
So if you just want to edit part of such a recording, we recommend that, before you begin editing with Melodyne, you convert the passage in question into a new event (Event>Bounce Selection). This will then be based on a new, shorter audio file that Melodyne will be able to analyze that much faster.
Saving, archiving and passing on your songs
Thanks to ARA, when saving and archiving your work, it is not necessary to give special thought to Melodyne, because all the files used by Melodyne (which it will need again when the song is next opened) are stored in the Studio One project.
If, however, you are passing on your Studio One project to third parties – for remixing, for example – you do then need to make sure that the recipient also has at their disposal Version 4 (or higher) of Melodyne. Which actual edition of Melodyne the recipient possesses is not relevant. If, for example, they only possess the “small” Melodyne essential, where you have been working with the “big” Melodyne studio, they will still hear all your Melodyne editing exactly as if they too had the studio edition. Naturally, if they propose to modify or add to your Melodyne editing of the song, they will be limited in in the actions they can perform to the function set of the edition they possess.
If not, it cannot hurt to render your tracks before sharing your work with others. This may be advisable for other reasons too, such as any use you may have made in your project of third-party plug-ins.
Buffer Size
We recommend that you set your audio buffer size to 1,024 samples. Smaller values lead to a significantly higher CPU load. Should you need to set smaller values, e.g. when doing the headphone mix directly in your computer and not via an external channel strip or mixer, deactivate all Melodyne instances while tracking. Switch Melodyne back on when you start editing your new tracks.


