Assigning tempo
- • What purpose does Assign Tempo Mode serve?
- • Overview of the Tempo Editor in Assign Tempo Mode
- • Editing the tempo curve using the tools
- • The tools for changing the tempo locally through the insertion of beats
- • Tempo regions
- • Tempo regions and sub-beats
- • Assigning the tempo designation "free"
- • Triggering a redetection of the tempo
- • The assignent of individual file tempos
- • Commands in the context menu
- • Enhanced tempo detection with the Universal Algorithm
-
Working without a click– How to take advantage of Melodyne’s tempo detection and match the tempo of different recordings. Shown here: Melodyne 5 studio, smaller editions may differ.

In Assign Tempo Mode, the Tempo Editor is used to correct the tempo map Melodyne creates in the course of its analysis of the audio material. Here it is not a question of altering the audio material itself but rather of making the requisite adjustments to the display background (or “Beat Grid”), which consists of bar lines (intended to coincide here with the first beat of each bar) and fainter lines between them (indicating the remaining beats of the bar). These are represented acoustically by metronome clicks. In Assign Tempo Mode, however, you are adjusting the metronome click to fit the music – not the other way around.
What purpose does Assign Tempo Mode serve?
Adjusting the click and the background display to fit the recording is necessary to ensure that subsequent editing procedures, such as quantization to the grid or matching the tempo of one recording to that of another, function correctly. The point of Assign Tempo Mode is best illustrated by an example: Suppose you have made a multi-track recording of a live performance during which no click was used by the performers to help them keep time. You load these tracks into Melodyne. From its own analysis of the music based on the sum of all the tracks, Melodyne now creates a tempo map; this can be thought of as a virtual click track that keeps time with the musicians (even though no click was used in the actual performance). This tempo map, provided it is accurate, gives rise to exciting possibilities. It can be used, for example, to tighten up the timing of the entire band; and here, remember, we are talking about a multi-track recording of a live performance!
Or, equally exciting, it can be used to adapt the rigid tempo of a sample to the reconstructed live click – and, with it, to the fluctuations in tempo real musicians inevitably introduce into each performance.
You are able now, in other words, to record without using a click and yet still retain full control over tempo and timing. Even if the band gets carried away and bolts towards the end of the song, it’s no problem; with Melodyne you have the reins at all times in your hands.
There are unbelievable, hitherto unknown, possibilities here – provided, always, that the tempo detection yields perfect results throughout the entire piece. But what does “perfect” mean here? Imagine, for example, that you have on one track a saxophone solo played with great rhythmic freedom and on another the drums played with rhythmic discipline. These two tracks, clearly, are pulling in different directions and perhaps urging Melodyne to different conclusions. To which instrument in this example greater weight should be given has nothing to do with perfection in the sense of right or wrong but is purely a question of interpretation.
It is to resolve such questions that your intervention in the tempo detection process is required. The Tempo Editor’s Assign Tempo Mode offers you a wealth of different ways of intervening and tools to assist you in the task, and it is these that form the subject of this tour.
Overview of the Tempo Editor in Assign Tempo Mode
Open the Tempo Editor by choosing Options > Show Tempo Editor > Assign Tempo from the menu or by selecting the same command from the drop-down menu to the right of the tempo field in the transport bar.

The Tempo Editor appears above the Note Editor. You can move the dividing line between the Tempo and Note editors if you wish to allow the one or the other GREATER headroom.
Before discussing the individual editing functions, let us begin with an overview of the various zones of the Tempo Editor in Assign Tempo Mode and the components of the interface.
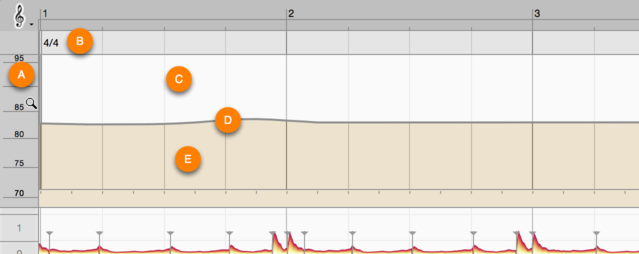
A: The Tempo (BPM) Scale. This is made up of three zones: If you click in the central third of the scale and then drag the mouse upwards or downwards, the display is scrolled. Click in either the upper or lower third and repeat the same procedure to zoom the display. If you double-click in the center, the display is zoomed in such a way as to ensure that the entire tempo range is visible. In the Tempo Editor itself, you can scroll horizontally with the hand tool or mouse wheel and vertically with the magnifying glass.
B: The area for editing time signature changes. How this is accomplished is the subject of a separate tour.
C: The area above the tempo curve. By clicking here and dragging the mouse pointer horizontally, you select the segment of the curve you wish to edit.
D: The tempo curve. This can be reshaped with the help of a context-sensitive tool. The contexts in question being three zones: a single shallow strip just above the curve and two separate layers below it.
E: The area beneath the tempo curve. This, as we have said, is divided into two distinct layers; in the upper layer the tool is used for the quantized movement of segments of the curve whereas in the lower layer it is used to reshape the curve within a beat selection. See below for details.
As in the Note editor, you can also perform the current functions of the tool (which depend, of course, upon its position) using the command and arrow keys. Since changes made in this way proceed by small increments, this is a particularly useful technique if you need to make fine adjustments. Whether you are using keyboard commands or tools in the normal way, holding down the [Alt] key at the same time allows you to adjust the values in still finer resolution.
Editing the tempo curve using the tools
The tempo curve is intersected by beats that correspond to the denominator of the time signature. When shaping the curve, you work with these beats; internally, however, the tempo changes are implemented in higher resolution.
If the tempo of a recording has not been correctly identified throughout, the problem will usually be that some of the beats coincide with the offbeat, with the result that the metronome click, too, sounds on the offbeat. This can occur when the performer hesitates or slows momentarily, causing the detection from that point onwards to slip back to the offbeat. It is recommended in view of this that, before you begin editing, you listen to the whole piece once through with the metronome running. At the same time check that the time signature is correct and that the “1” really does coincide with the start of the bar.
For these corrections, you should work initially with the Time Grid activated, as this will facilitate the movement of beats. The width of the grid (i.e. the interval between the lines) is of no importance; all that matters is that the grid is active. The width of the grid, incidentally, is determined by the number of sub-beats in the tempo region, as is explained below.
When working with an active Time Grid, the two most valuable tools are those found beneath the time curve, each in a separate layer. In the layer closest to the tempo curve you will find the Tool for Quantized Movement of segments; in the layer below, you will find the Wave Tool, which is used to reshape the curve within a beat selection. The shape assumed by the mouse pointer changes as it moves from layer to layer.
If no tempo regions (the functions of which are explained below) have been detected and the tempo throughout is on the offbeat, proceed as follows to correct it:
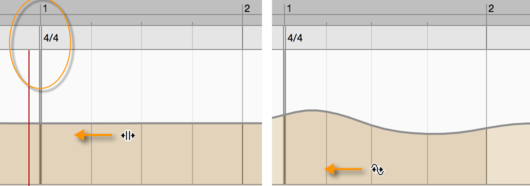
- With the Tool for Quantized Movement (the higher of the two tools beneath the tempo curve), click on the tempo curve at any point within four beats of the first bar definition and drag the mouse to the right or left. This will move the entire tempo curve sideways along the grid allowing you to correct the offbeat.
If the tempo has been correctly detected initially but at some later point slips to the offbeat, proceed as follows:
- Select with the Tool for Quantized Movement a beat at the point where the curve slips out of sync. The entire segment that follows (and which therefore needs to be corrected) will be selected automatically. Now drag the mouse to the left or right, as appropriate, which will allow you to move not only the beat you clicked on but also the selected beats that follow it along the Beat Grid and correct the offbeat.
Note: If several tempo regions have been detected within the recording, the area automatically selected by this procedure will extend only to the end of the current tempo region. You will find more information on tempo regions below.
It can also happen sometimes that the tempo as detected gets ahead of, or lags behind, the actual tempo, or that – perhaps because a passage is played rubato i.e. the performance is rhythmically very free – the start of almost every bar has to be corrected. This type of error is corrected using the Wave Tool (found in the lower of the two layers beneath the tempo curve), which reshapes the wave within a given selection of beats..
Since the Wave Tool affects not only the point clicked but also the surrounding area, clicking with this tool (when the Time Grid is active) invariably results in a segment of the tempo curve being selected. If you click on the beginning of a bar, the two neighboring bars are selected. If you now drag the mouse to the right or left, the beginning of the bar in question (i.e. the bar line) moves the furthest, whereas the beats in the neighboring bars are affected to a lesser extent. The first beats of the preceding and following bars are not moved at all.
In this way, if need be, you can go through an entire passage correcting the position of each bar line in turn. If a longer passage is affected by this “premature” or “tardy” tempo detection, you can select the passage manually before using the tool. Here, again, the most movement will be at the point from which the dragging commences, with the effect tailing off towards each end of the selection.
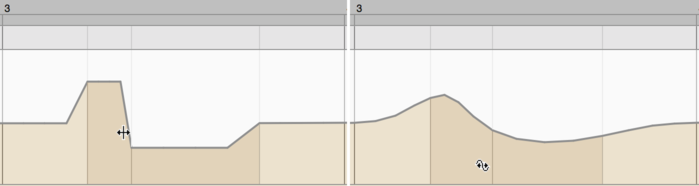
If you click and drag from a point within a bar, only the intermediate beats will move; the first beat of the bar and that of the following bar will be unaffected. In this way, if you ever need to, you can make subtle corrections to the tempo curve within a bar.
Tip: If, where the performance is very free, you have made a coarse correction to the position of almost every bar line, without making any fine corrections within the bars, unnecessary unevenness in the tempo progression may result. For this reason it is often useful, after making a coarse correction to the position of the bar lines, to select Smooth Tempo Over Several Bars from the context menu, as this command is designed to eliminate irregularities on a broader scale.
For the editing procedures described so far, we have been using an active Time Grid. If the Time Grid is not active, the two tools just described function differently. In this case, a range is not selected automatically, so the tools only affect the beat selected.
- The higher of the two tools allows you to move the beat in question without affecting the neighboring beats.
- The lower tool also moves the beat selected but the tempo flow to the neighboring beats is preserved.
Suppose, for example, the performer has introduced a fairly long pause before beginning a new section but that the lead-in (or “anacrusis”) to the following bar is more or less in the new tempo, so there is no continuous tempo flow and the beats have to be moved one by one to the correct position. It is to solve problems like these that you need to deactivate the Time Grid before using the two tools.
The tools for changing the tempo locally through the insertion of beats
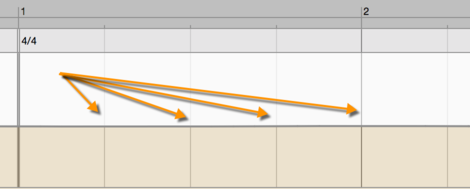
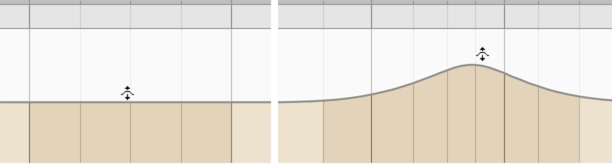
If the tempo as detected during a particular passage is too slow or too fast, so that a beat needs to be added or removed, you can correct this by clicking just above the tempo curve and dragging upwards or downwards. In this way, at the point clicked, you can create a mountain or a valley and alter the tempo by inserting or removing beats.
Note how this differs from Edit Tempo Mode: Nothing you do in Assign Tempo Mode ever changes the position in time of the notes. What you are seeking to do is adjust the timing of the metronome clicks to match the music, which is what happens here when you change the tempo and insert or extract beats. In Edit Tempo Mode, on the other hand, no beats can be inserted or removed and any tempo changes affect all the following notes, causing them to sound earlier or later as the case may be.
If, prior to using the tool, you have selected a segment of the curve, the tool will act upon the entire selection and is available in its central area. If nothing is selected at the time, use of the tool results in a number of beats being selected automatically.
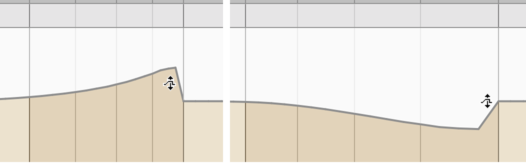
At the beginning or end of a selection, by dragging downwards or upwards you can also remove or insert one or several beats. In this way you can, for example, slow the tempo at the end of a phrase without affecting the tempo of what follows.
If you click near a tempo region separation, this tool mode is activated automatically and a segment of the curve extending to the region division will be selected. You will find more information on tempo regions in the next section.
Tempo regions
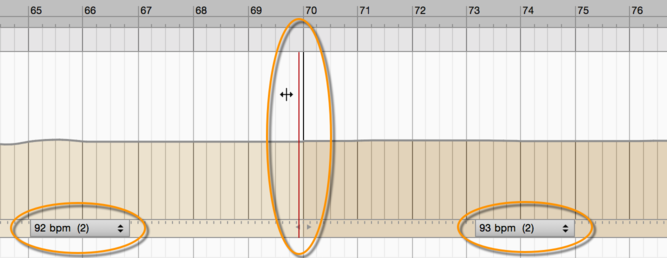
An evenly flowing tempo is generally interpreted by the analysis as a continuous sequence even if the tempo fluctuates. Just as with a constant tempo, Melodyne creates then a single tempo region for the entire duration. Tempo regions are indicated by pop-up menus in the horizontal ruler at the bottom of the Tempo Editor.
A tempo region extends rightwards to the end of the audio source or the beginning of the next tempo region. By clicking alongside one of these pop-up menus, you can select all the notes of the corresponding tempo region.
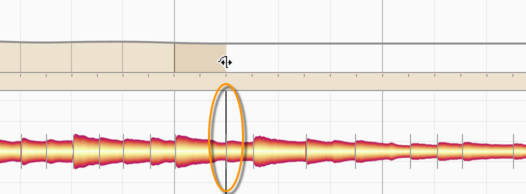
Each tempo region possesses at its left-hand division a black vertical line that serves as a handle and extends from the bottom to the top of the Tempo Editor. By dragging this line horizontally, you can move the beginning of a tempo region along the Beat Grid of the tempo curve.
If the tempo slows markedly in places, such as at the end of phrases performed in the “romantic” style, the analysis will split the tempo curve into multiple regions wherever the position is unclear. These tempo regions, on the one hand, provide a clearer overview of what is happening in terms of the tempo, but also offer some important setting options to ensure that the tempo in the passage affected is correctly interpreted.
If several tempo regions have been detected, it is frequently necessary to tidy up their divisions. In the following section, we describe the type of situation that can arise and how to adjust the tempo regions accordingly.
- Superfluous region divisions:* Sometimes the analysis introduces region divisions where the tempo only slows slightly. These divisions, and the superfluous tempo regions they create, can be deleted. To delete a tempo region, double-click on its vertical handle. As a result of the deletion, the tempo curve corresponding to the surrounding beats will be smoothed automatically to create a more regular tempo flow.
- The creation of additional tempo regions:* If you double-click in the ruler at the bottom of the Tempo Editor, where the pop-up menus of the tempo regions are located, a new tempo region will be created there. The insertion of a tempo region can be useful if , prior to the start of a new phrase, there is a pause that you wish to be spared the effect of any subsequent smoothing operations.
Position of the region divisions: Often the region divisions are not situated at the exact point where the music begins to slow down. In such cases, drag the tempo region by its handle to the correct position. So as to be able to hear inconsistencies clearly, before you begin editing you should check the detected time signature and ensure that the start of the first bar begins on the correct “1”. When you move a region division, the tempo and positions of the neighboring regions adjust accordingly.
Tempo regions and sub-beats
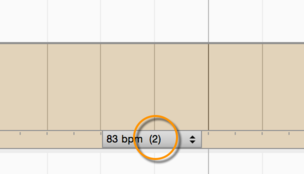
The analysis detects what are called “sub-beats”, these being the smallest pulse units found in the audio material. Beats are generally understood as quarter-notes (or “crotchets”) and the subdivisions of these displayed in the region indicate how many sub-beats there are to a crotchet. There could be two or four if the tempo has an even feel to it; three if it has a triplet feel; or even some other number in exceptional cases.
In the following, we discuss the cases in which you will need to edit the parameters of a tempo region with respect to these sub-beats.
- Sub-beats and tempo* It can happen that the analysis interprets sub-beats as eighth notes (or “quavers”), meaning that there are two sub-beats per crotchet, when in fact the “intended” tempo is only half as fast, because the sub-beats detected ought to be sixteenth notes (or “semiquavers”). A quarter note ought, therefore, to consist of four sub-beats, which would halve the tempo.
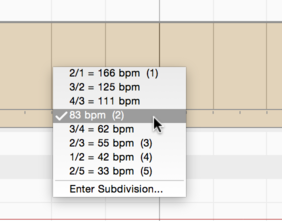
It can also happen that two sub-beats are assigned to quarter notes when eighth note triplets are in fact intended. In this case, the subdivision must be changed from 2 to 3 and the tempo with it by two thirds. These changes can be effected using the region’s pop-up menu. There you can stipulate how many sub-beats should make up a quarter note and alter the tempo accordingly. The numbers in brackets indicate how many of the discovered sub-beats are combined in the tempo, but values are also available for selection that are not multiples of sub-beats.
If several tempo regions are present and the tempo of the entire recording is to be halved, for example, select all the regions with [Cmd]+A and alter the tempo in the pop-up menu of one (it doesn’t matter which) of the selected regions.
Enter Subdivision: If a passage exhibits simultaneously a dual and triple feel or alternates between the two, it can happen that the analysis detects the sub-beats too unclearly. In such a case, you should choose Enter Subdivision from the region’s pop-up menu and type the desired value into the text box that appears.
This changes nothing with respect to the beats and tempo, but in the pop-up menu of the region other tempo ratios can then be selected and any movement of the region will henceforth be governed by the new sub-beat subdivision.
- The significance of the tempo regions after the editing:* The tempo detection offers regions initially in places where the detection may have discontinuities. In the case of recordings with a continuous flowing tempo, all these need to be cleared away; in other words, by the time you have finished editing, there should be no tempo regions left in the tempo map.
If, on the other hand, there are times in the recording where the performer has paused at the end of a phrase but returned to an even tempo at the start of the following phrase, the division between the regions should be moved to the start of this second phrase and left in place, because the tempo flow has been interrupted. A recording might also be made up of passages with sharply differing tempo levels that alternate. In this case, too, the region divisions need to be preserved.
Whenever you use one of the “Smooth Tempo ...” commands, the smoothing is invariably confined to a single region, so the region divisions are unaffected.
Assigning the tempo designation "free"
Where a performance is really free rhythmically, the tempo detection may in some cases provide little assistance and it may be easier to ignore the results of the detection altogether and simply assign to the entire passage the tempo designation “free”.
Similarly, where the music is silent for several bars or only contains a wash of sounds with no discernible note beginnings or rhythm, the analysis is unlikely to deliver a tempo curve that makes much sense. This, in itself, is hardly a problem, but if you need a click in such passages – because you wish, for example, to add a rhythmic overdub lasting a definite number of beats – proceed as follows:
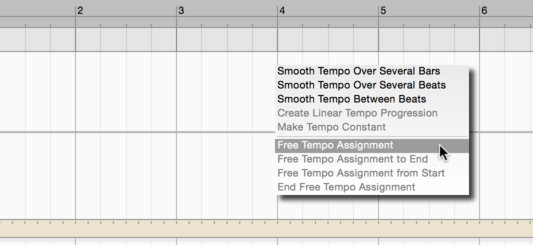
Select the area in question in the Tempo Editor and choose Free Tempo Assignment from the context menu. If you wish to assign the designation “free” to the tempo of the entire file, nothing should be selected at the time you use the command; that way it will act upon the entire tempo curve.
The effect of the command is to delete the existing tempo and replace it with a constant one. The passage in question will appear white – with no beats – and the tempo curve will be a straight line. First, by dragging the line horizontally at the bar zero point, establish the start of the tempo progression.
Then drag the straight line upwards or downwards until the average tempo of the recording is reached or the area is filled with the desired number of bars. If you wish to assign the designation "free” to the tempo of the entire file, as an alternative to moving the curve vertically, you can simply alter the value in the tempo field in the transport bar.
The best thing then is to go from left to right through the undefined tempo area clicking on the start of each bar which will result in a valid beat appearing at that point. Drag the beat to the correct note at the beginning of the bar in question. It is helpful here to orient yourself by the vertical line that appears at the bottom of the Note Editor during the movement.
When you have edited the tempo in this way until the desired position is reached, choose the command Finalize Free Tempo Assignment from the context menu. The range will be filled with beats and its “defined” status restored. If you have assigned the tempo designation “free” to a mere segment of the tempo curve rather than the entire map in this way, when you click in the last bar, beats will be inserted automatically and the transition of the curve to the following segment smoothed.
You will find in the context menu, in addition to the command Free Tempo Assignment that has been described, two other commands: Free Tempo Assignment to End and Free Tempo Assignment from Start. These two commands are designed to save you the trouble of performing the corresponding selections manually.
They are useful in the following situations: If there is a marked slowing down during the final notes of a piece, you will define a corresponding slowing down of the tempo at that point. After that, the defined tempo that follows needs to be discarded and the slower tempo retained until the end. To achieve this, select first Free Tempo Assignment to End and then edit the slowed down tempo at the end. The command Free Tempo Assignment from Start evens out the tempo in a leftward direction until the beginning of the file is reached.
Triggering a redetection of the tempo
If you have made a mess of your tempo assignments, you can trigger a redetection of the tempo and begin again from scratch. Instead of wiping the entire slate clean, you may prefer to keep most of your assignments and redo only the passage with which you have been having difficulty. In this case, select the blobs of the passage in question and choose from the main menu Edit > Tempo > Detect Tempo of Selection and Merge with Current Tempo.

This has the effect of discarding all the tempo assignments that you have applied to the passage and replacing it with tempo information derived by Melodyne from the audio material. To the right and left of the selected passage, however, the tempo curve remains unchanged, complete with any improvements you may have made to it.
What is of crucial importance to the success of this procedure is the choice of notes upon which the redetection will be based. Remember the example cited earlier of the band recorded live: If you were tapping your foot in time to the music, in all probability you would be following as you did so (albeit unconsciously) the drums and bass rather than the less disciplined saxophonist. By the same token, you would want Melodyne to base its analysis of the tempo on the drums and bass, along with the rhythm guitar perhaps, and not be distracted by the saxophone.
For this reason, you should drag into the Note Editor only those tracks that will help Melodyne with its analysis and select within them only the notes that coincide with the saxophone solo. Then choose Edit > Tempo > Detect Tempo of Selection and Merge with Current Tempo.
Now you have replaced throughout the problem passage the original detection (and your botched editing thereof) with another based upon an optimized track selection. To recap: The original detection was triggered when all the tracks were imported simultaneously, with equal weight being given to each of them. By triggering a redetection (this time based upon a narrower selection of tracks) in the manner just described, you ensure that the more laid-back playing of the saxophonist does not lead Melodyne into error.
You can optimize the starting material for a redetection by deliberately deselecting certain notes within a track. Suppose, for example, you were working with a stereo live recording and wanted to create a click track retrospectively. In this case, it might be advisable to deselect all the notes derived from the vocals along with one or two others, so as to ensure that Melodyne based its analysis of the tempo predominantly upon the bass or kick drum, which tend to be quite easily identified within the overall mix.
The assignent of individual file tempos
So far, we have been discussing the situation in which the entire project has a single tempo map that you can then optimize, if necessary, in Assign Tempo Mode to make it correspond more closely to the audio material. Here we were assuming that the project was composed of tracks that were broadly synchronous – either because they were recorded simultaneously or because some kind of overdub procedure was used. What if you want to combine in a single project recordings with different tempos? With Auto Stretch switched on, Melodyne adjusts each newly imported audio file to fit the tempo map of the project. What this involves – and how you can intervene in the process – is the subject of the following sections.
As each file is imported, Melodyne analyzes the audio material, detects the tempo throughout the file, and from the information thus obtained creates a tempo map. This is the tempo map of the file. If several files are imported, each will have its own tempo map. But the project itself can only have one tempo map: the one you have perhaps already begun editing in Assign Tempo Mode.
When it comes to play back the project, therefore, Melodyne will stretch or squeeze in all the right places the tempo map of each individual file to ensure that it conforms to the tempo map of the project A very simple example: Melodyne has detected in the file a fixed tempo of 100 BPM whereas that of the project is 120 BPM. All that is needed here is to play back the file 20% faster. Now suppose another file is imported with a fixed tempo of 112 BPM. This time, the new file must be played back around 7% faster.
The mathematics becomes far more complex, of course, when neither the file nor the project has a constant tempo, and the fluctuations found in the one have nothing to do with those found in the other. But no worries; Melodyne can cope even then. No action is called for on your part.
You may occasionally, however, want to redraw the tempo map of the file – i.e. to impose your own interpretation of the tempo, by halving or doubling the displayed tempo of a drum loop, for example, or, in the case of a polyrhythmic recording, by opting for triplets or not, as the case may be. Such decisions have no initial influence upon the file itself; when you come to import the file into a project with Auto Stretch switched on, however, they can make a considerable difference.
In short: Even single audio files have tempo maps that you can edit. To do this, switch to Note Assignment Mode. If on the track in question you have multiple audio files, click beforehand on a blob belonging to the file you wish to work on, to ensure that the correct file is available for editing in Note Assignment Mode.
In Note Assignment Mode, you always hear one audio file in isolation (and, initially, in its pure state – i.e. ignoring any note editing you may have done in the meantime).
Because you are now in Note Assignment Mode, when you come to open the Tempo Editor it will open automatically in Assign Tempo Mode; Edit Tempo Mode is inaccessible from Note Assignment Mode.
Now, however, it is not the tempo map of the project but that of the audio file alone that is being assigned. Or you could think of it another way and say you are now in a completely different project – namely, the one within which the file was originally recorded – and that your objective is to reconstruct the click track of the original recording so that Melodyne can later “bend” this to match the click track of the current project.
The procedures and tools used, and the functions available, in the Tempo Editor when you are assigning the file tempo are identical to those already described for Assign Tempo Mode of the Tempo Editor, except that two additional commands now come into play in the Edit > Tempo menu:

If you choose Edit > Tempo > Copy Song Tempo to File, the tempo of the file will be ignored and replaced by that of the project.
This command is particularly useful if you subsequently save an assignment file in the Algorithm Inspector from Note Assignment Mode. A useful application for this is shown by the following example.
Suppose you have recorded a “chanson” (i.e. some political or satirical song with perhaps a single guitar or piano as accompaniment) performed live with no click and for which Melodyne has detected a flowing tempo; suppose further that you want now to import the vocal track into a remix that is slightly faster but more importantly has a constant tempo. Here you must first create a tempo map for the vocal track so that it can be “bent” to match that of the remix. But wait – a tempo map already exists for the vocal track; it is that of the project from which it is derived: the live performance of the song we mentioned earlier. So adopt this for the current file with the command Apply Project Tempo Assignment to File Tempo Assignment and store it in your assignment file. During the playback in the remix context, Melodyne reads the fluctuating chanson tempo from the assignment file and synchronizes the singing automatically.
Or you might prefer to do things the other way around. If, for example, out of a number of related recordings you have assigned the tempo of the drum track only and then wish to apply this assignment to the tempo assignment of the entire project. This is where the command Edit > Tempo > Apply File Tempo to Project comes into play.
In the Tempo Editor’s Assign Tempo Mode, too, you can import a tempo map stored in an MPD, assignment or MIDI file if you wish to. This can be done either by choosing “File > Import Tempo...” or simply by dragging the file in question into the Tempo Editor.
In this way, you could, for example, transfer the tempo detection of a file that has already been edited to the project or the file just edited in Note Assignment Mode.
In the Tempo Editor’s Assign Tempo Mode, an imported data map is always placed at the start of the project. From the imported file, not only the tempo map but also any time signature changes and tempo regions are adopted.
Commands in the context menu
If the Tempo Editor is in Assign Tempo Mode, you will also find in the context menu the following commands that correspond exactly to those in the Tempo Editor’s edit mode.
- Smooth Tempo Over Several Bars: This function spreads the tempo change smoothly over the course of several bars, causing the start of the bars to move slightly.
- Smooth Tempo Over Several Beats: This function spreads the tempo change evenly over a bar, whereby the bars themselves are hardly affected.
- Smooth Tempo Between Beats: This function effects a smooth tempo change within the beats. This does not change the position of the beats but the tempo change between them is smooth rather than proceeding in steps.
- Create Linear Tempo Progression: This function calculates a gradual tempo change between the current tempo at the first beat, and that at the last beat, of the selection (regardless of the prior shape of the Curve between these two points).
Note how this differs from Edit Tempo Mode: If in Edit Tempo Mode an increasing or decreasing tempo progression has been calculated, the number of beats selected in the range in question remains the same; the position of the following beats, however, is moved as a result of the new local tempo progression. When assigning the tempo, this is not what you want, so in Assign Tempo Mode the number of beats in the range selected alters to match the new tempo progression; the following beats do not change position.
- Make Tempo Constant: This function calculates a constant tempo for the selected segmen that is equivalent to the average tempo over the course of the selected segment. Once again, beats are added or removed within the selected area to ensure their number matches the new tempo.
You can also use this command when nothing is selected in which case it applies to the entire tempo map. An example: In the course of the analysis, Melodyne has detected a mildly fluctuating tempo. You know, however, that a constant click was used during the recording. In this case, the command calculates the constant tempo that best fits the given material as well as its starting point and adopts this constant tempo as the assigned tempo.
These commands can also be accessed from the main menu under “Edit > Tempo ...”.
Enhanced tempo detection with the Universal Algorithm
If you wish to edit the tempo of a complex piece of music for which the Universal Algorithm has been used for the detection, you can achieve still more accurate tempo detection by choosing the option Edit > Tempo > Enhanced Tempo Detection.
If the option is selected, Melodyne employs the same tempo detection algorithms internally as for polyphonic detection. The tempo detection is more accurate in this case because it is able to access additional information about the file.
Of course, in the case of highly rhythmic or comparatively simple material you will notice no difference. With complex piano sonatas or the mix of an entire band, on the other hand, you will: Such material reveals the real advantages of the enhanced tempo detection, which delivers better results.
The option “Enhanced Tempo Detection” is only available when the Universal Algorithm is selected. When the Polyphonic Algorithm is used, it is always active; with the other algorithms it is grayed out.