Editing tempo
-
The human touch – tempos that breathe– How to introduce or rein in tempo fluctuations within a recording without robbing it of vitality. Shown here: Melodyne 5 studio, smaller editions may differ.

In Edit Tempo Mode, the Tempo Editor allows you to shape the tempo map of your project and the audio material it contains in a musical way. This possibility only exists in the stand-alone implementation of Melodyne, as the plug-in derives its tempo information from the DAW. Tempo editing in that case is accomplished using the functions of the DAW, which passes the information on to the Melodyne plug-in.
Opening the Tempo Editor and overview
Open the Tempo Editor from the Note Editor in normal editing mode (Note Assignment Mode must not be active) by choosing Options > Show Tempo Editor > Edit Tempo from the main menu or by clicking the triangle to the right of the tempo field in the transport bar and choosing Edit Tempo from the drop-down menu.

Tip: The Tempo Editor can also be used in an empty document to create a predefined tempo map. This is useful, for example, if you wish to generate a click with a variable tempo for recording or to define the tempo to which audio loaded via drag ‘n’ drop should adjust.
The Tempo Editor appears above the Note Editor. You can move the dividing line between the two editors if you wish to allow the one or the other more headroom. The legend details the various areas and control elements of the Tempo Editor in Edit Tempo Mode.
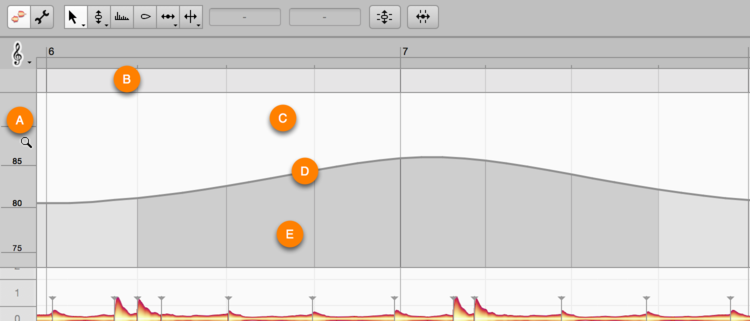
- A:* The Tempo (BPM) Scale. If you click in the central third of the scale and then drag the mouse upwards or downwards, the display is scrolled. Click in either the upper or lower third and repeat the same procedure to zoom the display. If you double-click in the center, the display is zoomed in such a way as to ensure that the entire tempo range is visible. In the Tempo Editor itself, you can scroll horizontally with the hand tool or mouse wheel and vertically with the magnifying glass.
- B:* The area for editing time signature changes. How this is accomplished is the subject of a separate tour.
- C:* The area above the tempo curve. By clicking here and dragging the mouse pointer horizontally, you select the segment of the curve you wish to edit.
- D:* The tempo curve. This can be redrawn with the help of a context-sensitive tool. There is a shallow strip just above the curve and two separate areas below it; the functions of the tool in each of the three areas are different. They will be described in detail later.
- E:* The area beneath the tempo curve. Here, too, the function of the tool varies, depending upon whether you simply click on the curve or do so after previously selecting a segment of it.
As is the case in the Note Editor, you can access most of the functions of the current tool using the [Cmd] and arrow keys. Whether using a tool in the normal way or operating it using the arrow keys, holding down the [Alt] key permits finer adjustment of the values.
Editing the tempo curve
When you wish to change the tempo or create a tempo map, it will mostly be for a particular segment of the timeline. The tempo curve is divided into beats that correspond to the denominator of the time signature. When shaping the curve, you work with these beats; internally, however, the tempo changes are implemented in higher resolution.
Select first the desired segment of the tempo curve by clicking in the white area above the curve and dragging horizontally with the standard arrow pointer. You can lengthen or shorten the selection subsequently by holding down the [Shift] key as you click or drag. The keyboard shortcut [Cmd]+A can be used to select the entire curve.
Rather than a whole passage, you may wish to edit an individual beat; in that case, click in the gray area beyond the shallow strip beneath the tempo curve (“E” in the illustration) on the relevant vertical line and drag it horizontally in the desired direction.
In the Tempo Editor, there is only one tool, but it has a wide variety of functions that depend, naturally, upon its position with relation to the tempo curve and the segment selected (if any). All the context-sensitive tool functions allow you, in one way or another, to reshape the tempo curve, with the form the mouse pointer assumes at any given moment illustrating not only the result to expect but also (through the two arrows in each diagram) whether to drag the mouse vertically or horizontally to obtain it. The best thing is to try it out for yourself on a selection several bars long and study the cursor. That’s the easiest way to get to know how to use the context-sensitive tool and its various functions.
Let’s look first at how the tool functions when it is near the center of the segment of curve selected:
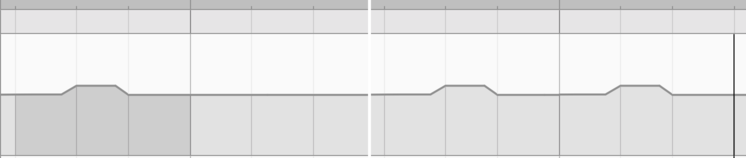
A (just above the curve): With this tool, you can form a “hill” or a “valley”, depending upon whether you drag upwards or downwards. The highest or lowest point, respectively, of the hill or valley will be perpendicular to the point at which you begin dragging, so the result will not necessarily be symmetrical.
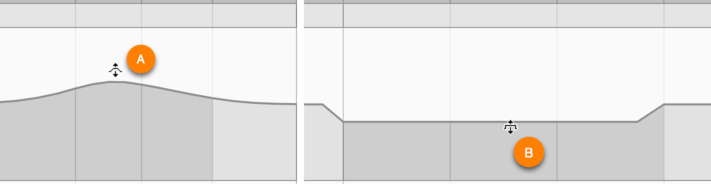
B (just below the curve): With this tool, you can raise or lower the tempo of the entire selection by a uniform amount, creating a plateau. At each end of the plateau there will then be an abrupt change of tempo. Whether you begin dragging from a point dead in the middle of the selection or a little to the left or right of center makes no difference with this tool.
As you create a plateau – or a hill or valley for that matter – you will notice that the length of the edited area changes. If you have increased the tempo of the passage, it takes up less time; decreasing the tempo, obviously, has the opposite effect. This is not reflected in the number or numbering of the bars or beats (as these remain the same whether there is a tempo change or not) but in the displayed length of the passage on screen: if you reduce the tempo, the bars and beats spread out; if you increase it, they huddle together.
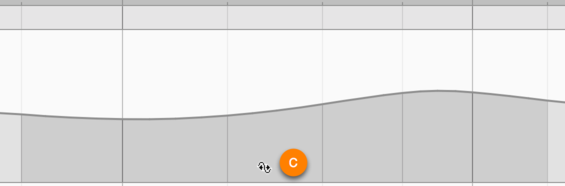
C (in the gray area beneath the curve) Clicking within the selection and dragging to the left or right with this tool reshapes the selected passage by creating a wave on one side of the point clicked and a trough the other. The point within the selection at which you begin dragging determines the shape of the wave. However, regardless of the exact point at which you begin dragging, the increase in tempo to one side of it invariably compensates for the reduction in tempo to the other, leaving the overall length of the selection unchanged; by which we mean that it occupies not only the same number of beats but also the same number of seconds (and therefore inches on screen).
As you are editing, you will notice that the tempo curve reflects tempo changes with a gentle curve up to a certain point, but then breaks off and an abrupt tempo change appears at that point. This is normal and due to the fact that a very sudden and sharp change of tempo cannot be implemented in a flowing way and in all probability would make no musical sense either – an abrupt change of tempo is more plausible in such cases.
As you move the mouse pointer towards either end of the selected segment, new context-sensitive tools appear. Each tool on the right has a mirror image on the left in terms both of appearance and functionality, so we will consider only the tools on the right-hand end of the selected segment of curve.
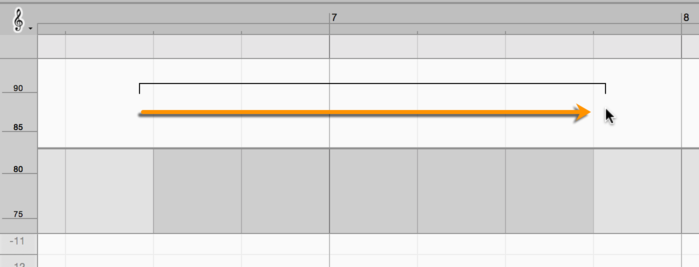
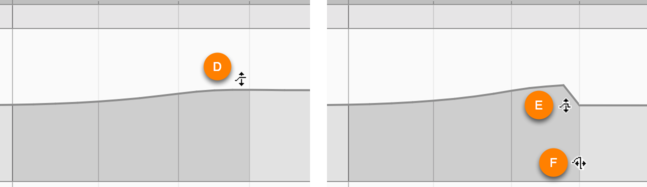
- D* (just above the curve): Here a ramp tool is active; this creates a gradual increase or decrease in tempo throughout the selected segment, the level reached being then maintained beyond the boundaries of the selection.
E (just below the curve): Here a second ramp tool comes into play; it, too, implements a gradual increase or decrease in tempo throughout the selected segment, but with this tool, when the end of the selection is reached, the tempo returns instantly to its former level.
F (in the gray area beneath the curve): Here you can obtain the same result as in area “E”, this time by dragging the beat line horizontally. Use whichever of the two you prefer.
Until now, we have been working with a selected segment of the tempo curve. If, however, you have not made a prior selection and simply click on the curve, the context-sensitive functions are different still.
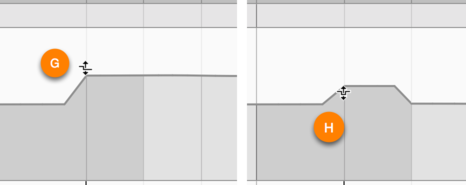
G (just above the curve): With this tool, you can raise or lower the entire tempo curve uniformly from the clicked beat onwards.
H (just below the curve): With this tool, you can raise or lower the tempo for the duration of a single beat.
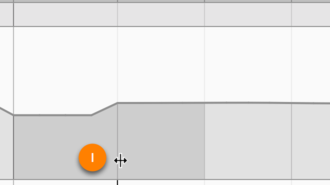
I (in the gray area beneath the curve): With this tool, you can move the vertical beat line left or right and thereby increase or decrease the tempo of the preceding beat. If the entire tempo curve is selected, you can move the zero point of the tempo curve by this means.
Tempo changes in the transport bar
When the Tempo Editor is closed, the tempo edit field in the transport bar reflects the current tempo at the playback cursor (whether or not playback is in progress).
An equals sign (“=”) in front of the tempo indicates that the tempo is constant. A tilde (“~”) denotes a variable tempo. These indications, if the Tempo Editor is closed, apply to the whole project. If the Tempo Editor is open, they relate to the segment of the tempo curve selected. If no segment is selected, the equals sign or tilde refer to the entire project.

When the Tempo Editor is open, the value displayed reflects the average tempo of the selected segment of the tempo curve. Dragging from the tempo field or typing in a new tempo or percentage value all then have the effect of modifying the average tempo within the selected segment. The tempo curve at this point is then raised or lowered proportionally.
When nothing is selected, typing a new value into the tempo field or clicking on the displayed value and then dragging alters the overall tempo – just as though the entire tempo curve were selected.
The contextual menu
Right-clicking in the Tempo Editor opens a contextual menu with the following commands:
- Smooth Tempo Over Several Bars: This function spreads the tempo change smoothly over the course of several bars, with the start of the bars moving only slightly.
- Smooth Tempo Over Several Beats: This function spreads the tempo change evenly over a bar, producing virtually no change in the position of the start of each bar.
- Smooth Tempo Between Beats: This function effects a smooth tempo change between the beats. This does not change the position of the beats but the tempo change between them is smooth rather than proceeding in steps.
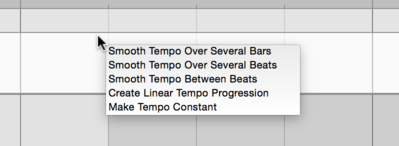
- Create Linear Tempo Progression: This function creates a smooth acceleration – or deceleration, as the case may be – between the tempos at the beginning and end of the selected passage (overwriting any existing tempo changes within it).
- Make Tempo Constant: This function calculates a constant tempo for the selected segment. This is equivalent to the average tempo over the course of the selected segment. Using this as a starting point, you can, of course, increase or decrease the tempo by dragging it or typing a new value into the tempo field.
If nothing is selected at the time, these commands act upon the entire tempo curve.
The tempo editing commands can also be accessed by choosing Edit > Tempo from the main menu.
Constant tempo and the start of Bar 1
If no tempo map has been defined or only a constant tempo was detected in the audio file loaded, there is only one tempo value. It is simple in that case to specify the tempo in the transport bar. If you wish to make an existing variable tempo constant, you can do this using the Make Tempo Constant command already described.
If, when an audio file was analyzed, the first beat was not detected at the beginning of the file, but you know that that is where it is located, you can move it to the correct position by choosing Edit > Tempo > Set Bar 1 to Start of File. This command can only be used if the tempo is constant. The command can only be executed when the tempo is constant and only then when the Tempo Editor is open in either Assign Tempo or Edit Tempo Mode.
Copying and pasting tempo maps
To copy a part of the tempo map to a new location, select the segment of the tempo curve in question and choose Copy from the menu; move the playback cursor to the first beat of the passage to which you would like to copy the tempo and choose Paste. The segment of the tempo curve copied will be pasted (without changing its length) to the target position, overwriting the existing tempo for the duration of the pasted segment.
Alternatively, you can select a segment of the curve at the target position. In this case, if the copied segment is longer than the selected segment, the former will be truncated to fit the selection. If the copied segment is shorter than the selected segment, part of the selected segment will remain unchanged.
The insert point, however, will move to the end of the pasted segment to allow you to repeat the operation once or several times.
Tip: If you copy a selection of notes from part of the project where the tempo is variable to another part where the tempo is constant, the copied notes will adopt the constant tempo. This adjustment, naturally, is advantageous and often desirable, though it does mean that the passage once pasted no longer sounds quite the same. If you do wish its original character to be maintained, first copy the corresponding section of the tempo curve from the source to the destination and then copy the notes; or vice versa, copy the notes first and then the corresponding section of the tempo curve. By copying both the notes and the corresponding section of the tempo curve, you ensure that the notes sound the same at the destination as at the source.
Importing a tempo map
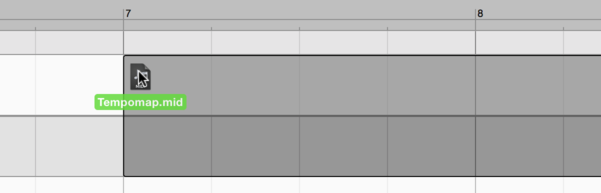
Similar to the copy and paste procedure is that whereby you import a tempo map from an MPD file, from an audio file that has already been detected (having a valid assignment file), or from a MIDI file.
The data can be imported by dragging and dropping it into the Tempo Editor. Any tempo regions and changes of time signature are ignored; only the pure curve is imported. The same principles apply to importing as copying segments of the tempo map:
If nothing is selected, the imported file snaps to a beat and determines the tempo for a period equivalent to its own length as defined in the file. If something is selected, the imported file snaps to the beginning of the selection and determines the tempo of the selected passage. Thereafter, the original tempo is resumed.
The starting point of the tempo map derived from the file is always its Beat “0”. If in the file a tempo is defined prior to the first bar, this is ignored.
The import can also be performed, however, by choosing File > Import Tempo from the main menu, in which case the tempo will be defined from the start of the document.
Exporting a tempo map
By choosing File > Export and Tempo Map from the Format list box, you can export a tempo map from Melodyne as a standard MIDI file. This will create a MIDI file containing no notes but simply a tempo curve. This file could then be imported, for example, by a DAW, so that the tempo map created by Melodyne could be used there. To create a MIDI file containing both a tempo map and the notes, choose File > Export followed by MIDI (not ‘Tempo Map’) from the Format list box.