Tools for fades and sibilant balance
-
The leveling tools– Hands-on film about the dynamic functions: inter alia the new Fade Tool and the Leveling Macro. Shown here: Melodyne 5 studio, smaller editions may differ.

Beneath the Amplitude Tool, there are further tools offering still greater control over volume ratios within a track.
The Fade Tool: Fade-in and fade-out on notes
Activate the Fade Tool from either the toolbar or the context menu of the Note Editor or by pressing the [F4] key on your computer keyboard twice in quick succession. If you would prefer to use some other keyboard combination to activate this tool, you can easily define an alternative from the Shortcuts page of the Preferences dialog.

Using the Fade Tool, you can implement a fade-in at the beginning of a note and – quite independently – a fade-out at the end.
For the former, click with the tool at the left-hand end of a note, hold the mouse button and drag to the left or right. As you do this, a triangular handle will appear, the length of which changes as you move the mouse.
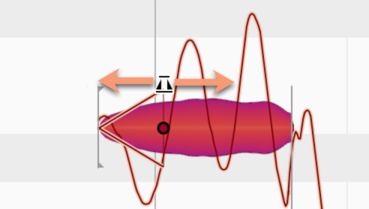
At the same time, the shape of the blob will change, indicating a corresponding change in its loudness contour.
As an alternative to clicking, holding the mouse button and dragging, you can create a new fade by double-clicking. If you double-click on the first half of a note, you will create a fade-in. To create a fade-out, double-click on the second half of the note.
As soon as a fade-in is created, any soft separation between the note in question and the preceding note will be replaced by a hard separation. With a fade-out, a hard separation will be inserted between the note that fades out and the one that follows.
If you double-click on a fade, it is removed and the blob regains its original dynamic contour. An alternative method of restoring the original dynamic contour of a note is by a right-clicking and choosing “Discard Fades” from the context menu. Whichever method you choose, please note that whilst this removes the fade, the hard separation remains in place. To replace this with the original soft separation, you must use the Separation Type Tool.
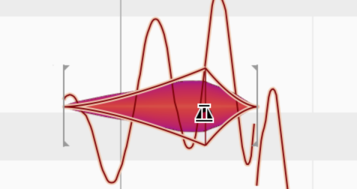
You can also select and apply fades to multiple notes simultaneously and adjust them simultaneously as well.
To change the length or curve of a fade, proceed as follows:
- To change the length, click on the fade in question and drag to the left or right.
- To change the curve, click on the curve and drag upwards or downwards.
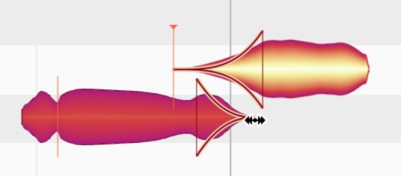
If you drag the end of a fade-in so far to the right that you reach the start of any fade-out that may have been applied to the note, you can still carry on dragging; all that will happen is that the fade-in will be extended and the fade-out shortened accordingly.
You can also make a fade-out longer by extending it leftwards, but in this case no further than the point where it meets any fade-in that may be present.
It is not possible for a fade-in and a fade-out to overlap.
Fades in conjunction with other tools
The length of a fade is not defined in milliseconds but tied to the position (set by you) within the note. So if, for example, a note with a fade-out is later lengthened using the Time Tool, the fade-out will be lengthened by the same amount. This gives rise to considerably more musical possibilities – particularly in combination with the other tools – than those afforded by the fixed fades offered by DAWs for regions or clips.
A further example: fade-outs continue, naturally, until the end of the note. If, however, towards the end of a note there is some unwelcome noise on the track, and you wish the fade out to end before this, you can split the note using the Note Separation Tool, delete (or mute) the part of the note to the right of the separation and then apply a new fade out to the part of the note that remains.
As a result of the placing of a fade, a hard separation will automatically be inserted between the note in question and the one that follows. It is therefore easy to create an overlap with the Time Tool between previously adjacent notes and then – using the Fade Tool – create a very musical crossfade between them.
The Sibilant Balance Tool: The management of sibilants and breath noise
Select the Sibilant Balance Tool from either the tool bar or the context menu of the Note Editor or by pressing the [F4] key on your computer keyboard three times in quick succession. If you would prefer to use some other keyboard combination to activate this tool, you can easily define an alternative from the Shortcuts page of the Preferences dialog.
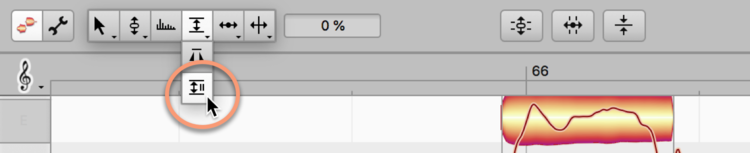
With the Sibilant Balance Tool, you can control the loudness of the sibilants relative to the other components of the sound. It is only available with the algorithms Melodic or Percussive Pitched; with all other algorithms it is grayed out.
In the case of vocal tracks, Melodyne regards as sibilants not only “s” and “ch” sounds, but also certain other word fragments such as “k” and “t” as well as the sound of the singer inhaling or exhaling between words: those components of the sound, in other words, that lack a definite pitch. Broadly speaking, and if we include instrument tracks, Melodyne regards as sibilants all parts of the signal that consist essentially of noise.
If you drag upwards (positive values) from a note or selection of notes with the Sibilant Balance Tool, you reduce the volume of the pitched components of the sound. If you drag downwards (negative values), it is the sibilants that become quieter.
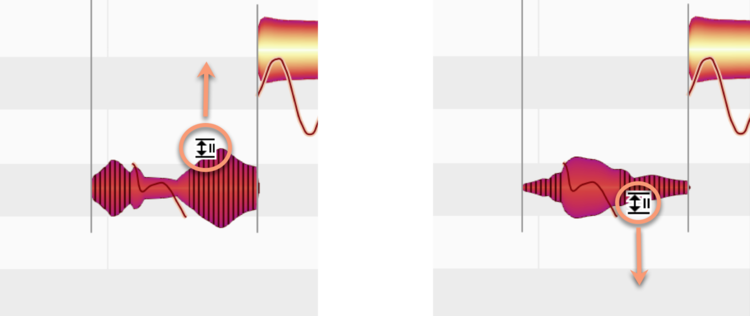
At the two extreme settings in the case of vocals, you will either hear sibilants and breath noise only (if you drag upwards) or only the pitched components of the sound (if you drag in the other direction). This would admittedly create the impression of a pronounced lisp, but there are certain applications in which such extreme settings make sense (see below).
Double-clicking with the Sibilant Balance Tool sets the parameter to -100%, which is equivalent to maximum attenuation (i.e. muting) of the sibilants; a second double-click, resets the parameter to 0%, thereby restoring the note to its original state.
Please note that in speech or singing it is not the case – from a technical standpoint – that the sound at any given instant is invariably either sibilant or pitched; sometimes it is a little of both – i.e. the overall sound is a blend of pitched and unpitched components. Fortunately, the Sibilant Balance Tool operates in a way that takes this into account, governing only the noise components of the sound. Such an approach makes eminently good sense musically – fortunately without compromising the intuitiveness of the software, as you still see only one blob per note, not two.
Uses for the Sibilant Balance Tool
When individual sibilants become obtrusive (which is more often a problem with some singers than with others – though a poorly designed or adjusted signal chain at the recording stage could be the real culprit), you would ordinarily turn to a de-esser. But adjusting the controls of a de-esser can be tricky, as de-essers invariably act upon the entire signal. This can have a negative influence even upon sibilants that were perfectly OK; furthermore, the pitched components of the sound necessarily feel their influence as well. The Sibilant Balance Tool (with values somewhere between -40% and -10%) takes considerably less time to set up, operates with far greater precision, and also, at the end of the day, delivers acoustically superior results.
In the case of backing vocals or when double-tracking, you could even use settings of around -80%. Heard on their own, the voices affected might appear to lisp, but when the lead vocals are restored to the mix, the overall result is a much tidier sonic image in which – at the ends of words in particular – there is far less of the usual fluttering. This fluttering is most often the main problem with double-tracking, and it becomes even more obtrusive when you apply delays and reverb to the various voices – as you must, in fact, to ensure they sit right in the mix. Very few mouse-clicks are now needed to bring these commonly encountered mixing problems under control; all you have to do, basically, is select all the notes of the backing vocals, then set the sibilant balance to somewhere like -80%.
And a further tip for sound design and mixing: Begin by duplicating the vocal track. On one track, set the sibilant balance to -100% (in which case you will no longer hear any sibilants or breath noise) and on the other track, set the same parameter to +100% (so, on this track, only the sibilants and breath noise will be audible). Now set the same volume level for both tracks in the mixer, so initially you have exactly the same signal as before – only split between two tracks. This leaves you free to make intensive use of the effects chain (delays, reverbs etc.) on the sibilant-free track, and only sparing use – or none whatsoever – on the track containing the sibilants.
Note: Melodyne detects automatically the exact location and length of each sibilant. This means that with the vast majority of vocal tracks, you will no longer need to give the matter any thought; your only concern now will be to find the ideal balance between the pitched and unpitched components of the sound using the Sibilant Balance Tool. Nonetheless, in exceptional cases or for experiments in sound design (and not only with vocals), you may wish, on occasion, to adjust the results of the sibilant detection. To do this, enter Note Assignment Mode and select the Sibilant Range Tool, the use of which is described in detail here.