Note separation tools
- • Inserting, moving and removing note separations
- • Editing note separations with multiple notes selected
- • Soft and hard note separations
- • Switching between hard and soft separations with the Separation Type Tool
- • In the context menu: Separate Note
- • In the context menu: Separate Notes as Trills
- • In the context menu: Merge notes
-
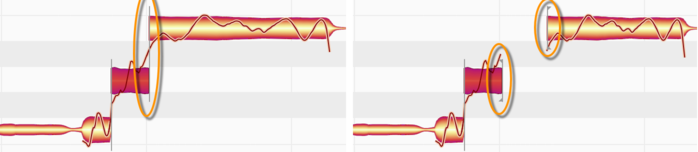
The creative use of note separations– How to control the transitions between neighboring notes, enhancing minute details through skillful editing. Shown here: Melodyne 5 studio, smaller editions may differ.

With the Note Separation Tool, you can cut notes as well as removing and moving note separations. With the Separation Type Tool, you can switch between hard and soft separations.
Inserting, moving and removing note separations
Select the Note Separation Tool from either the toolbox or the context menu of the Note Editor or by pressing the [F6] key of your computer keyboard. (If you wish to assign a different shortcut to this tool, you may do so after choosing Melodyne > Preferences > Shortcuts > Editing Tools from the main menu.)

By double-clicking within a note with the Note Separation Tool, you can introduce a note separation and thereby slice the note in two.

Don’t be surprised if the resulting pair of notes move apart in pitch; this is because as soon as the fission occurs a new tonal center is calculated for each of the newly created notes, and their respective tonal centers may differ from the tonal center the notes shared when they were one. In such cases, each therefore moves to a new vertical position based on its newly calculated pitch center.
You can move an existing note separation horizontally simply by dragging it with the Note Separation Tool.
You can double-click a note separation to remove it.
Editing note separations with multiple notes selected
If you select several notes and move a note separation, the note separations of the other selected notes will also be moved. If you double-click one of the note separations to remove it, the note separations of the other selected notes will also be removed.
If you have selected several notes that overlap, you can insert a note separation in the same place in all of them simultaneously as well as move or remove one.
Soft and hard note separations
Depending upon the audio material and the algorithm selected, Melodyne places either soft or hard separations between notes. Soft separations only occur between consecutive notes and provide a link between the notes: if the end of the first note is moved, the beginning of the second note moves along with it, to ensure that no gap opens between them. This helps you preserve phrasing when editing.
The connection between notes also plays a role in the pitch, formant and amplitude transitions between notes: such transitions are only possible in the case of connected notes between which a soft separation exists.
In the case of a hard separation, consecutive notes are independent of one another. This means that changing the length of the first note has no affect upon the position of the second. It also means there are no pitch, formant or amplitude transitions between the two notes.
Soft separations are indicated by a thin vertical line between notes, whereas hard separations are denoted by a bracket.
Switching between hard and soft separations with the Separation Type Tool
The Separation Type Tool is the sub-tool of the Note Separation Tool. It allows you to toggle between hard and soft separations. To select it, press the [F6] key (assigned by default to the note separation tools) twice in quick succession. If you would prefer to use some other key combination, choose Preferences -> Shortcuts -> Editing Tools -> Note Separation Tools and press the keys of your choice. If you wish, you can define separate keyboard shortcuts for each of the two tools.

Double-click on a separation with this tool in order to change its type.
Please note that it is only with certain separations that the option of switching freely between ‘soft’ and ‘hard’ exists.
- Soft separations can always be turned into hard ones.
- Hard separations, however, can only be turned into soft ones if they were soft to begin with and their type has subsequently been changed. An exception to this rule is material detected using the Percussive algorithm; in this case, all separations are initially hard but can be turned into soft ones.
In the context menu: Separate Note
This command separates notes automatically at a point determined by Melodyne. It can be used, for example, to slice up a vocal passage into small segments in order to prepare the way for extremely detailed editing using the tools.
You will find the “Separate Note” command in the context menu of the Note Separation Tool and on the “Shortcuts” page of the Preferences property sheet, where you can assign a keyboard shortcut to it.
In the context menu: Separate Notes as Trills
When the Note Separation Tool is selected, you will find the command “Separate Notes as Trills” in the Note Editor’s context menu. The effect of this is to slice a selection of one or more notes into smaller segments determined by the instantaneous pitch of each note. This is done by inserting note separations into the slopes of the pitch curve as it rises and falls, thereby turning each ‘hill’ and each ‘valley’ of a vibrato into a separate note.

The use of this command allows you, for example, to improve the intonation of a trill, by tuning the notes more closely to their intended pitches, or to rein in an unruly vibrato, by applying the Correct Pitch Macro to its upper and lower extents.
Please note that the fluctuations in the Pitch Curve must be fairly pronounced for the “Separate Notes as Trills” function to have any effect and that it is only available when the Melodic algorithm is active, being grayed out in every other case. If you wish to assign a shortcut to the command “Separate Notes as Trills”, this can be done using the Preferences dialog.