Time Handles and Attack Speed
-
The timing tools– How to quantize notes, change their position and length, and modify their internal timing. Shown here: Melodyne 5 studio, smaller editions may differ.
The Time Handle Tool and the Attack Speed Tool are found below the Timing Tool in the toolbar. Their purpose is to allow you to adjust the internal time path and envelope of notes.
How time handles and the Attack Speed Tool work
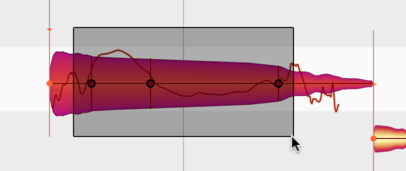
Time handles are handles you can affix to particular stages in the evolution of a note and drag sideways in order to advance or retard their attainment. In this way, you can accelerate or slow down particular phases of a note’s development in order to fine-tune the musical phrasing.
The Attack Speed Tool also affects the speed at which a note evolves: either by stretching and slowing down its early development phase and thereby accelerating its later development, or vice versa.
The result is either a slower, softer attack or a faster, harder one. The ‘perceived’ musical starting point of the note, however, remains unchanged.
Modifying the evolution of notes using time handles
The Time Handle Tool is the first of the two sub-tools of the Time Tool. To select it, press the [F5] key twice in quick succession. (If you wish to assign a different shortcut to this tool, you may do so after choosing Melodyne > Preferences > Shortcuts > Editing Tools from the main menu.) There, if you wish, you can also define separate keyboard shortcuts for all three time tools.

Zoom in on the note you wish to edit, so that you can see it clearly and position the time handles more precisely. Now double-click the point in the note’s evolution that you wish to advance or retard. A time handle will appear that you can move forwards or backwards in time by dragging the tool respectively upwards or downwards. Since the overall length of the note remains unchanged, the result is to shorten and accelerate the phase of the note’s development lying to one side of the time handle while lengthening and slowing down the phase the other side.

You can attach multiple time handles to a single note, moving each one individually, thereby influencing fine details of the note’s evolution. There is no limit to the number of time handles that can be attached to a single note. Melodyne does, however, impose constraints as to how close to one another the handles can be placed. If ever you find you cannot place a time handle exactly where you want it, try a little further along.
If you select multiple time handles using the usual selection techniques, you can move them all en bloc.

Double-clicking on a time handle or a selection of time handles removes them, thereby causing the affected phases of the note to evolve at their original speeds.
By choosing Edit > Reset Individual Edits > Time > Remove Time Handles from the main menu, you can remove the time handles from all the selected notes.
Changing the attack speed of notes
The Attack Speed Tool is the second sub-tool of the Time Tool. To select it, press the [F5] key three times in quick succession. From the Preferences dialog, you can also, if you wish, define a separate keyboard shortcut for this tool.
Please note that this tool has no function when the Universal algorithm is selected. You will notice therefore that the corresponding blobs lack handles and that the Attack Speed field in the Note Inspector for these blobs is grayed out.

When you select the Attack Speed Tool, a white dot appears at the start of every note. If you now place the tool anywhere on a note (not necessarily on the dot) and drag vertically, the dot will move up or down.
If you move it upwards, the attack phase of the note will be compressed and play back faster, but the rest of the note correspondingly more slowly. The note will therefore have a harder attack; its peak amplitude will be reached more swiftly.

If you move the point downwards, the opposite will occur. The beginning of the note will be stretched – even beyond its visible starting point – and will play back more slowly, the rest, however, increasingly rapidly. The attack will therefore be softer. Note that the position of the musical start of the note indicated by the orange anchor is not affected by changes in attack speed. The ‘perceived’ start of the note is therefore independent of the attack speed. The end of the note is in all cases unaffected.
You can vary the attack speed of notes individually, in order to accentuate them. You can also, however, select and modify the attack speeds of multiple notes simultaneously and thereby alter the timbre of an entire phrase.
If you double-click on a note or one of a selection of notes with the Attack Speed Tool, the corresponding parameter will return to its neutral (central) position. The same result can be achieved by choosing Edit > Reset Individual Edits > Time > Reset Attack Speed from the main menu.
Combining time handles with the Attack Speed Tool
You can combine the use of time handles with that of the Attack Speed Tool. Altering the attack speed in this case will cause the time handles to move, functioning as a kind of timing master. You can therefore shape the evolution of the note to enhance the phrasing before adjusting the overall timing (so that the note starts faster or more slowly) with the Attack Speed Tool.
