Timing Tool
-
The timing tools– How to quantize notes, change their position and length, and modify their internal timing. Shown here: Melodyne 5 studio, smaller editions may differ.

The Timing Tool allows you to edit the horizontal position and length of notes with or without quantization.
Adjusting the beginning and length of notes
Select the Time Tool from either the toolbox or the context menu of the Note Editor or by pressing the 5 key of your computer keyboard. Press the 5 key twice or three times in quick succession to select, respectively, the first or second sub-tools of the Time Tool. (If you wish to assign a different shortcut to this tool, you may do so after choosing Melodyne > Preferences > Shortcuts > Editing Tools from the main menu.) There, if you wish, you can also define separate keyboard shortcuts for all three tools.

If you click on the left-hand end of a blob and drag, you will stretch or squeeze the beginning of the note. If you click on the right-hand end of the blob and drag, you will stretch or squeeze the end of the note in the same way.
Whatever changes you make will be governed by the current Time Grid setting, unless you choose to override the grid by holding down the [Alt] key in order to permit finer adjustment.
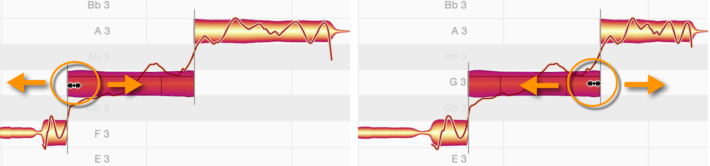
If the note in question is connected to the note or notes adjacent to it – as is likely to be the case if the Melodic algorithm is selected – the end of the preceding note or beginning of the following note will be stretched or squeezed by however much necessary to avoid a gap or an overlap occurring.
A connection of this type between two notes is indicated by a thin vertical line between the corresponding blobs. This warns you that moving the end of the first of the two notes will affect the start of the second, and that moving the start of the second will affect the end of the first. If you do not wish this to happen, use the Separation Type Tool to replace the thin vertical line with a square bracket. Then you will be able to move the start or end of a note without this affecting adjacent notes, in which case a gap or an overlap could occur.
Clicking on and dragging the middle of a blob
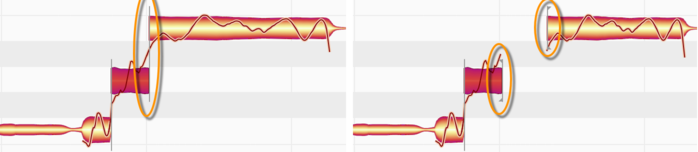
Click the center of a note (or of one of a number of selected notes) and drag it to the left or right to move the entire note (or notes) horizontally. Press and hold the [Alt] key during the movement if you wish the time grid to be temporarily ignored to permit finer adjustment.
Please note, however, that if notes are connected – as is likely to be the case when the Melodic algorithm is selected – clicking on the middle of a blob and dragging will only result in the beginning of the note being stretched or squeezed. The behavior in this case is therefore the same as when you click on the beginning of the note and drag.
To simply move the note, without altering its length and without affecting any other notes, switch from soft separations (indicated by thin vertical lines) to hard separations (indicated by square brackets) using the Separation Type Tool (as described above).
Correcting timing with a double-click
If you double-click with the Time Tool on a note (or one of several selected notes), you quantize this (or these) to what Melodyne, in the course of the detection, considered to be the ‘intended’ note (or notes). To see these (displayed as little gray frames beneath the blobs), choose “Options > Note Editor > Show Intended Notes”.
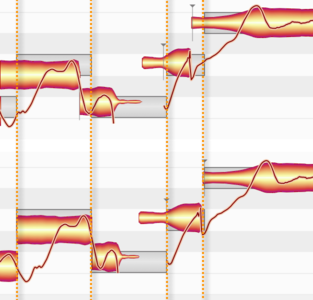
The gray frames are not necessarily (all) aligned with the grid selected in the Bar Ruler. One intended note, for example, might coincide with a line belonging to the 16th note grid, another with one belonging to an 8th note triplet grid, and so on. The result of double-clicking is therefore more ‘intelligent’ musically (and thus, in practice, more suitable) than simple quantization, say, to 8th notes, with which, if you use a MIDI sequencer, you are perhaps more familiar.
There may be applications, however, in which you might actually prefer rigid quantization to a particular uniform grid. In that case, you can achieve the desired result with the Quantize Time macro, the use of which is described in detail in this tour. You will also learn there how note lengths are adjusted during quantization as well as what options exist for the quantization of chords.
Adding random deviations
With the commands in the Edit > Add Random Deviations sub-menu, you can randomly alter the timing of the notes currently selected – introducing either slight, moderate or drastic deviations from the original timing. You can also employ the commands several times in succession to intensify the effect. These commands are useful when, for example, you’ve doubled a track in order to obtain a fuller or ‘fatter’ sound. By introducing random deviations, so that the copy is no longer identical to the original, you can simulate more realistically the effect of two performers playing or singing in unison. All these commands affect only the selected notes and are therefore grayed out if no notes are selected.
The reset commands
In the Edit > Reset Individual Edits > Time sub-menu, you will find a number of commands that can be used to reverse the effects of whatever editing has been performed on the timing. These commands apply always to the current selection and are grayed out if no editing of the type in question has been performed on the notes selected. Note that these reset commands work quite independently of the normal Undo command.