Display and other options
- • Showing and hiding elements of the user interface
- • Show Pitch Curve
- • Show Note Separations
- • Show Note Tails
- • Displaying sibilants
- • Displaying fades
- • Show Blob Info
- • Show Intended Notes
- • Highlight Notes During Playback
- • Highlight Track Affiliation
- • Monitor When Editing Blobs
- • Show Clip Borders
Melodyne offers for the user interface and working in the Note Editor various options that allow you to adapt the appearance and behavior of the program to your tastes.
Showing and hiding elements of the user interface
Melodyne’s user interface can be adapted to a variety of different work situations and demands. You will find the means of doing so in the Options menu as well as the interface itself.
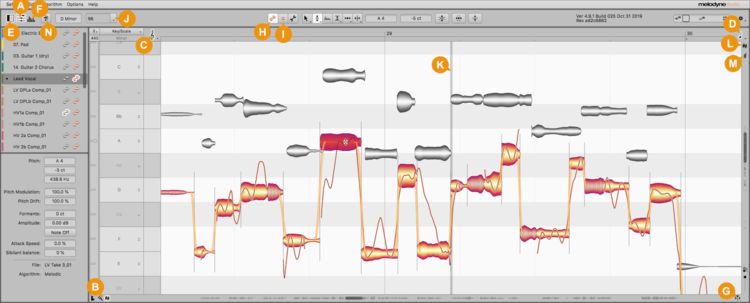
- “List All Plug-in Instances” (A): Shows/Hides the pane in which the headers for the various plug-in instances are displayed and adjusts the height of the info pane accordingly, assuming it is not hidden at the time.
- “Show Scale Editor” (B): Shows/Hides the three Scale Editor columns.
- “Pitch Grid Settings” (C): Offers the choice between various options for the Pitch Grid.
- “Time Grid Settings” (D): Offers the choice between various options for the Time Grid.
- “Show Info Pane” (E): Shows/Hides the info pane.
- “Show Sound Editor” (F): Shows/Hides the Sound Editor beneath the Note Editor.
- “Auto Scroll” (G): When this option is selected, the display in the Note Editor follows the playback cursor (for more on this, see the note below).
- “Track Edit Mode” (H): Shows the notes of all the regions/clips on the track.
- “Clip Edit Mode” (I): Shows only the notes of the region/clip currently selected.
- “Tempo Dialog” (J): Offers various options governing the way tempo adjustments are performed.
- “Clip Borders” (K): Gray lines indicating the borders between clips. The display of these lines is activated/deactivated via “Options” > “Show Clip Borders”.
- With the “Keys” (L) and “Chords” (M) switches, you can show or hide the Key and/or Chord tracks.
- The “Compare” switch (N): This facilitates acoustic and visual A/B comparisons between the edited and original state of the notes.
A note about automatic scrolling in the Note Editor:
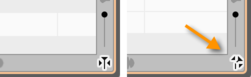
If you have selected one or several notes, Melodyne assumes that you wish to see and edit them, and exercises the requisite restraint by deactivating the auto-scroll function temporarily. Only when you deselect the notes (for example, by clicking in the background of the Note Editor) and restart the playback does the display resume its pursuit of the playback cursor.
Similarly, if you move the horizontal scroller so far during playback that the playback cursor actually disappears from the screen, automatic scrolling will be deactivated. Stopping and restarting in this case will reactivate the auto-scroll function.
If automatic scrolling has temporarily been deactivated, the auto-scroll icon in the bottom right-hand corner of the Note Editor takes the form shown here.
All the options described below relate to the Note Editor and are found by choosing Options > Note Editor Options from the main menu or by clicking the cog icon in the top right-hand corner of the Note Editor.
Please note that these options can be selected independently for Edit and Note Assignment modes.
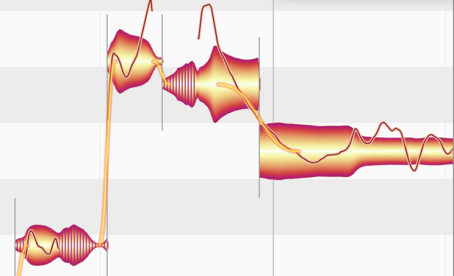
Show Pitch Curve
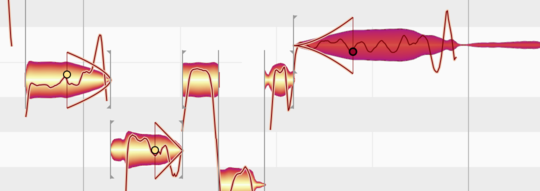
If you check the option Show Pitch Curve, a thin line tracing the exact pitch of the tone at each instant will be superimposed on the corresponding blob.
On the left, you can see the ‘naked’ blobs (with none of the Note Editor display options selected) and on the right, the same blobs with the Show Pitch Curve option checked.

Regardless of whether or not this option is checked, the pitch curve will be displayed whenever the Pitch Tool is selected.
Show Note Separations
If you select the option Show Note Separations, gray vertical lines appear at the beginnings and endings of notes indicating their limits or separations.
Note Separations are either shown as lines (soft separations between connected notes) or thin brackets (hard separations).
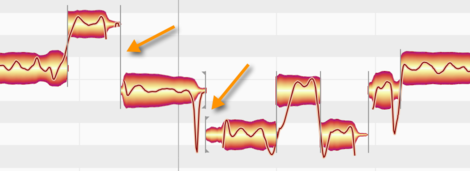
Note separations are always displayed when the independent Note Separation Tool is in use, regardless of whether or not the menu entry is checked.
Show Note Tails
In the detection and display of notes, Melodyne editor draws a distinction between the notes themselves and their tails – notes being the events of musical relevance and tails depicting the non-musically-determined fading-away of the sound. The share of the reverberation ascribed to a given tone, for example, is reflected in its tail. The Show Note Tails option allows you to decide whether the reverberative phase of notes should be displayed or hidden. This is likely to depend upon whether you prefer to concentrate upon their musical or their acoustic aspects.

If the tail is not displayed, the end of the musically relevant part of the note provides the handle you can drag with the Time Tool to make the note longer or shorter. Any reverberation present will in this case automatically be governed by the changes made. This display option serves to provide a clearer overview of the intended musical events.
If the note tail is displayed (assuming it has one), it is this that provides the handle for the Time Tool. Show Note Tails is the option most suitable when what is sought is as authentic a picture as possible of the sounds actually heard – including any reverberation present.
Displaying sibilants
If you check the option “Show Sibilants”, the presence of sibilants (usually “s” sounds or breath noise) is indicated by hatching.
When the Sibilant Balance Tool is selected in normal edit mode, or the Sibilant Range Tool is selected in Note Assignment Mode, the sibilants are invariably hatched, whether this option is checked or cleared.
Displaying fades
If the “Show Fades” option is checked, the control elements belonging to the Fade Tool are displayed beside any notes you have previously edited using the Fade Tool.
When the Fade Tool is selected in normal edit mode, the control elements in question are invariably displayed, whether this option is checked or cleared.
Show Blob Info
With the option Show Blob Info, you can elect to show or hide a variety of display elements designed to facilitate working with individual notes.
The most striking of these elements is the Local Pitch Ruler that appears directly in front of any note over which you move the mouse pointer. Within the blob itself, thin lines mark the drag zones for the context-sensitive tools.
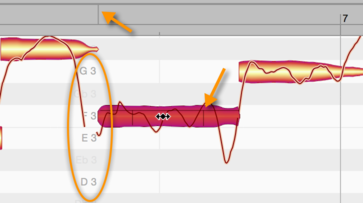
If you drag a blob when the Show Blob Info option is checked, a vertical line also appears in the Time Ruler aligned with the exact start of the note. This makes more precise positioning possible.
Show Intended Notes
If you check the option Show Intended Notes, gray frames appear around each blob.

These invariably lie directly on the semitone and coincide exactly with a gridline. They represent, in other words, Melodyne’s assumptions (based on its own analysis of the audio) as to the intended pitch of the note and its intended position within the measure or bar. These assumptions generally turn out to be correct, but are not inevitably so. They are to be thought of as suggestions.
The frames also display the positions in pitch and time towards which the notes in question will gravitate if partial quantization is applied to them with the macros, which are also the positions they will snap to if you double-click on them with the Time Tool or Pitch Tool.
Highlight Notes During Playback
With this option, you can select whether or not you would like your eye to be drawn to the note currently playing back. Highlighting is mainly useful when the screen is thick with notes.
Highlight Track Affiliation
This option gives you a better overview of which notes belong to which tracks when multiple tracks are being displayed simultaneously in the Note Editor: When the option is checked and you click on a note with a tool, all notes belonging to tracks other than that of the note selected will be displayed in grey for as long as you hold down the mouse key. This lets you see at once which notes do, and which do not, belong to the same track as the note selected.

Monitor When Editing Blobs
When you shift the pitch of blobs in the Note Editor with this option selected, Melodyne plays for the purpose of orientation the sound of the note at the position originally clicked. You can turn this acoustic feedback on or off.
Show Clip Borders
This option is only visible when you are using ARA. It allows you, if you wish, to hide the gray lines between the clips in Track Mode to obtain a clearer overview of the material in the Note Editor. This is especially useful when the track you are examining contains a large number of clips and you have zoomed the display a long way out.
